Crochet Forget Me Not Sweater

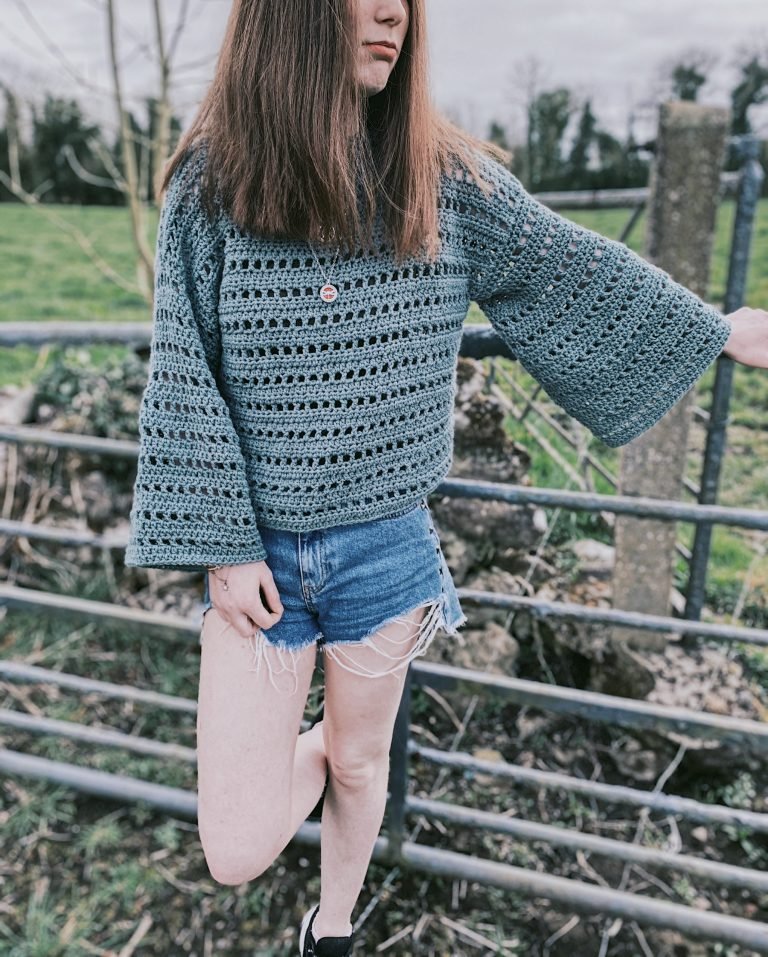
I named this crochet summer sweater the Forget Me Not Sweater because the stitches I used throughout the sweater reminded me of little of forget me not flowers!
This crochet sweater pattern is easy, beginner friendly and quite quick to work up. It is made using two identical T shaped pieces that are seamed together. Easy peasy!

YARN USED:
The yarn I used for this crochet summer sweater was Drops Cotton Light. This yarn is a cotton and polyester blend giving the sweater a light and cool feel, perfect for lovely summer weather.

PIN IT FOR LATER!

MATERIALS:
- Drops Cotton Light Yarn (weight 3/ Light/ Dk/ 8 Ply/ 50g, 105 m/ 115 yds
- 8( 8, 9, 9, 9, 10) balls
- Size 5mm crochet hook
- Tapestry needle
- Scissors
** These materials contain affiliate links for which I make a small commission. No extra cost to you whatsoever!
SIZES:
S( M, L, XL, 2XL, 3XL)
GAUGE:
15 sc x 4 rows sc = 4″
FINISHED MEASUREMENTS:
To fit bust 34( 38, 42, 46, 50, 54) inches

ABBREVIATIONS:
Ch = chain
Sc = single crochet
Dc = double crochet
Dc-cl = double crochet cluster
V-st = v stitch
SPECIAL STITCHES:
Double crochet cluster (dc-cl): yarn over, insert hook into designated stitch, pull yarn through, yarn over pull through 2 loops, yarn over, insert hook in same stitch, pull yarn through, yarn over pull through 2 loops, yarn over, insert hook in same stitch again, pull yarn through, yarn over pull through 2 loops, yarn over pull through remaining 4 loops on hook.
V Stitch (v-st): (dc, ch 1, dc) into same stitch.
PANELS (MAKE TWO):
Stitch multiple 3+1
Ch 73( 79, 85, 91, 97, 103)
ROW 1: sc in 2nd ch from hook, sc across to end. Turn
ROW 2: Ch 1, sc across. Turn
ROWS 3-4: repeat row 2
Row 5: Ch 3 (counts as first dc), v-st in next st, *skip 2, v-st in next st, repeat from * across ending with a dc in last stitch. Turn
Row 6: Ch 3 (counts as first dc) dc-cl in ch1-sp of next v-st, *ch 2, dc-cl in ch1-sp of next v-st, repeat from * across ending with a dc in last st (the turning ch). PLEASE NOTE THAT YOU DO NOT CH 2 AFTER LAST DC-CL) Turn.
Row 7: Ch 1, sc in same stitch, sc on top of dc-cl, *2 sc in next ch 2-sp, sc in dc-cl, repeat from * across placing last sc on top of turning chain.
ROWS 8-10: Ch 1, sc across. Turn.
Row 11: repeat row 5
Row 12: repeat row 6
Repeat rows 7-12 five more times for sizes S/M, six more times for L/XL and seven more times for 2XL/3XL.
For more length add more rows but make sure you end with row 6
Continuing on from where you are now:
Ch 45. Cut yarn and fasten off. Then attach yarn to the other edge (on top of ch 3 turning chain) and make a ch of 45. Cut yarn and fasten off.
Turn your sweater around so the wrong side is facing you (you can tell the wrong side is facing you when the bottom yarn tail is to the left).
Attach yarn to the end ch of the 45 chains you made ( make sure you are attaching to the chains on your right)
Ch 1 and sc in same stitch, sc across next 44 chains, across the body of sweater and across the other 45 chains on the other side.
Row 2 of sleeve shaping: ch 1, sc across. Turn
Row 3-4: repeat row 2.
Row 5: ch 3, v-st in next st, *skip 2, v-st in next st, repeat from * across placing last dc in last stitch. Turn.
Row 6: Ch 3, dc-cl in ch1-sp of next v-st, *ch 2, dc-cl in ch1-sp of next v-st, repeat from * across placing a dc in last st (the turning chain. PLEASE NOTE YOU DO NOT CH 2 AFTER LAST DC-CL)
Repeat rows 5-10 twice more for S/M, three more times for L/XL, and four more times for 2XL/3XL
Cut yarn leaving a long tail and fasten off.
NECKLINE:
Lay one panel on a hard surface with right side facing up. Then lay the other panel on top it it with the wrong side facing up. Count 67( 67, 69, 69, 71, 71) stitches in from the edge of sleeve and place a stitch marker. Repeat on the other side. Using your yarn needle and your yarn tail stitch along until you reach stitch marker. Fasten off and repeat on other side.
Weave in all ends and you are done!
If you are more of a visual learner you can follow the video tutorial below.