Crochet Funfetti Bomber Cardigan – Free Pattern

The Crochet Funfetti Bomber Cardigan is a chunky, oversized crochet cardigan with a playful pop of color and plenty of texture. Featuring a relaxed fit, ribbed cuffs and a cozy open front, this beginner-friendly design is a lovely addition to your handmade wardrobe.
Made using a super bulky yarn and simple crochet stitches, this free crochet bomber cardigan pattern works up quickly without complicated techniques. The oversized fit gives it that classic slouchy bomber style, while the textured stitch pattern adds interest throughout.
For my cardigan, I chose Hobbii Umami Tweed in the shade Pink Neon Glaze. The soft bubblegum pink base is scattered with bright neon flecks of green, orange and yellow, giving the finished cardigan a fun, distinctive appearance.
Whether you wear it with jeans for a casual day out or throw it over your favorite outfit on a chilly afternoon, the Funfetti Bomber Cardigan is all about warmth, texture and a little personality.
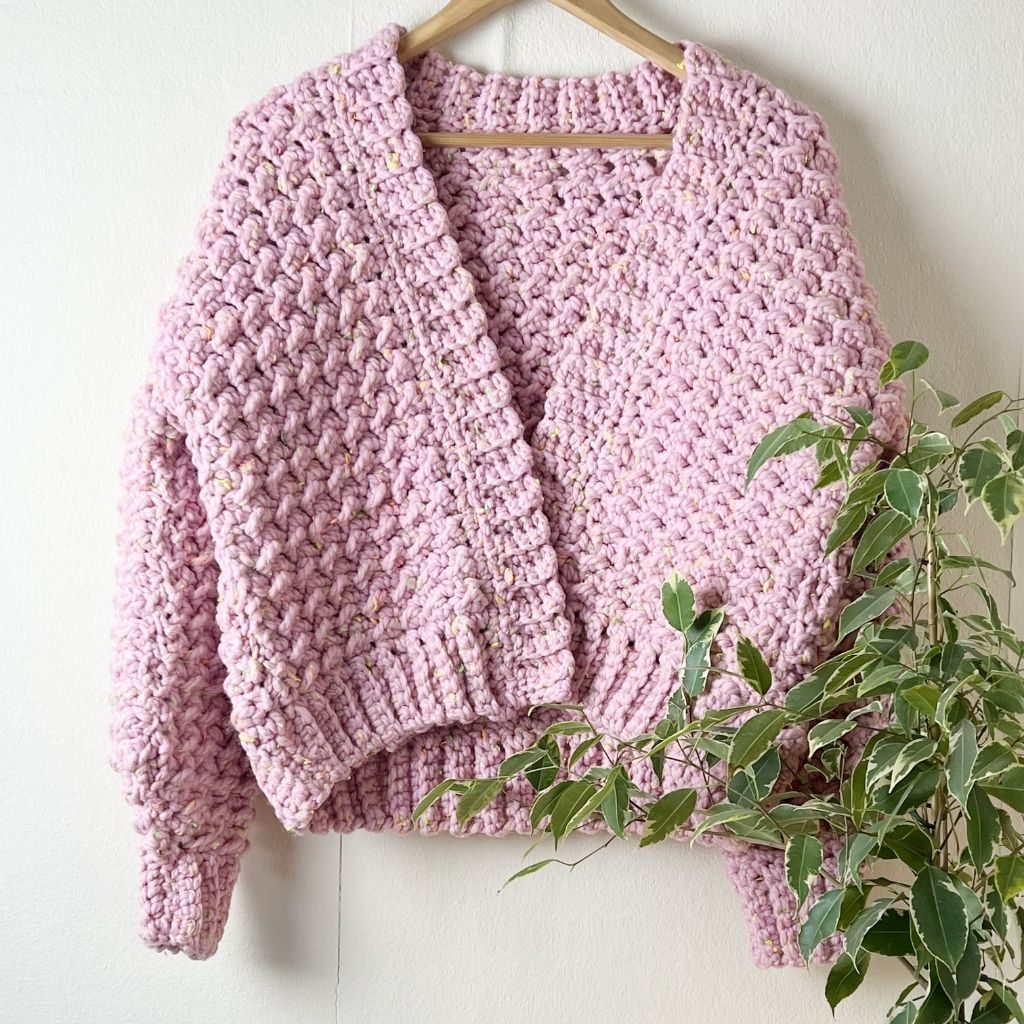
How the Crochet Funfetti Bomber Cardigan is Constructed
The Crochet Funfetti Bomber Cardigan is constructed from five separate pieces: one back panel, two front panels and two sleeves.
Each piece is crocheted from the bottom up, beginning with the ribbed hem for the body panels or the ribbedd cuff for the sleeves. Once the ribbing is complete, you’ll work the main section using simple crochet stitches that create the cardigan’s chunky, textured appearance.
The easy construction makes this an approachable project for beginners who are ready to try crocheting their first cardigan. Working the pieces separately also makes it easier to follow the pattern and keep track of your progress.
Once all five pieces are complete, they are joined together to create the finished bomber cardigan
Crochet Funfetti Bomber Cardigan at a Glance
- Skill level: Easy
- Construction: Worked flat, bottom up
- Yarn: Super bulky
- Fit: Relaxed, oversized
- Features: Chunky textured stitches, ribbed hem and cuffs, open front
- Terminology: US crochet terms
Yarn
I chose Hobbii Umami Tweed to create this crochet bomber cardigan. This yarn is a super bulky yarn that is perfect for creating cardigans, sweaters or hats. It’s bulky weight means anything you make with it will work up very quickly.
The shade I chose was Pink Neon Glaze. When it arrived I literally gasped with excitement because I have not seen a tweed yarn like this before. It has a beautiful bubblegum pink base with neon flecks similar to what I describe as highlighter pen throughout. I love the bright neon greens, oranges and yellows throughout this yarn. It really is unique.

Umami Tweed has a fibre content of 75% acrylic, 22% wool and 3% viscose. It is a super chunky yarn and soft to the touch. One of the best things about this yarn is that it is machine washable, making it perfect for everyday wear.
There is a nice variety of colours to chose from in the line, from a more muted tone to some of the loudest and more playful tones.
Materials
Yarn – Hobbii Umami Tweed – super chunky/ super bulky (6)/ 150g/ 83m/ 91yds
10(11, 11, 12, 12, 13) balls
12mm crochet hook
8mm crochet hook
Yarn needle
Scissors
Stitch markers
Sizing & Measurements
Sizes S(M, L, XL, 2XL, 3XL)
Finished bust: 48(52, 56, 60, 64, 68) inches
Length: 20(20.5, 21, 21.5, 22, 22.5) inches
Stitches & Abbreviations
Ch = chain
Sc = single crochet
Hdc = half double crochet
Slst = slip stitch
BLO = back loop only
St(s) = stitch(es)
Rep = repeat
GAUGE: 7 sts x 8 rows using 12mm hook in main body stitch = 4″
Crochet Funfetti Bomber Cardigan Pattern
YOU CAN NOW PURCHASE THE THE AD FREE PDF ON MY ETSY
Back Panel
Using 8mm hook
Ch 7
ROW 1: sc in 2nd ch from hook, sc in each ch to end. Turn.
ROW 2: ch 1, sc in BLO in each st across. Turn.
Rep row 2 until end of row 42(46, 48, 50, 52, 54).
Change to 12mm hook
Now we will work along the edge of the ribbed hem.
NEXT ROW: ch 1 and make 42(46, 48, 50, 52, 54) sc across. Turn.
NEXT ROW: ch 2 (counts as first hdc here and throughout), slst in next st, *hdc in next st, slst in next st, rep from * across. Turn.
NEXT ROW: ch 2, slst in next st, *hdc in next st, slst in next st, rep from * across. Turn.
Rep last row until end of row 36(37, 38, 39, 40, 41). Feel free to add or subtract rows here for a longer or shorter cardigan.
Fasten off.
Front Panel (Make 2)
Using 8mm hook
Ch 7
ROW 1: sc in 2nd ch from hook, sc in each ch to end. Turn.
ROW 2: ch 1, sc in BLO in each st across. Turn.
Rep row 2 until end of row 16(18, 18, 20, 20, 22).
Now we will work along the edge of ribbed hem.
Change to 12mm hook
NEXT ROW: ch 1 (not counted as st) and make 16( 18, 18, 20, 20, 22) sc across. Turn.
NEXT ROW: ch 2, slst in next st, *hdc in next st, slst in next st, rep from * across. Turn.
NEXT ROW: ch 2, slst in next st, *hdc in next st, slst in next st, rep from * across placing last slst on top of ch 2. Turn.
Rep last row until end of row 36(37, 38, 39, 40, 41). Feel free to add or subtract rows here but make sure it has same number of rows as back panel.
Fasten off leaving a long tail. Now go ahead and make second front panel.
Sleeves (Make 2)
Using 8mm hook
Ch 7
ROW 1: sc in 2nd ch from hook, sc in each ch to end. Turn.
ROW 2: ch 1, sc in BLO in each st across. Turn.
Rep row 2 until end of row 16( 16, 18, 18, 20, 20).
Change to 12mm hook
NEXT ROW: ch 1, make 16(16, 18, 18, 20, 20) sc across. Turn.
NEXT ROW: Ch 2, slst in same st as ch 2 (increase made), *hdc in next st, slst in next st, rep from * across placing a hdc + slst in last st (increase made). Turn.
NEXT ROW: Ch 2, slst in same st as ch 2, *hdc in next st, slst in next st, rep from * across ending row by placing hdc + slst on top of ch 2. Turn.
Rep last row until you have 28(30, 30, 34, 34, 36) sts. Turn.
NEXT ROW: ch 2, slst in next st, *hdc in next st, slst in next st, rep from * across placing last slst on top of ch 2. Turn.
Rep last row until sleeve measures 17( 17, 17, 18, 18, 18) inches.
Fasten off leaving a long tail.
Assembly
Lay the back panel on a flat surface. Next place both front panel on top and with a yarn needle and long tails seam front panels to back panel.
Next lay entire piece out flat with the wrong side still facing up. Grab a sleeve and mark the middle st with a stitch marker. Now attach stitch marker to the shoulder seam. With yarn needle and long tail seam sleeve to main body. Rep on the other side with the other sleeve.
Fold over your cardigan and seam along under edge of sleeves and down along the sides.
Turn cardigan right side out.
USING 8mm hook
Attach yarn to the right inner corner on the bottom.
NEXT ROW: ch 1 and sc all the way around the inner edge of cardigan until you reach the other side. Ch 5(6, 5, 6, 5, 6)
NEXT ROW: sc in 2nd ch from hook, sc in next 3(4, 3, 4, 3, 4) chains, slst in next 2 sc, *turn. skip 2 slsts, sc in BLO in next 4(5, 4, 5, 4, 5) sts, ch 1, turn, sc in BLO in next 4(5, 4, 5, 4, 5) sts, slst in next 2 sc, rep from * all the way to the other side.
Fasten off.
Weave in all ends.
You are now finished you Crochet Funfetti Bomber Cardigan.