
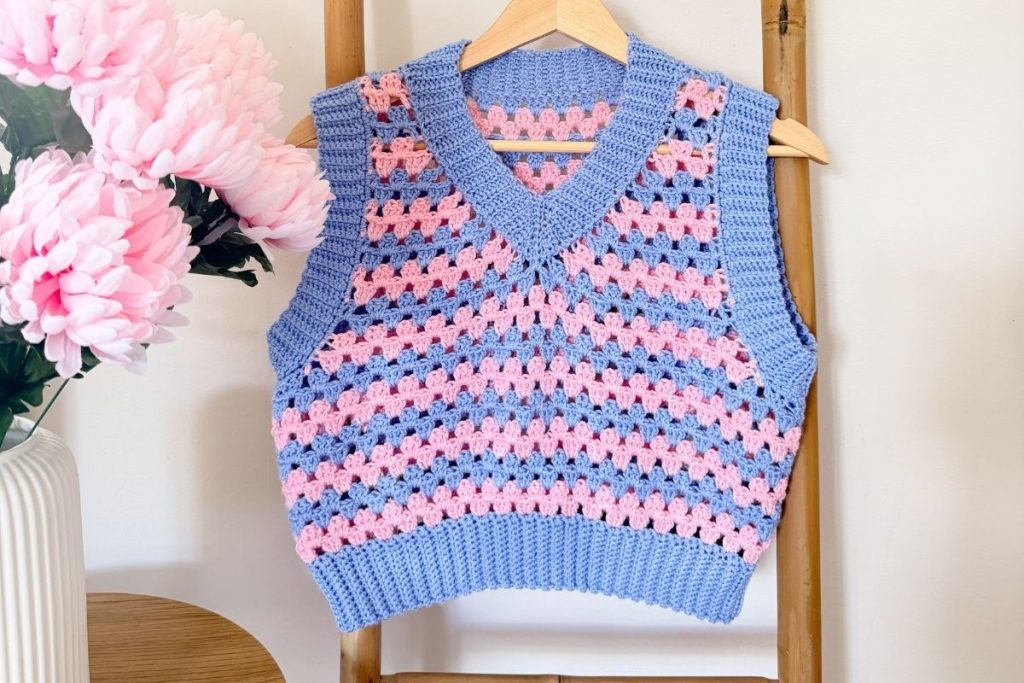
Our crochet V-Neck granny stitch vest top is a stylish and versatile handmade garment with a slightly relaxed fit, making it comfortable to wear while still giving a flattering shape. The classic granny stitch creates a beautiful textured fabric and gives this crochet vest top a timeless look that works wonderfully with jeans, skirts or shorts.
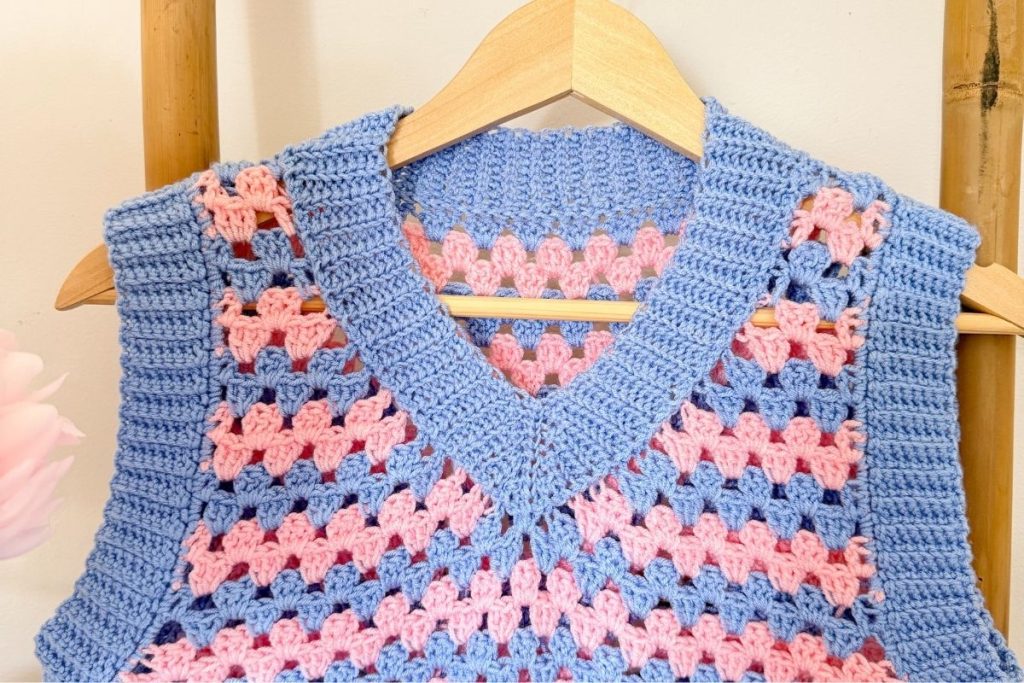
The vest top features ribbing along the hem and around the armholes, adding a neat, finished look to the garment. The V neckline is finished with short rows ribbing, creating a lovely structured neckline that compliments the relaxed fit of the top. These details give the crochet granny stitch vest a polished finish while keeping the design comfortable and easy to wear.
This pattern is worked using a 5 mm crochet hook and dk yarn, making it a relatively quick and enjoyable project to crochet. The combination of granny stitch and simple ribbing makes this crochet v neck top a great project for crocheters who want to create a stylish handmade garment with plenty of everyday versatility.
Whether you’re looking for a lightweight layering piece or a comfortable summer crochet top, this crochet granny stitch vest top is a lovely addition to any wardrobe.
PROJECT OVERVIEW
The crochet V neck granny stitch vest top is worked from the bottom up in two separate panels, with each panel beginning at the ribbed hem. Once both panels are complete, they are sewn together to create the main body of the vest top. This simple construction makes the project straight forward to follow and allows you to create a beautifully finished handmade crochet top without complicated shaping.
After the two panels have been joined, the crochet ribbed armholes are worked around the arm openings. The ribbing uses rows of yarn over slip stitches alternated with rows of slip stitches, creating a wonderfully stretchy rib with an almost knitted appearance. This detail gives the crochet vest top a professional, polished finish while adding definition around the armholes.
The final step is crocheting the ribbed V neckline, which is created using short rows to shape the neckline beautifully. Although short row shaping might sound intimidating, the process is very easy to follow. I have also included a Youtube tutorial showing every step of the shaping so you can crochet along with me and see exactly how the neckline is constructed.
Overall, this crochet granny stitch vest top pattern is an easy and enjoyable garment project with simple construction and beautiful finishing details. If you’re looking for an easy crochet vest top pattern with a relaxed fit, classic granny stitch texture and a knitted look ribbing, this is a lovely project to add to your list of things to make.
SKILL LEVEL: Easy to Intermediate
SIZE: S(M/L and XL/2XL)
FINISHED FIT: Relaxed
YARN WEIGHT: Dk (weight 3)
YARN: Paintbox Anti Piling Dk
HOOK SIZES: 4 mm and 5 mm
CONSTRUCTION: Seamed, bottom up.
VIDEO TUTORIAL: Click here
WHY I DESIGNED THIS CROCHET V NECK VEST TOP
I wanted to design a crochet V neck granny stitch vest top that combined a classic crochet stitch with a fresh, modern look. The granny stitch is one of those timeless crochet stitches that never really goes out of style. It has been a favorite for generations and I love how it can be used to create both traditional and contemporary crochet garments. For this design I wanted to take that classic texture and turn it into a colorful, wearable crochet vest top.
Wanting something colorful, I decided to use two colors throughout the top, changing every two rows. I love the effect this creates because it adds plenty of visual interest without making the pattern overly complicated. The simple two row color changes create lovely horizontal stripes and allow you to experiment with your favorite color combinations. You could choose bold, contrasting colors for a bright statement vest or softer muted shades for a more subtle everyday look.
I’ve designed V necks in the past but for this project I wanted to try something a little different. I experimented with short row shaping for the ribbed neckline and I absolutely loved how it turned out. The short rows create a wonderful shaped neckline while givng the ribbing an interesting knitted appearance.
The result is an easy crochet V neck vest top that combines classic granny stitch, colorful stripes and a unique ribbed neckline. I love how the traditional granny stitch works alongside the short row technique to create a vest top that feels both timeless and modern.
10 REASONS WHY YOU”LL LOVE THIS CROCHET V NECK VEST TOP
- Classic granny stitch – The granny stitch is timeless, making this crochet vest top a stylish piece you’ll be able to wear year after year.
- Fun two color design – Changing colors every two rows creates colorful stripes and gives you endless opportunities to play around with different color combinations.
- Relaxed and comfortable fit – The slightly relaxed fit makes this vest top comfortable for everyday wear while still looking stylish and flattering.
- Flattering V neckline – The V neck adds a lovely shape to the vest top and makes it easy to layer over a shirt, blouse or T-shirt.
- Beautiful knitted look ribbing – The rows of yarn over slip stitches in combination with slip stitches create ribbing that looks surprisingly similar to knitted fabric.
- Unique short row neckline – The ribbed neckline is shaped using short rows, adding an interesting technique and a beautiful finish to the garment.
- Easy construction – The vest top is made from two simple panels worked from the bottom up, then sewn together, making the construction straight forward.
- Beginner friendly techniques – Despite the professional looking finish, the pattern uses approachable crochet techniques making it a great garment project for confident beginners.
- Youtube tutorial included – The video tutorial walks you through the neckline shaping step by step, so you don’t have to figure out the short rows on your own.
- A versatile handmade wardrobe piece – Wear your crochet vest top with jeans, shorts or a skirt, or layer it over a T-shirt for a completely different look. It’s colorful, comfortable and easy to style.
YARN
Paintbox Anti Piling Dk
100g/250m/273yds per ball
100% acrylic
Suggested substitutes:
- King Cole Baby Dk
- Rico Design Baby So Soft Dk
- Mary Maxim Mjs Off The Hook Timeless Tones
- Knit Picks Brava Baby Dk
- Stylecraft Bambino Dk
- Stylecraft Bellissima Dk
- Ice Yarns Antipilling Baby
- Schachenmayr Soft and Easy Fine
- Universal Yarn Uptown Bamboo Dk
- Premier Yarns Anti Pilling Everyday Dk
CROCHET HOOKS & MATERIALS NEEDED
- 4 mm & 5 mm crochet hooks
- Stitch markers (optional)
- Scissors
STITCHES & ABBREVIATIONS
ch – chain
sc – single crochet
dc – double crochet
yoslst – yarn over slip stitch
yoslstblo – yarn over slip stitch back loop only
slst – slip stitch
slstblo – slip stitch back loop only
sp – space
st(s) – stitch(es)
rep – repeat
MC – main color
CC – contrast color
GAUGE: 4.5 clusters x 9 rows = 4″
PROJECT TIPS
- Change color before finishing off last stitch
- Carry yarn up along the sides as it prevents cutting, attaching and weaving in lots of ends.
- Make sure not to crochet your slip stitches too tightly or you will have difficulty inserted your hook.
- If you find the top is too big you can size down or perhaps use a 4 mm hook for the main body and 3.5 mm for ribbing.
- It is highly recommended that you block your finished vest top. I used a hand held steamer for mine. Blocking your finished work will relax your stitches giving the end result a nice and polished look.
- Check out the Youtube tutorial for the neckline shaping process.
GET THE PRINTABLE PDF PATTERN
This crochet vest top is free to view below on our blog. If you prefer an ad-free printable version you can purchase the PDF pattern. The PDF includes the complete written instructions and link to the video tutorial.
CROCHET GRANNY V NECK VEST TOP PATTERN
SIZING: S(M/L and XL/2XL)
Finished bust: 36(40, 45)”
Scroll down for larger sizes
Size SMALL
Back Panel
Ribbed Hem
Using the smaller hook and using MC
**Ch 13
Row 1: sc in 2nd ch from hook and in each ch across, turn. [12 sts]
Row 2: ch 1, scblo in each ch across turn.
Rep row 2 until you have a total of 64 rows
Now we will be working along the edges of the rows we just completed. Turn your ribbing so you are working on the long edge of the hem. To make things simpler to read we will revert back to row 1:
Setup row: ch 1, work 1 sc into the edges of each row you just completed. Change to CC before you finish the last sc. From now on there will be no mention of any color changes in the pattern. For this vest I did 2 rows of granny stitch in each color.[64 sts]
Change to larger hook
Row 1: Ch 2 (counts as 1st dc here and throughout), dc in same st, skip 2 sts, *3dc into the next st, skip 2, rep from * across ending with 2dc in last st, turn.
Row 2: ch 2, 3dc in sp between each cluster across, ending the row with a dc on top of the ch 2, turn
Row 3: ch 2, dc in 1st sp, 3dc in sp between each cluster across, ending with a dc in sp between last 3dc cluster and the ch2, then, dc on top of the ch 2, turn
Row 4: ch 2, 3dc in sp between each cluster across, ending with a dc on top of the ch 2, turn.
Rep rows 3-4 until you have a total of 10 granny stitch rows. Add more rows here if you want the top longer. This should be held under the arm to check length needed. Fasten off and make sure you have turned after your last row.
Armhole Shaping
We will now revert back to row 1 again to make the pattern simpler for you to read:
Looking at the righthand side of the top, skip 7 dc and attach yarn in the sp between the 2nd & 3rd clusters
Row 1: ch 2, 3dc in next cluster sp and in each of the next 15 cluster sps, dc in next cluster sp, turn.
Row 2: ch 2, skip 1st sp, 3dc in each cluster sp across [15 clusters] dc on top of ch 2, turn.
Row 3: rep row 2. You should now have a total of 14 clusters, turn.***
Row 4: ch 2, dc in same sp, 3dc in each cluster sp across, (13 clusters), ending with a dc on top of ch 2, turn.
Rep row 4 until you have a total of 15 rows completed, counting from Row 1. Fasten off
Front Panel
Rep as for back panel from ** to ***
Row 4: ch 2 dc in same p, 3dc in each of the next 6 sps, dc in next sp, turn.
Row 5: ch 2, skip 1st sp, 3dc in each sp across (6 clusters), dc on top of ch 2, turn.
Row 6: ch 2, dc in same sp, 3dc in each sp (5 clusters), dc on top of ch 2, turn.
Row 7: ch 2, skip 1st sp, 3dc in each sp (5 clusters), dc on top of ch 2, turn.
Row 8: ch 2, dc in same sp, 3dc in each sp across (4 clusters), dc on top of ch 2, turn.
Row 9: ch 2, skip 1st sp, 3dc in each sp (4 clusters), dc on top of ch 2, turn.
Row 10: ch 2, dc in same sp, 3dc in each sp (3 clusters) dc on top of ch 2, turn.
Row 11: ch 2, skip 1st sp, 3dc in each sp (3 clusters) dc on top of ch 2, turn.
Row 12: ch 2, dc in same sp, 3dc in each of the next 2 sps, dc on top of ch 2, turn.
Row 13: ch 2, skip 1st sp, 3dc in each of the next 2 sps, dc on top of ch 2, turn.
Row 14: ch 2, dc in same sp, 3dc in next sp, dc on top of ch 2, turn.
Row 15: ch 2, dc in same sp, 3dc in next sp, dc on top of ch 2, turn.
Row 16: ch 2, dc in same sp, 3dc in next sp, dc on top of ch 2, turn.
Row 17: ch 2, dc in same sp, 3dc in next sp, dc on top of ch 2, turn.
Other Side
Attach yarn to same sp as last dc created on row 4
Row 1: ch 2, 3dc in next sp and each sp across (6 clusters), dc in last sp, dc on top of ch 2, turn.
Row 2: ch 2, 3dc in each sp across (6 clusters), dc on top of ch 2, turn.
Row 3: ch 2, skip 1st sp, 3dc in each sp (5 clusters), dc in last sp, dc on top of ch 2, turn.
Row 4: ch 2, 3dc in each sp (5 clusters), dc on top of ch 2, turn.
Row 5: ch 2 skip 1st sp, 3dc in each sp (4 clusters) dc in last sp, dc on top of ch 2, turn.
Row 6: ch 2, 3dc in each sp across (4 clusters) dc on top of ch 2, turn.
Row 7: ch 2, skip 1st sp, 3dc in each sp (3 clusters), dc in last sp, dc on top of ch 2, turn.
Row 8: ch 2, 3dc in each sp (3 clusters), dc on top of ch 2, turn.
Row 9: ch 2, skip 1st sp, 3dc in each of next 2 sps , dc in last sp, dc on top of ch 2, turn.
Row 10: ch 2, 3dc in each of the next 2 sps, dc on top of ch 2, turn.
Row 11: ch 2, dc in same sp, 3dc in next sp, dc in last sp, dc on top of ch 2, turn.
Row 12: ch 2, 3dc in each of the next 2 sps, dc on top of ch 2, turn.
Row 13: ch 2, dc in same sp, 3dc in next sp, dc in last sp, dc on top of ch 2, turn.
Row 14: ch 2, dc in same sp, 3dc in next sp, dc on top of ch 2, turn.
Scroll further down to see the assembly, ribbed armholes and neckline ribbing.
Size MEDIUM & LARGE
Back Panel
Ribbed Hemline
Using the smaller hook
** Ch 13
Row 1: sc in the 2nd ch from the hook and in each ch across, turn.
Row 2: ch 1, scblo in each st across, turn.
Rep row 2 until you have a total of 67 rows.
Now we will be working along the edges of the rows we just completed. Turn your ribbing so you are working on the long edge of the hem. To make things simpler to read we will revert back to row 1:
Setup row: ch 1, work 1 sc into the edges of each row you just completed. Change to CC before you finish the last sc. From now on there will be no mention of any color changes in the pattern. For this vest I did 2 rows of granny stitch in each color.[67 sts]
Change to larger hook
Row 1: Ch 2 (counts as 1st dc here and throughout), dc in same st, skip 2 sts, *3dc into the next st, skip 2, rep from * across ending with 2dc in last st, turn.
Row 2: ch 2, 3dc in sp between each cluster across, ending the row with a dc on top of the ch 2, turn
Row 3: ch 2, dc in 1st sp, 3dc in sp between each cluster across, ending with a dc in sp between last 3dc cluster and the ch2, then, dc on top of the ch 2, turn
Row 4: ch 2, 3dc in sp between each cluster across, ending with a dc on top of the ch 2, turn.
Rep rows 3-4 until you have a total of 12 granny stitch rows for Medium and 14 granny stitch rows for Large. Add more rows here if you want the top longer. This should be held under the arm to check length needed. Fasten off and make sure you have turned after your last row.
Armhole Shaping
We will now revert back to row 1 again to make the pattern simpler for you to read
Looking at the righthand side of the top, skip 7 dc and attach yarn in the sp between the 2nd & 3rd clusters
Row 1: ch 2, 3dc in next cluster sp and each of the next 16 cluster sps, dc in next cluster sp, turn
Row 2: ch 2, skip 1st sp, 3dc in each cluster sp across (16 clusters), dc on top of ch 2, turn.
Row 3-4: rep row 2. You should have a total of 14 cluster at the end of row 4***
Row 5: ch 2, dc in same sp, 3dc in each cluster sp across (13 clusters), dc in last sp, dc on top of ch 2, turn.
Row 6: ch 2, 3dc in each cluster sp across, (14 clusters), dc on top of ch 2, turn.
Row 7: ch 2, dc in same sp, 3dc in each cluster sp across (13 clusters), dc in last sp, dc on top of ch 2, turn.
Rep rows 6 -7 until you have a total of 17 rows for Medium and 19 for Large completed, counting from row 1 of armhole shaping. Fasten off.
Front Panel
Rep as for back panel from ** to ***
Row 5: Ch 2, dc in same st, 3dc in each sp (6 clusters), dc in next sp, turn
Row 6: Ch 2, skip 1st sp, 3dc in each sp (6 clusters), ending with a dc on top of ch 2. turn.
Row 7: ch 2, dc in same sp, 3dc in each sp across, (5 clusters) ending with a dc on top of ch 2, turn
Row 8: Ch 2, skip 1st sp, 3dc in each sp across, (5 clusters) ending with a dc on top of ch 2, turn.
Row 9: ch 2, dc in same sp, 3dc in each sp across, (4 clusters) ending with a dc on top of ch 2, turn.
Row 10: ch 2, skip 1st sp, 3dc in each sp (4 clusters) ending with a dc on top of ch 2, turn.
Row 11: ch 2, dc in same sp, 3dc in each sp across (3 clusters) ending with dc on top of ch 2
Row 12: ch 2, skip 1st sp, 3dc in each sp across, (3 clusters) ending with dc on top of ch 2
Row 13: ch 2, dc in same sp, 3dc in each sp (2 clusters), ending with dc on top of ch 2
Row 14: ch 2, skip 1st sp, 3dc in each sp (2 clusters), ending with a dc on top of ch 2
Row 15: ch 2, dc in same sp, 3dc in next sp, dc in next sp, dc on top of ch 2
Row 16: ch 2, 3dc in each of the next 2 sps, dc on top of ch 2.
Row 17: ch 2, dc in same sp, 3dc in next sp, dc in next sp, dc on top of ch 2, turn. Stop here for medium size and fasten off leaving long tail.
Row 18: ch 2, 3dc in each of the next 2 sps, dc on top of ch 2, turn.
Row 19: ch 2, dc in same sp, 3dc in next sp, dc in next sp, dc on top of ch 2, turn. Fasten off leaving a long tail
Other Side
Attach yarn to same sp as last dc created on row 5
Row 1: Ch 2, 3dc in each sp (6 clusters), ending with a dc in last sp and dc on top of ch 2
Row 2: ch 2, 3dc in each sp across (6 clusters) ending with dc on top of ch 2, turn.
Row 3: ch 2, skip 1st sp, 3dc in each sp across (5 clusters) ending with dc in last sp, dc on top of ch 2
Row 4: ch 2, 3dc in each sp (5 clusters) ending with dc on top of ch 2
Row 5: ch 2, skip 1st sp, 3dc in each sp (4 clusters), dc in last sp, dc on top of ch 2
Row 6: ch 2, 3dc in each sp (4 clusters) ending with dc on top of ch 2
Row 7: ch 2, skip 1st sp, 3dc in each sp (3 clusters) ending with dc in last sp and a dc on top of ch 2
Row 8: ch 2, 3dc in each sp (3 clusters) ending with dc on top of ch 2
Row 9: ch 2, skip 1st sp, 3dc in each of the next 2 sps, dc in last sp, dc on top of ch 2
Row 10: ch 2, 3dc in each of the next 2 sps, dc on top of ch 2
Row 11: ch 2, dc in same sp, 3dc in next sp, dc in last sp, dc on top of ch 2
Row 12: ch 2, 3dc in each of the next 2 sps, dc on top of ch 2
Row 13: ch 2, dc in same sp, 3dc in next sp, dc in last sp, dc on top of ch 2. Stop here for Size Medium. Fasten off leaving long tail.
Row 14: ch 2, 3dc in next 2 sps, dc on top of ch 2, turn
Row 15: ch 2, dc in same sp, 3dc in next sp, dc in last sp, dc on top of ch 2, turn.
Scroll further down to see the assembly, ribbed armholes and neckline ribbing.
Size X LARGE & 2X LARGE
Back Panel
Ribbed Hemline
Using the smaller hook
** Ch 13
Row 1: sc in the 2nd ch from the hook and in each ch across, turn.
Row 2: ch 1, scblo in each st across, turn.
Rep row 2 until you have a total of 73 rows.
Now we will be working along the edges of the rows we just completed. Turn your ribbing so you are working on the long edge of the hem. To make things simpler to read we will revert back to row 1:
Setup row: ch 1, work 1 sc into the edges of each row you just completed. [73 sts]. Change to CC before you finish the last sc. From now on there will be no mention of any color changes in the pattern. For this vest I did 2 rows of granny stitch in each color.
Change to larger hook
Row 1: Ch 2 (counts as 1st dc here and throughout), dc in same st, skip 2 sts, *3dc into the next st, skip 2, rep from * across ending with 2dc in last st, turn.
Row 2: ch 2, 3dc in sp between each cluster across, ending the row with a dc on top of the ch 2, turn
Row 3: ch 2, dc in 1st sp, 3dc in sp between each cluster across, ending with a dc in sp between last 3dc cluster and the ch2, then, dc on top of the ch 2, turn
Row 4: ch 2, 3dc in sp between each cluster across, ending with a dc on top of the ch 2, turn.
Rep rows 3-4 until you have a total of 16 granny stitch rows. Add more rows here if you want the top longer. This should be held under the arm to check length needed. Fasten off and make sure you have turned after your last row.
Armhole Shaping
We will now revert back to row 1 again to make the pattern simpler for you to read
Looking at the righthand side of the top, skip 10 dc and attach yarn in the sp between the 3rd and 4th clusters
Row 1: ch 2, skip 1st cluster sp, 3dc in next cluster sp and in each of the next 16 clusters, dc in next cluster sp, turn.
Row 2: ch 1, skip 1st sp, 3dc in each cluster sp across (16 clusters), dc on top of ch 2, turn.***
Row 3: ch 2, dc in same sp, 3dc in each cluster sp across (15 clusters), dc in next sp, dc on top of ch 2, turn
Row 4: ch 2, 3dc in each cluster sp across (16 clusters), dc on top of ch 2, turn
Row 5: ch 2, dc in same sp, 3dc in each cluster sp across (15 clusters), dc in next sp, dc on top of ch 2, turn.
Rep rows 4-5 until you have a total of 19 rows, counting from row 1. Fasten off.
Front Panel
Rep as for the back panel from ** to **
Row 3: ch 2, dc in same sp, 3dc in each sp across (7 clusters) dc in next sp, turn.
Row 4: ch 2, skip 1st sp, 3dc in each sp across, (7 clusters) ending with a dc on top of ch 2, turn
Row 5: ch 2, dc in same sp, 3dc in each sp across, (6 clusters), ending with a dc on top of ch 2, turn
Row 6: ch 2, skip 1st sp, 3dc in each sp across (6 clusters) ending with dc on top of ch 2, turn.
Row 7: ch 2, dc in same sp, 3dc in each sp across (5 clusters) ending with dc on top of ch 2, turn.
Row 8: ch 2, skip 1st sp, 3dc in each sp across (5 clusters) ending with dc on top of ch 2, turn.
Row 9: ch 2, dc in same sp, 3dc in each sp across (4 clusters) ending with dc on top of ch 2, turn.
Row 10: ch 2, skip 1st sp, 3dc in each sp across (4 clusters) ending with dc on top of ch 2, turn.
Row 11: ch 2, dc in same sp, 3dc in each sp across (3 clusters) ending with dc on top of ch 2, turn.
Row 12: ch 2, skip 1st sp, 3dc in each sp across (3 clusters), dc on top of ch 2, turn.
Rows 13-19: ch 2, dc in same sp, 3dc in each of the next 2 sps, dc on top of ch 2, turn. Fasten off leaving a long tail.
OTHER SIDE
attach yarn in same sp as dc from row 3 then
Row 1: ch 2, 3 dc in each sp across, (7 clusters) ending with a dc in last sp and a dc on top of ch 2, turn
Row 2: ch 2, 3dc in each sp across, (7 clusters) ending with a dc on top of ch 2, turn
Row 3: ch 2, skip 1st sp, 3dc in each sp across, (6 clusters) ending with dc in last sp and dc on top of ch 2, turn
Row 4: ch 2, 3dc in each sp across (6 clusters) ending with dc on top of ch 2, turn.
Row 5: ch 2, skip 1st sp, 3dc in each sp (5 clusters) ending with dc in last sp and a dc on top of ch 2, turn.
Row 6: ch 2, 3dc in each sp (5 clusters) ending with a dc on top of ch 2, turn.
Row 7: ch 2, skip 1st sp, 3dc in each sp (4 clusters) ending with dc in last sp and a dc on top of ch 2, turn.
Row 8: ch 2, 3dc in each sp across (4 clusters) ending with a dc on top of ch 2, turn.
Row 9: ch 2, skip 1st sp, 3dc in each sp (3 clusters) ending with a dc in last sp and a dc on top of ch 2, turn.
Row 10: ch 2, 3dc in each sp (3 clusters), ending with a dc on top of ch 2
Row 11: ch 2, skip 1st sp, 3dc in each of the next 2 sps, ending with a dc in last sp, dc on top of ch 2, turn
Row 12-17: ch 2, 3dc in each of the next 2 sps, ending with a dc in last sp, dc on top of ch 2, turn. Fasten off leaving a long tail.
Assembly FOR ALL SIZES
Lay the back panel on a flat surface with the right side facing upwards. Next lay the front panel directly on top of the back panel with its right side facing downward, With a yarn needle and some yarn seam the sides beginning at the bottom ribbed hemline and working your way upwards towards the underarm. Fasten off and repeat on the other side. Next seam across each shoulder. Fasten off and weave in all ends. Now turn your piece the right side out.
Armhole Ribbing
Using smaller hook and MC
Setup round: Attach yarn to the underarm. I like to attach to to the centre point of the underarm as possible. Ch 1, sc around the entire armhole, placing 2sc into the edges of every dc row around. Slst to the beginning sc to close the round.
Round 1: ch 9, sc in 2nd ch from the hook and in each of the next 7 chains, slst into each of the next 2 sc, turn.
Round 2: skip the 2 slsts you just created, scblo in each of the next 8 sts, turn.
Round 3: ch 1, scblo in each of the next 8 sts, slst into each of the next 2 sc, turn.
Round 4: ch 1, skip the 2 slsts you just created, scblo in each of the next 8 sts, turn.
Rep rounds 3-4 all the way around the entire armhole. Fasten off leaving a long tail.
With a yarn needle and the long tail seam the two ends of the ribbing together with the wrong side facing outward. If you prefer, you can also slst them together.
Rep this entire process for the 2nd armhole.
Neckline Ribbing
Using the smaller hook and MC
Setup Round: With your vest top turned the right side out, and the back facing you, attach yarn near the right shoulder seam. Once attached, ch 1 and slip stitch across the back neck, down the edge of the inner neckline edge. Place 2 slsts in the edge of every granny stitch row. Work your way in this manner until you reach the centre point of the V. Place a slst in to that and mark it. Now continue up along the other edge of the V. Slst to the 1st slst you made to close the round.
With the front facing you, find where you marked that centre st. Working from that marked stitch towards your left, mark the 8th st with another marker. So now you should have 7 sts between each marker. From where your hook is now and counting from the next stitch you must have an even amount of stitches to the st before the second marker you added. If you don’t have an even number you may have to go back and add another slst.
Row 1: Ch 10, yoslst into the 2nd ch from hook and into each of the next 8 chains, slst into each of the next 2 sts, turn.
Row 2: skip the 2 slsts you just made, slstblo 9, turn.
Row 3: ch 1, yoslstblo 9, slst into each of the next 2 sts, turn
Rep rows 2-3 until you have reached the st before the nearest marker.
Next row: skip the 2 slsts you just made, slstblo 7, turn.
Next row: ch 1, yoslstblo 7, slst into each of the next 2 sts, turn.
Next row: skip the 2 slsts you just made, slstblo 5, turn.
Next row: ch 1, yoslstblo 5, slst into each of the next 2 sts, turn.
Next row: skip the 2 slsts you just made, slstblo 3, turn.
Next row: ch 1, yoslstblo 3, slst into each of the next 2 sts, turn.
Next row: skip the 2 slsts you just made, slstblo 1, turn.
Next row: ch 1, yoslstblo 1, slst into each of the next 2 sts, turn.
Next row: skip the 2 slsts you just made, slstblo 1, then insert hook into the side of the ‘bump’ below where your hook is now, then insert hook into next st, yo, pull yarn through all loops on hook, slstblo into next st, insert hook into side of bottom ‘bump’ and into the next st, yo and pull through all loops on hook, slstblo into next st, insert hook into side of bottom ‘bump’ and into the next st, yo and pull through all loops on hook, slstblo into next st, insert hook into side of bottom ‘bump and into the next st, yo and pull through all loops on hook, slstblo into the last st, turn.
Next row: ch 1, yoslstblo 9, slst into each of the next 2 sts, turn.
Next row: skip the 2 slsts you just made, slstblo 1, turn.
Next row: ch 1, yoslstblo 1, slst into each of the next 2 sts, turn.
Next row: skip the 2 slsts you just made, slstblo 1, then insert hook into the side of the bottom bump and then into next st, yo, pull through all loops, slst into next st, turn.
Next row: ch 1, yoslstblo 3, slst into each of the next 2 sts, turn.
Next row: skip the 2 sts you just made, slstblo 3, then insert hook into the side of bump then into next st, yo, pull through all loops on hook, slstblo in next st, turn.
Next row: ch 1, yoslstblo 5, slst into each of the next 2 sts, turn.
Next row: skip the 2 slsts you just made, slstblo 5, then insert hook into side of bottom bump and then into next st, yo and pull through all loops, slstblo into next st, turn.
Next row: ch 1, yoslstblo 7, slst into each of the next 2 sts, turn.
Next row: skip the 2 slsts you just made, slstblo 7, then insert hook into the side of the bottom bump, and into the next st, yo, pull through all opps, slstblo into the last st, turn.
Next row: Ch 1, yoslstblo 9, slst into each of the next 2 sts, turn.
Next row: skip the 2 slsts you just made, slstblo 9, turn.
Rep the last 2 rows until you have worked your way around the entire neckline. Slst the two ends of the ribbing together. Fasten off.
Weave in all ends. It is recommended that you block this vest. I find that blocking with a handheld steamer works perfectly. Blocking your work will relax the stitches giving your piece a nice and polished look.