
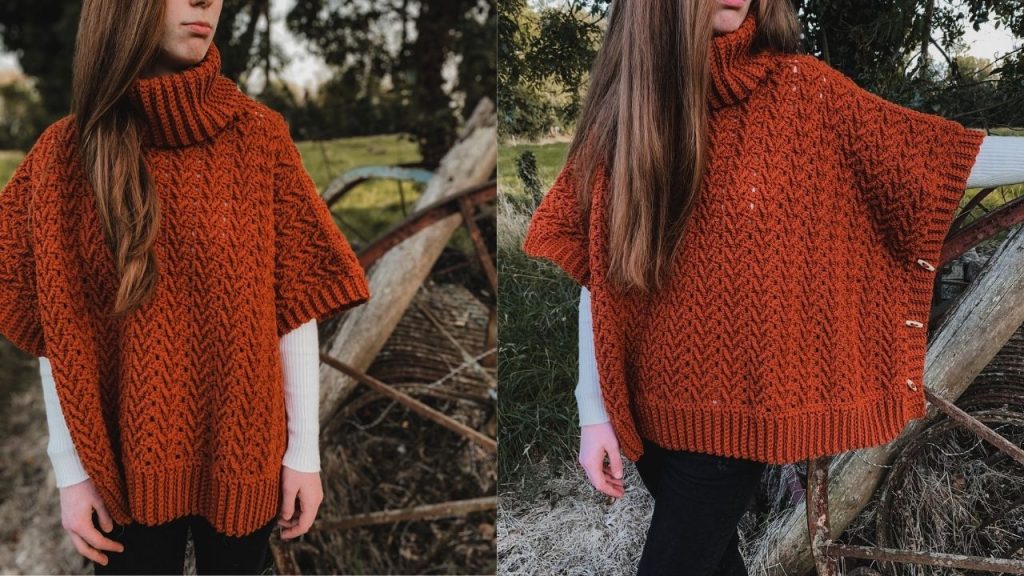
Learn to crochet this quick and easy crochet turtleneck poncho, perfect for throwing over a sweater or top during the cooler months ahead.
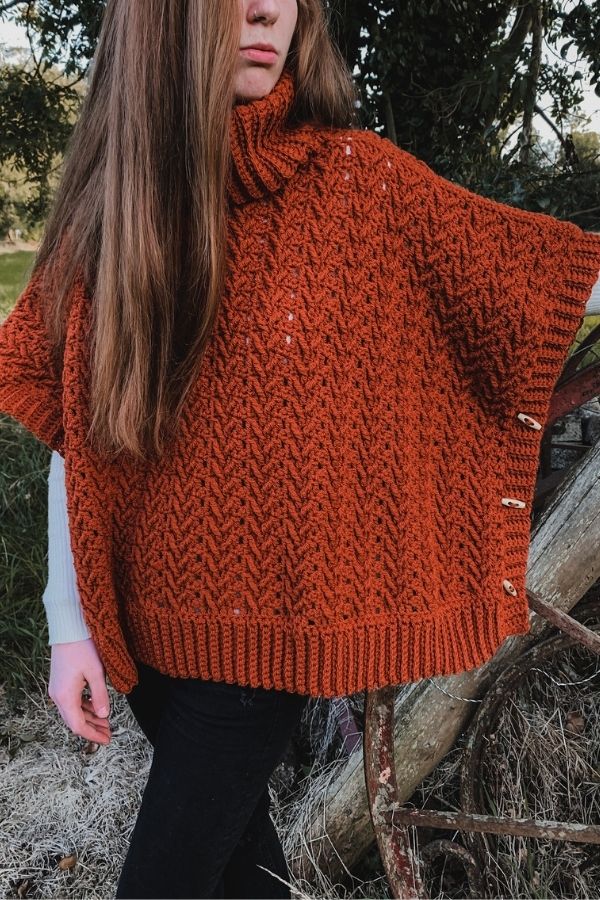
Designed with lots of texture and with a length you can fully customize to your own liking. With the added coziness of a big collar, this crochet poncho will make a great addition to your wardrobe.
The poncho is created by crocheting two identical panels that are sewn at the shoulders, with some ribbing along the sides before we finally add the collar. Each panel is worked from the bottom up, starting with the bottom ribbed edge, then we will crochet in our stitch pattern until we are satisfied with the length. Easy peasy!
YARN
** The materials listed below contain affiliated links. They are no cost to you whatsoever but it does help me out**
The Harvest Turtleneck Poncho uses Lionbrand Heartland which is a weight 4 acrylic yarn. This yarn is quickly becoming one of my all time favorite yarns ever to use. Even though it is an acrylic yarn, it is super soft and has great stitch definition. There are lots of shades to choose from but the color I used was Yosemite. Doesn’t this color literally scream Fall? I’m simply in love with this shade and can already foresee myself purchasing lots more so I can make cardigans or sweaters.
MATERIALS
Yarn – Lionbrand Heartland – weight 4/aran/worsted/10 ply – 140g/251 yds/230 m
Approximately 7(8, 8, 9) balls
6mm crochet hook
6 buttons
Yarn needle
Stitch markers
Scissors
Measuring tape
STITCHES & ABBREVIATIONS
ch = chain
sc = single crochet
dc = double crochet
FPTC = front post treble crochet
slst = slip stitch
BLO = back loop only
rep = repeat
st(s) = stitch(es)
SPECIAL STITCHES
Dc/FPTC2TOG: yo, insert hook in next st, yo and draw up a loop, yo draw through 2 loops, yo twice, insert hook around post of 3rd dc 2 rows below and draw up a loop, yo draw through 2 loops, yo draw through 2 loops, yo draw through 3 loops on hook.
FPTC/TC2TOG: yo twice, insert hook around same post as last FPTC, yo and draw up loop, yo draw through 2 loops, yo insert hook into next sc, draw up loop, yo draw through 2 loops, yo draw through 3 loops.
GAUGE: 15 scblo = 4″
SIZING & MEASUREMENTS
The sizing guide follows S/M(L/XL, 2XL/3XL, 4XL/5XL)
Width: 34(38, 42, 46) inches
Length: 23(24, 25, 26) inches
CROCHET HARVEST TURTLENECK PONCHO PATTERN
** THIS WRITTEN PATTERN IS ACCOMPANIED WITH A FREE STEP BY STEP VIDEO TUTORIAL. SCROLL DOWN TO VIEW **
(MAKE 2)
Ch 12
ROW 1: sc in 2nd ch from hook, sc in each ch to end. Turn.
ROW 2: ch 1 sc in BLO in each st across. Turn.
Repeat row 2 until you have completed a total of 109(121, 133, 145).
Now working on the long side of the ribbing:
NEXT ROW: ch 1 make 109(121, 133, 145) sc evenly across. Turn.
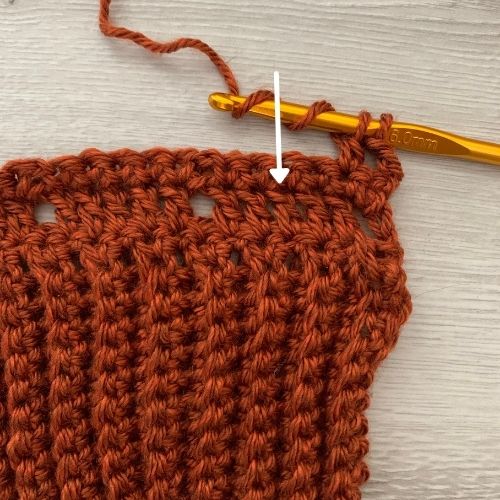
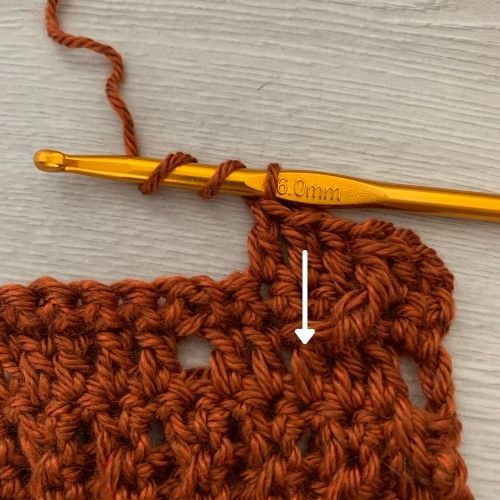
NEXT ROW: ch 3(counts as dc) dc in next 5 sts, ch 1, skip 1, *dc in next 5 sts, ch 1, skip 1, rep from * across ending with 6 dc. Turn.
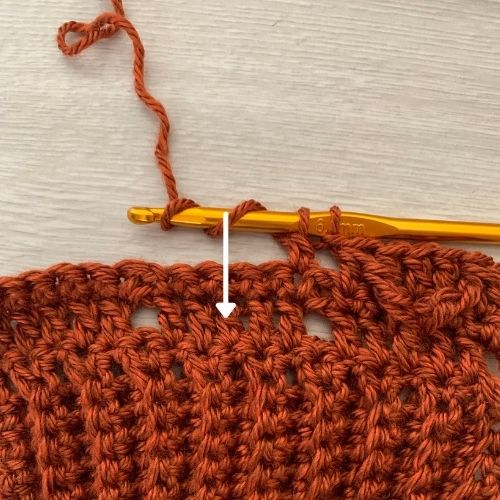
NEXT ROW: ch 1 sc in next 6 sts, ch 1, skip ch1-sp, *sc in next 5 sts, skip ch1-sp, rep from * across ending with 6 sc. Turn.
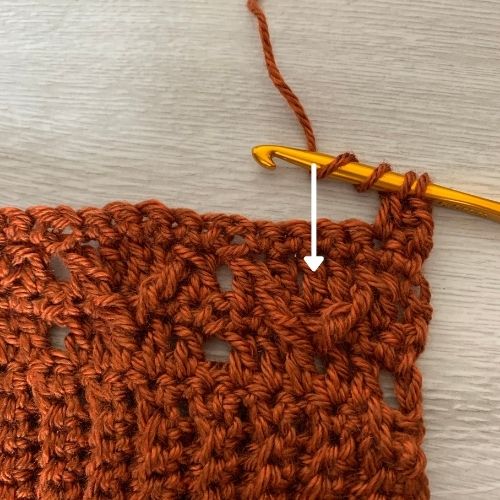
NEXT ROW: ch 3 *dc/FPTC2TOG, dc in next 3 sc, FPTC/TC2TOG, ch 1, skip ch1-sp, rep from * across ending last rep at dc/FPTC2TOG, dc in next 3 sc, FPTC/TC2TOG, dc in last st. Turn.
NEXT ROW: ch 1 sc in next 6 sts, *ch 1 skip ch1-sp, sc in next 5 sts, ch 1, skip ch1-sp, rep from * across ending with 6 sc. Turn.
Rep last 2 rows until panel measures 23(24, 25, 26) inches long. Feel free to add more rows here but make sure to end on a sc row. Fasten off leaving a long tail. Now go ahead and make second panel using the same method.
COLLAR
Ch 39
ROW 1: sc in 2nd ch from hook, sc in each ch to end of row. Turn.
ROW 2: ch 1 sc in BLO in each st across to end of row. Turn.
Repeat row 2 until collar measures approximately 20 inches long.
Slst ends together to create a “tube”. Fasten off leaving a long tail.
ASSEMBLY
Lay one of your panels on a flat surface with the right side facing up. Now lay the second panel on top of it with the right side facing down.
With 2 stitch markers mark out the centre 10 inches of the poncho. These centre 10 inches will be the neck opening. Feel free to make it smaller or bigger but you will have to adjust the length of your collar to fit.
With a yarn needle and your tail ends seam across the shoulders.
Next sew your collar to the poncho making sure the poncho is wrong side facing out.
SIDE RIBBING
With the right side of the poncho facing out attach yarn to one of the bottom corners.
Ch 1 and sc all the way around until you reach the other side.
Now you need to plan out where your buttonholes will be. For me I counted 11 sc from where my hook is now, placed my first stitch marker there, counted another 11-12 sc from that stitch marker and placed my second stitch marker, then counted another 11-12 sc and placed the third stitch marker. Where you place your stitch marker is entirely up to you.
NEXT ROW: ch 8, sc in 2nd ch from hook, sc in each of next 6 chains, slst into each of next 2 sc (on the main body of poncho), turn, skip over 2 slsts, *sc in BLO in next 7 sc, ch 1 sc in BLO in each of next 7 sc, slst in each of next 2 sc (on main body of poncho, turn, rep from * until you reach your first stitch marker, then sc in BLO in next 3 sc, ch 1, skip 1, sc in BLO in each of next 3 sc, **ch 1, turn, sc in next 7 sts, slst in each of next 2 sc (on main body), turn, sc in BLO in next 7 sc, rep from ** until second stitch marker. Rep what you did for the first stitch marker and continue on until you have made your third button hole in the same way.
Once all buttonholes have been created simply continue on working the ribbing as normal until you reach the other side. Fasten off.
Repeat this entire process for the other side of poncho.
You are now finished creating your Crochet Harvest Turtleneck Poncho.
This is a beautiful poncho Ms. Carrie. I hope to try to make it this fall. I’m going to watch your the youtube video you attached. Thank You for the pattern
I have loved this Poncho, like all your fabrics, I appreciate that you are so generous in teaching us how to do it.
Me ha encantado este Poncho, como todos tus tejidos, agradezco que seas tan generosa al enseñarnos como hacerlo.
Excellent!
Beautiful!
Thank you very much!!!
I will probe the crochet this poncho for my daughter.
Have a wonderful weekend!
Best wishes
Marianne
Is there a purchasable pdf of this pattern available?
This Poncho is truly stunning!!! I am on an Advanced Beginner/Intermediate level, so this may be too advanced for me, but it is so gorgeous that I’m making it my next “must-do/challenge-myself” project!
This pattern is so pretty! One of the nicest poncho designs I’ve seen. I agree the Lionbrand Heartland in Yosemite makes this a perfect Fall statement piece. Thanks for your beautiful work!
Carrie I Iove your amazing sweaters and this poncho. Going to attempt this along with your sweaters. You make it look so easy thank you for explaining the direction so well🙂
I love this poncho, especially with the different stitch used in the body of it. The only change I personally would make is to convert the turtleneck into a mock turtleneck as I can’t stand to have that much fabric under my chin and as I live in Minnesota, I have to be able to fully close all my winter coats. Looking forward to more ideas from you. Thank you for a new and unique poncho!
Beautiful work although I’m more into bright summer colours than the earthly autumnal ones. Whatever colour this is made in it will be a fantastic addition to any wardrobe.
lovely!! thank you so much^^
How do I get a printable pattern of the crochet harvest turtleneck poncho. That would be very valuable.
Is there somewhere where I can purchase a pdf of this pattern – the Harvest Crochet Poncho? I want to make this as a Christmas gift for my oldest daughter. Thanks!
Am self taught and found the pattern hard to read but having it in a video also has made this really easy to follow. Have made this and love it. Thanks.
Is it possible to get a printable pattern for this poncho please? Xx
Hello Carrie,
How many chains do I do to make a (L) Cowl neck poncho? Love it!