
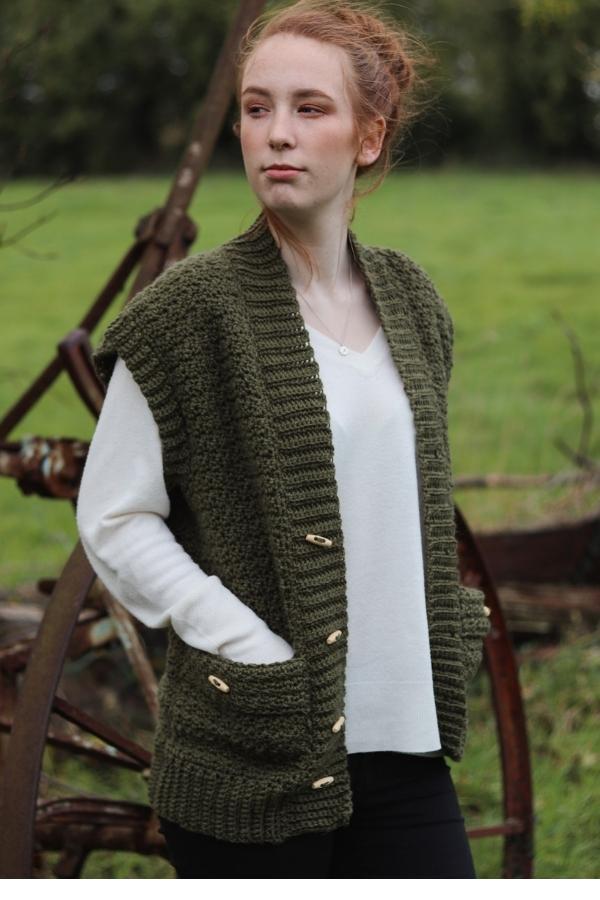
Learn to crochet this quick and easy crochet vest in a matter of days. Perfect for most seasons of the year, this fun little project is the perfect piece to have on your lap while watching tv during the cooler months ahead.
This free written pattern is accompanied with a step by step video tutorial if you are more of a visual learner. Please scroll down to view.
One of my most requested pieces to make every year has got to be a crochet vest and I can see why. The are the perfect piece for layering and with the added bonus of not having to crochet sleeves, you will finish your piece so much quicker. A plus in my books!
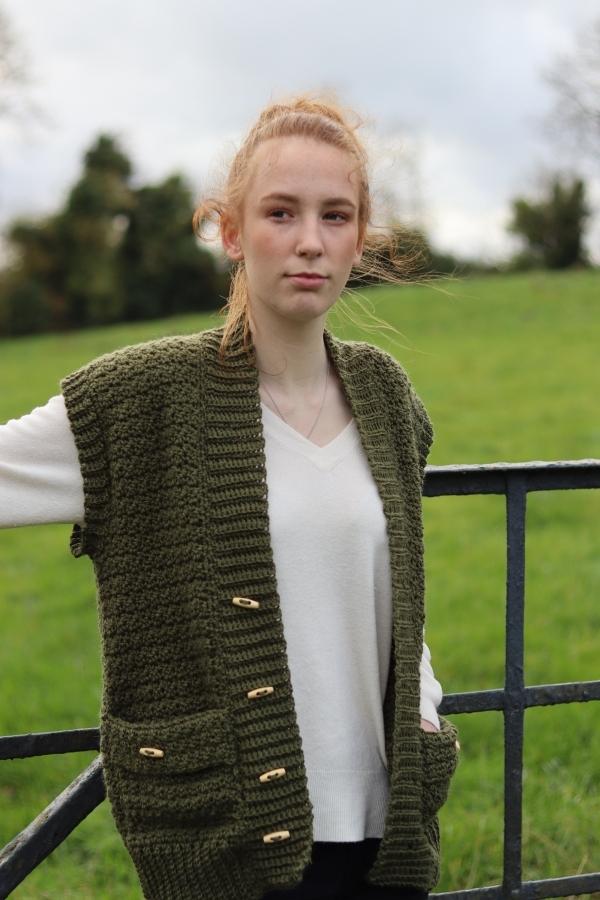
This crochet vest would be perfect layered over a sweater in the cooler months and just a plain tee and jeans during the warmer months. I just love the versatility of this piece.
CONSTRUCTION
This easy crochet vest is constructed using five separate pieces, the back panel, two identical front panels and two pockets. The back and two front panels are worked from the bottom up, beginning with the bottom ribbed hem. We will then crochet in stitch pattern along the long edge of the hem until we reach the armhole. After a few rows of decreasing we will continue in pattern until we reach the armhole depth according to your size. Once these three pieces are crocheted we will lay the front panels on top of the back panel and seam across shoulders and up along the side. Then we will do some ribbing for the collar/inner edge as well as some ribbing along the armholes. Finally we will crochet two pockets and stitch them to the bottom of the vest.
MATERIALS
Yarn – Lionbrand Touch of Alpaca – weight 4/aran/10 ply – 90% acrylic 10% alpaca – 189 m (207 yds) per 100 g ball
Approximately 4(5, 5, 6, 6, 6) balls
5 mm crochet hook
Notions – 4 stitch markers, scissors, tapestry needle, 6 buttons.
SIZING & MEASUREMENTS
S(M, L, XL, 2XL, 3XL)
Finished bust – 42(46, 50, 54, 58, 62)”
Length – 26(26.5, 27, 27.5, 28, 28.5
Armhole depth – 10(11, 11.5, 11.5. 12, 12)”
STITCHES & ABBREVIATIONS
ch – chain
sc – single crochet
dc – double crochet
scblo – single crochet back loop only
slst – slip stitch
rem – remaining
st(s) – stitch(es)
rep – repeat
GAUGE 12 sts x 11 rows = 4″
CROCHET EASY VEST PATTERN
BACK PANEL
Begin Bottom Hem
Ch 13
Row 1: sc in 2nd ch from hook and in every ch across, turn [12 sc]
Row 2: ch 1, scblo in each sc across, turn.
Rep row 2 until the end of row 63(69, 75, 81, 87, 93).
Now turn your work and begin working along the edge of the rows you just completed.
MAIN BODY
Row 1: ch 1 and sc into the ends of the rows you just completed [63(69, 75, 81, 87, 93) sc].
Row 2: ch 1, sc in same st, *dc in next st, sc in next, rep from * across. Turn.
Row 3: ch 3 (counts as first dc here and throughout), *sc in next st, dc in next st, rep from across, turn.
Rep rows 2-3 until the end of row 35(35, 35, 37, 37, 39).
Row 36(36, 36, 38, 38, 40): DO NOT ch 1, slst into next 5 sts, ch 1, sc in same st, dc in next, *sc in next, dc in next, rep from * across leaving last 4 sts unworked. Turn.
Row 37(37, 37, 39, 39, 41): Ch 1, sc2tog, dc in next, *sc in next, dc in next, rep from * across until 2 sts rem, sc2tog. Turn
Row 38(38, 38, 40, 40, 42): rep last row.
Row 39(39, 39, 41, 41, 43): ch 3, *sc in next st, dc in next, rep from * across. Turn.
Row 40(40, 40, 42, 42, 44): ch 1, sc in same st, *dc in next, sc in next, rep from * across. Turn
Rep last 2 rows until the end of row 62(64, 66, 68, 70, 72). Fasten off
FRONT PANELS (MAKE 2)
Begin Bottom Hem
Ch 13
Row 1: sc in 2nd ch from hook and in every ch across, turn [12 sc]
Row 2: ch 1, scblo in each sc across, turn.
Rep row 2 until the end of row 23(25, 29, 31, 35, 37).
Now turn your work and begin working along the edge of the rows you just completed.
MAIN BODY
Row 1: ch 1 and sc into the ends of the rows you just completed [23(25, 29, 31, 35, 37) sc].
Row 2: ch 1, sc in same st, *dc in next st, sc in next, rep from * across. Turn.
Row 3: ch 3 (counts as first dc here and throughout), *sc in next st, dc in next st, rep from across, turn.
Rep rows 2-3 until the end of row 35(35, 35, 37, 37, 39).
Row 36(36, 36, 38, 38, 40): DO NOT ch 1, slst into next 5 sts, ch 1, sc in same st, dc in next, *sc in next, dc in next, rep from * across. Turn.
Row 37(37, 37, 39, 39, 41): Ch 3, sc in next st, dc in next, rep from * across until 2 sts rem, sc2tog. Turn
Row 38(38, 38, 40, 40, 42): Ch 1, skip first st, sc in next st, *dc in next, sc in next, rep from * across, turn.
Row 39(39, 39, 41, 41, 43): ch 3, *sc in next st, dc in next, rep from * across. Turn.
Row 40(40, 40, 42, 42, 44): ch 1, sc in same st, *dc in next, sc in next, rep from * across. Turn
Rep last 2 rows until the end of row 62(64, 66, 68, 70, 72). Fasten off leaving a long tail.
ASSEMBLY
Lay the the two front panels on top of the back panel and using your tapestry needle and long tails, seam across shoulders and up along the sides making sure not to close armholes.
Next turn your piece right side out. Attach yarn to the bottom right corner and ch1, then sc all the way around the inner edge of the vest until you reach the other side.
Count 11 sc up from bottom and mark that st, count another 11 and mark that stitch, rep until you have 4 markers in total.
Next row: ch 13, sc in 2nd ch from hook, sc in each of the rem 11 chains, slst into next 2 sc, *turn, skip 2 slsts, scblo in next 12 sc, ch 1, turn, scblo in next 12 sc, slst into next 2 sc, rep from * until you reach first stitch marker.
**Next row: skip last 2 slsts you did, scblo in next 6 sc, ch 2, skip 1, scblo in next 5 sc, turn.
Next row: ch 1, sc across making sure to put 1 sc in ch 2 space. slst in next 2 sc.
Rep last 2 rows until you reach next st marker and continue from ** creating an additional 3 more buttonholes.
Once all buttonholes are created you will just continue in regular ribbing until you reach the other side. Fasten off and weave in your ends.
Sew buttons to corresponding buttonholes.
ARMHOLE RIBBING
Attach yarn to the underarm.
Row 1: ch 1, sc all the way around armhole, slst to first sc.
Row 2: ch 7, sc in 2nd ch from hook, sc in rem 5 chains, slst in next 2 slsts. Turn.
Row 3: skip 2 slsts you just made, scblo in next 6 sc, turn.
Row 4: ch 1, scblo in next 6 sc, slip st in next 2 sc.
Rep last 2 rows all the way around armhole.
Using tapestry needle stitch the two ends of the ribbing together to close. Rep this entire process for the other armhole.
POCKETS
Ch 20
Row 1: sc in 2nd ch from hook, *dc in next, sc in next, rep from * across. Turn.
Row 2: ch 3, *sc in next st, dc in next, rep from * across, turn.
Rep last 2 rows until the end of row 14.
Row 15: ch 1 and back loop slst in each st across. Turn.
Row 16: ch 1, sc in same st, *dc in next, sc in next, rep from * across. Turn.
Row 17: ch 3, *sc in next st, dc in next st, rep from * across. Turn.
Rep last 2 rows twice more. Fasten off leaving a long tail.
Flip the top of your pocket over and stitch to vest. I also added a button on each pocket for decorative purposes.
Stitch pockets to vest and you are now finished your vest.
Hi Carrie,
I couldn’t find a link for the accompanying video. Could you help me, please.
Hi Carrie!
Just when I was looking for a vest pattern-VOILA!!
Thank you so much- your patterns are always beautiful
Em
What yarn color did you make your best in? Thank you. I love it!
Is it possible to print a copy of free pattern without all the ads?
Thank you
Love the looks of the Easy Crochet Vest. I am wondering if you have a pattern of it without ads. I am willing to purchase it if you do.
Thanks,
Mary
I love the look of this vest! I’ve never been fond of the look of crochet sweaters and such, but this caught my eye. I don’t make things for myself either, but this one is mine!!
Can’t wait to get started on this. Thank you for the pattern and changing my point of view!
Carrie, I love all your designs. I started this cute vest but really got confused with the directions for the front panels, starting Row 36. Please clarify. It appears we only should sc2together for one side vs both sides.
Thanks for the clarification .
Agreed! It looks like the directions are written the same for the back and the two fronts. I think there should be decreasing on only one side?
Hi, on main body, you are doing sctog on both sides, however, your picture of the vest doesn’t have it. I did sctog and now I did the ribbing, and it looks weird. So which way should it be done? Thank you.
I agree. The samples only need decrease in one side. Lord of mistakes especially in front ribbing concerning chaining number and skip stitches. I am experienced enough to fix it myself
I’m about to start the ribbing. Can you clarify where the mistakes are as I’m not an experienced crocheted.
Could you use inch measurements instead of rows. Would be much easier than continually counting rows when working with a yarn that is hard to count rows.