
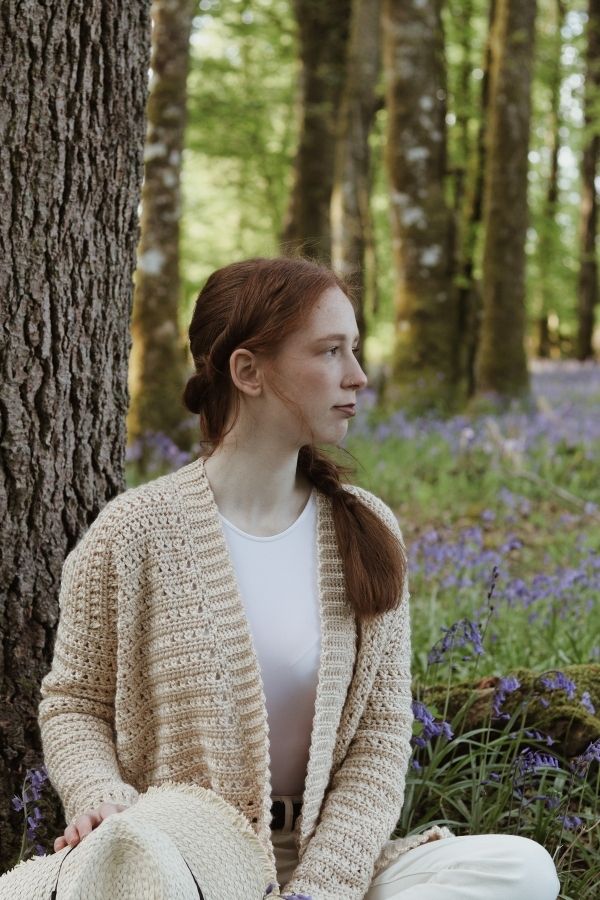
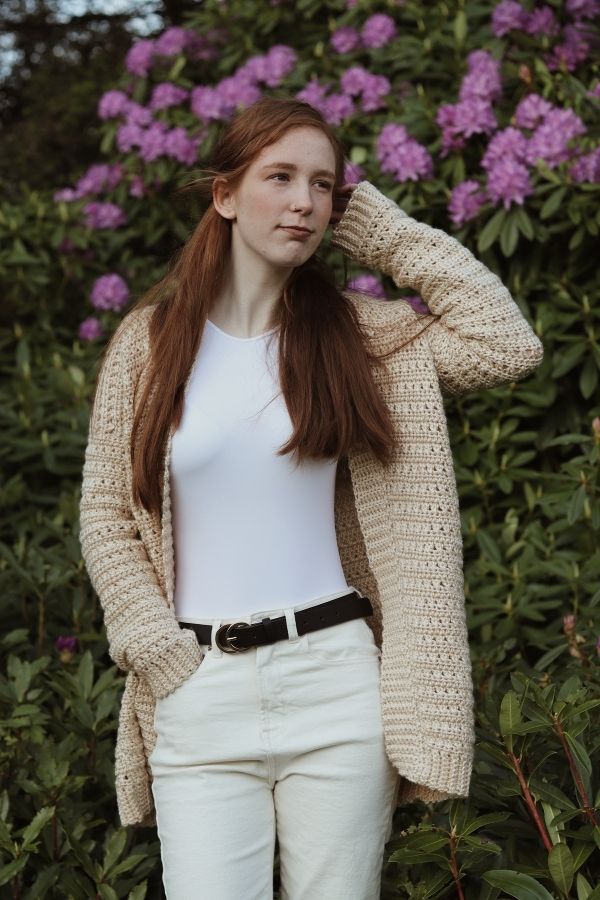
The Be Mine Cardigan is the ultimate easy oversized crochet cardigan. Designed with ample room for a slouchy look and beautiful texture throughout, this cardigan is the perfect layering piece for any season!

This post may contain affiliate links for which I make a small commission. It is no cost to you whatsoever but it does help me out
The Be Mine Cardigan is perfect for anyone new to crocheting garments as it contains easy, basic stitches and minimal shaping, making this crochet cardigan a perfect project while watching your favorite tv show!
It has been some time since I have designed an oversized cardigan so I thought I’d start the new season with my Be Mine Cardigan. With easy rows of crossed double crochet that give this piece a wonderful textured look and beautiful drape, I feel this cardigan with be a piece I wear throughout the year.
CONSTRUCTION
The Be Mine Cardigan is worked from the bottom up in five separate pieces: one back panel, two identical front panels and two sleeves. The body panels begin with the bottom hem, and the sleeves begin with the cuff. Once all pieces are seamed together you will finally crochet the collar ribbing directly into the cardigan.
MATERIALS
Yarn:
Lionbrand Heartland in colorway Acadia – worsted/aran/10 ply (100% acrylic)
251 yds (230 m) per 5-oz (142-g) skein
Yardage – 6(7, 7, 8) skeins or 1380(1600, 1750, 1880) yds
Hook – Size U.S. H/8 (5 mm) or size needed to obtain gauge.
Notions – Tapestry needle, several locking stitch markers
Gauge 4 x 4″ (10 x 10 cm) = 14 half double crochet and 9 rows
STITCHES & ABBREVIATIONS
Written in U.S. crochet terms
ch: chain
sc: single crochet
hdc: half double crochet
dc: double crochet
scBLO: single crochet back loop only
sl st(s): slip stitch(es)
rep: repeat
tch: turning chain
YOU CAN NOW PURCHASE THE AD FREE PATTERN HERE
BE MINE CARDIGAN PATTERN
BACK PANEL
Bottom Hem
Ch 9
Row 1: sc in 2nd ch from hook and in each ch across, turn [8 sc].
Row 2: Ch 1, scBLO in each sc across, turn.
Rep Row 2 until you have a total of 84(98, 112) rows completed.
Turn your work to begin working across the ends of the rows you just completed.
Body
Row 1: Ch 1, work 1 hdc into the ends of each row you just completed [84(98, 112) hdc]
Row 2: Ch 3 (counts as first dc), *skip next st, dc into next st, working in front of dc just worked dc in skipped st, rep from * across ending with a dc in last st, turn.
Row 3: Ch 1, hdc in each st across, turn.
Rep Rows 2-3 until the end of row 57. For a shorter or longer cardigan simply crochet less/more rows!
Fasten off and block if desired.
FRONT PANEL (MAKE 2)
Bottom hem
Ch 9
Row 1: sc in 2nd ch from hook and in each ch across, turn [8 sc]
Row 2: Ch 1, scBLO in each sc across, turn.
Rep Row 2 until you have a total of 32(40, 46) rows completed.
Turn your work to begin working across the ends of the rows you just completed.
Body
Row 1: Ch 1, work 1 hdc into the ends of each row you just completed, turn [32(40, 46) hdc]
Row 2: Ch 3 (counts as first dc), *skip next st, dc into next st, working in front of dc just worked dc in skipped st, rep from * across ending with a dc in last st, turn.
Row 3: Ch 1, hdc in each st across, turn.
Rep Rows 2-3 until the end of Row 57. Fasten off leaving a long tail for seaming across the shoulders.
SLEEVES
Cuff
Ch 9
Row 1: sc in 2nd ch from the hook and in each ch across, turn [8 sc]
Row 2: Ch 1, scBLO in each sc across, turn.
Rep Row 2 until you have a total of 32(32, 34) rows completed.
Turn your work to begin working across the ends of the rows you just completed.
Sleeve Body
SIZE S/M ONLY
Row 1: Ch 1, work 1 hdc into the ends of each row you just completed, turn [32 hdc]
Row 2: Ch 3 (counts as first dc), *skip next st, dc into next st, working in front of dc just worked dc in skipped st, rep from * across ending with a dc in last st, turn.
Row 3: Ch 1, 2hdc in first st, 1 hdc in each st across, placing 2hdc in last st, turn [34 hdc]
Rep Rows 2-3 until the end of row 21 [52 hdc]
Row 22: Ch 3, *skip next st, dc into next st, working in front of dc just worked dc in skipped st, rep from * across ending with a dc in last st, turn.
Row 23: Ch 1, hdc in each st across, turn.
Rep Rows 22-23 until the end of row 39. Fasten off leaving a long tail for seaming the sleeve to the body of the sweater.
SIZE L/XL ONLY
Row 1: Ch 1, work 1 hdc into the ends of each row you just completed, turn [32 hdc]
Row 2: Ch 3 (counts as first dc), *skip next st, dc into next st, working in front of dc just worked dc in skipped st, rep from * across ending with a dc in last st, turn.
Row 3: Ch 1, 2hdc in first st, 1 hdc in each st across, placing 2hdc in last st, turn [34 hdc]
Rep Rows 2-3 until the end of row 25 [56 hdc]
Row 26: Ch 3, *skip next st, dc into next st, working in front of dc just worked dc in skipped st, rep from * across ending with a dc in last st, turn.
Row 27: Ch 1, hdc in each st across, turn.
Rep Rows 26-27 until the end of row 39. Fasten off leaving a long tail for seaming the sleeve to the body of the sweater.
SIZE 2XL/3XL ONLY
Row 1: Ch 1, work 1 hdc into the ends of each row you just completed, turn [34 hdc]
Row 2: Ch 3 (counts as first dc), *skip next st, dc into next st, working in front of dc just worked dc in skipped st, rep from * across ending with a dc in last st, turn.
Row 3: Ch 1, 2hdc in first st, 1 hdc in each st across, placing 2hdc in last st, turn [36 hdc]
Rep Rows 2-3 until the end of row 27 [60 hdc]
Row 28: Ch 3, *skip next st, dc into next st, working in front of dc just worked dc in skipped st, rep from * across ending with a dc in last st, turn.
Row 29: Ch 1, hdc in each st across, turn.
Rep Rows 28-29 until the end of row 39. Fasten off leaving a long tail to seam the sleeve to the body of the sweater.
Assembly
Lay the front panels over the back panel. Use locking stitch markers to help line up the panels stitch-for-stitch along the shoulders and sides of the cardigan making sure to leave openings at the armholes for the sleeves. Use your tapestry needle and long tails to seam pieces together.
Fold your sleeve lengthwise and using a tapestry needle and long tail seam from bottom cuff edge to top of sleeve.
Lay the sleeves against the armhole with the seam side facing downward. Seam to armhole.
Turn your cardigan the right side out.
COLLAR
Attach yarn to one of the bottom inside corners with a sl st to begin the collar.
Set-Up Row: Ch 1, sc evenly around the entire collar, up around the neckline and down the opposite side. Once you have reached the opposite bottom corner, turn your work to begin working back on this Set-Up Row.
Ribbing
Ch 9
Row 1: sc in 2nd ch from hook and in each ch across, sl st into next 2 sts from Set-Up Row to join row to body, turn [8 sc]
Row 2: [No tch] Skip 2 sl sts just worked, scBLO in each st, turn [8 scBLO]
Row 3: [No tch] ScBLO in each st to end of row, sl st into next 2 sts from Set-Up Row, turn.
Rep Rows 2-3 until you have worked your way around the entire collar and reached the other corner.
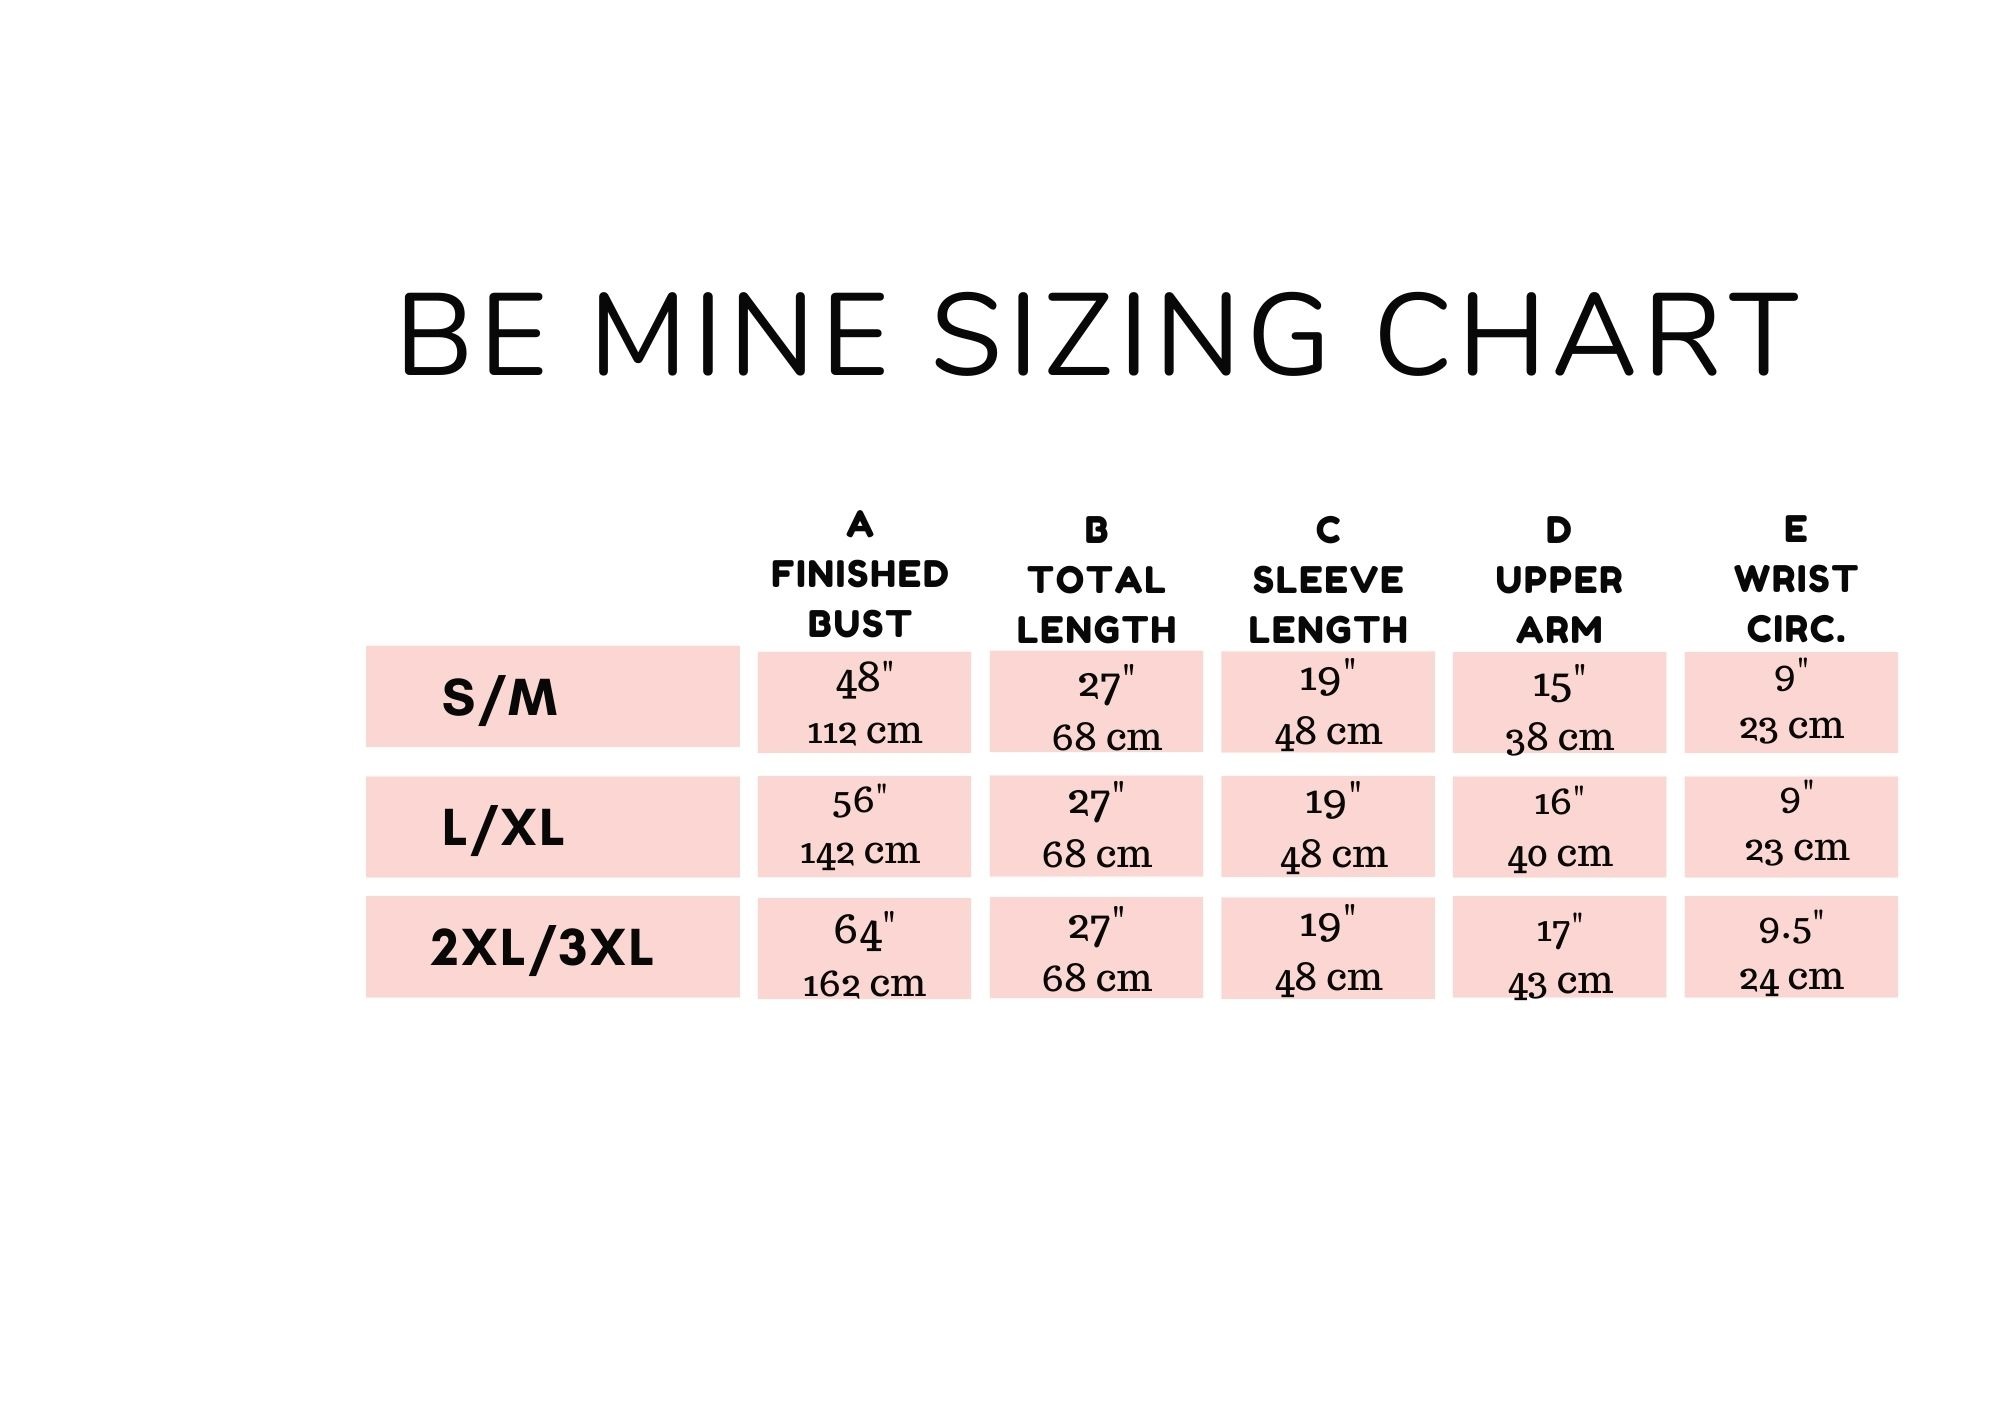
Fasten off and weave in any remaining ends. Block your sweater if needed to the dimensions listed in the chart above.
Gorgeous Cardigan! I look forward to using your fabulous pattern to create one!
Thank You So Much for sharing your inspiration and creativity!
Kind Regards from Texas!
This is fab. How do I buy a pdf printable version please
Very pretty and easy directions.. Thank you Carrie for sharing your patterns. You do such beautiful patterns.
I love your patterns. One problem: in order to print the instructions I need to cut and paste the little sections between ads. Very difficult and time consuming. PLEASE give us a way to just print them as one document! I’m sure many of your fans will be thrilled!
Thank you I love your patterns so easy to understand and make this will be my third
Love the pattern
How can I print the pattern
Hi there! I love this cardigan! How do I print the pattern?
Hi there-
How do I print this pattern?
Hello ! An over beautiful one ! It is possible to know what size is the model wearing please ?
Lovely patterns thanks for sharing.
Hi I was wondering if you could help as you’ve made her other patterns. I’m stuck on this part.
Row 2: Ch 3 (counts as first dc), *skip next st, dc into next st, working in front of dc just worked dc in skipped st, rep from * across ending with a dc in last st, turn.
Do I technically need to skip 2 stitches at the beginning because the first stitch would act as the chain 3?
If I don’t skip 2 then I’m left with 2 stitches at the end not one. If I’m left with 2 stitches then I need to finish on a crossed dc but the pattern says I need to finish on a dc meaning I should only be left with 1 stitch.
Yeah, I have the same problem. I have crocheted a significant chunk of the back piece ending the row on a crossed pair and it’s now leaning significantly to one side. I’m not really sure what is happening.
Hi, wondering if you ever figured this out?
Hi Carrie:
Hope all is well. If you want to make larger than 3AM how would you increase?
I
Thank you
Hi Carrie:
Hope all is well. If you want to make larger than 3AM how would you increase?
Thank you
Hi Carrie:
Hope all is well. If you want to make larger than 3AM how would you increase?
Thank you
Can you include a printer friendly link
Did you ever figure this out? I can not make this work either.
Hi Carrie,
Beautiful cardigan. I just have one question before I purchase the yarn. The materials section shows yarn for 4 sizes but the pattern is written for 3 sizes. I will be making L/XL. Do I need 7 or 8 skeins?
Thank you.
I had the same problem so I adjust the pattern a little bit. On row two I skip the first two stitches since the ch 3 act as the first stich. That way you end your row with a dc. Then, I start row three with two ch instead of one and I skip the first st. The last hdc should be on your ch 3. Hope this could help!
I’ve found the same. Unfortunately I’ve worked the whole back panel before discovering this 🥴 I’m hoping it’ll straighten up with blocking. Also, the photo appears to show two rows of hdc but the pattern says repeat row 2 & 3
Hey Danielle,
I’m a year late to this, but I’ve just started working on this pattern and I’m facing the same issue. I think I found the work around. So, when you crochet Row 2 and the chain 3 counts as a stitch, that’ll mean you’ll have 41 stitches at the end if you crochet into each stitch as well. Each time you repeat the rows, you’ll add a stitch on the one side, which is why the project turns out lopsided. To counter this, I’ve just been skipping the second-to-last stitch on the Row 2 each time and placing my 40th double crochet into the last stitch. You could also use Veronique’s technique of skipping an extra stitch at the start as well. Just make sure that when you do Row 3, you are placing your 40th half double crochet stitch into the top of the chain 3 from Row 2 to pop it out and create the straight edge on that side. I’ve only just started doing this on the 2nd front panel, so my back piece and 1st front panel are so lopsided, but I don’t have the patience to go back and correct it lol. Hopefully your project turned out!
I’ve been doing this for several weeks now, constantly reworking because it kept being lopsided. I’ve decided to give up on restarting, but I’ll follow your advice. You have no idea how much of a timesaver you are. Thank you!!!
I’m a bit confused on the instructions for the back panel.
On Row 2 I chain 3 skip what would be the 4th stitch from hook and DC into the 5th stitch? Then repeat down the row?
If continuing to do this for 57 rows (as stated in the next set of instructions that’s not pictured) wouldn’t it start becoming a triangle shape? That doesn’t seem right to me but wanted to ask before I proceed