
Learn to crochet this quick and easy oversized Fómhar Cardigan. Designed with an abundance of texture with deep pockets, this crochet cardigan is perfect for Fall.
**This post contains affiliated links. It is no cost to you but it does help me out a great deal**

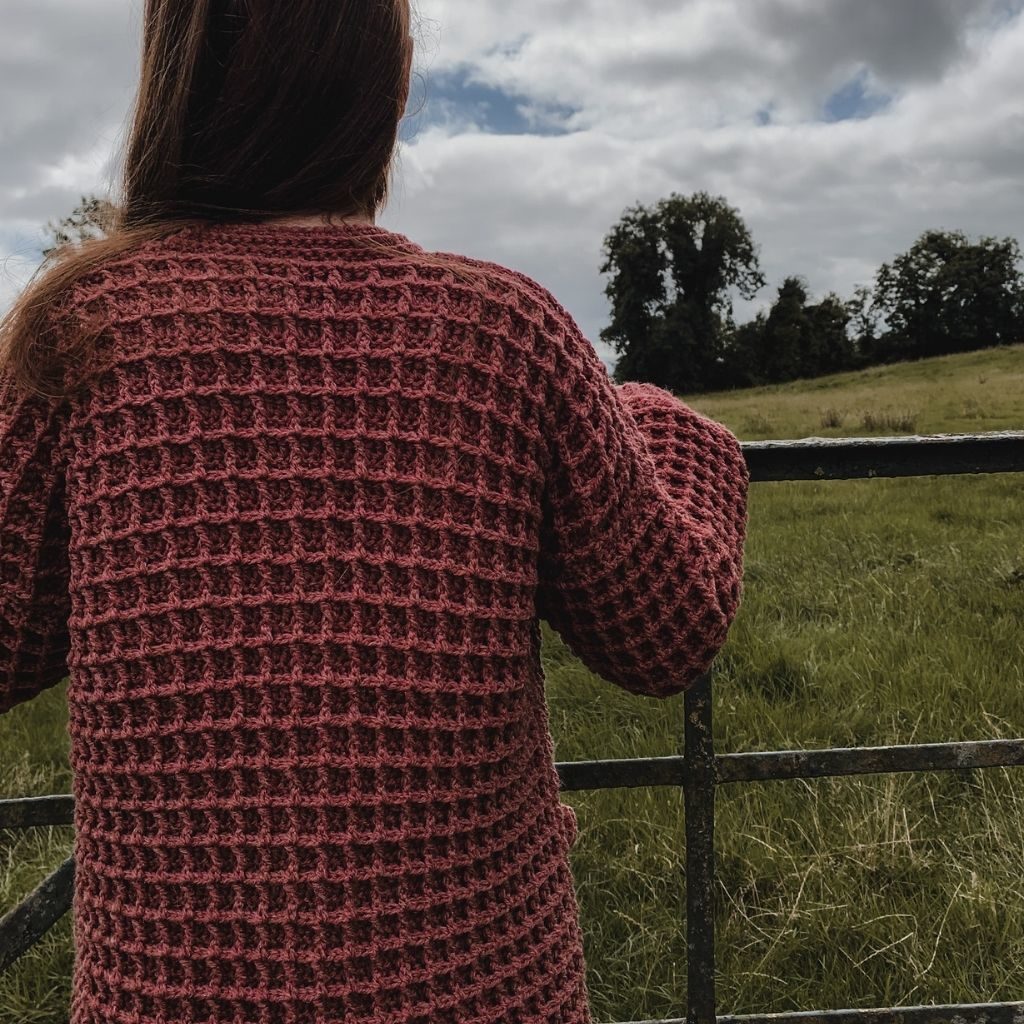
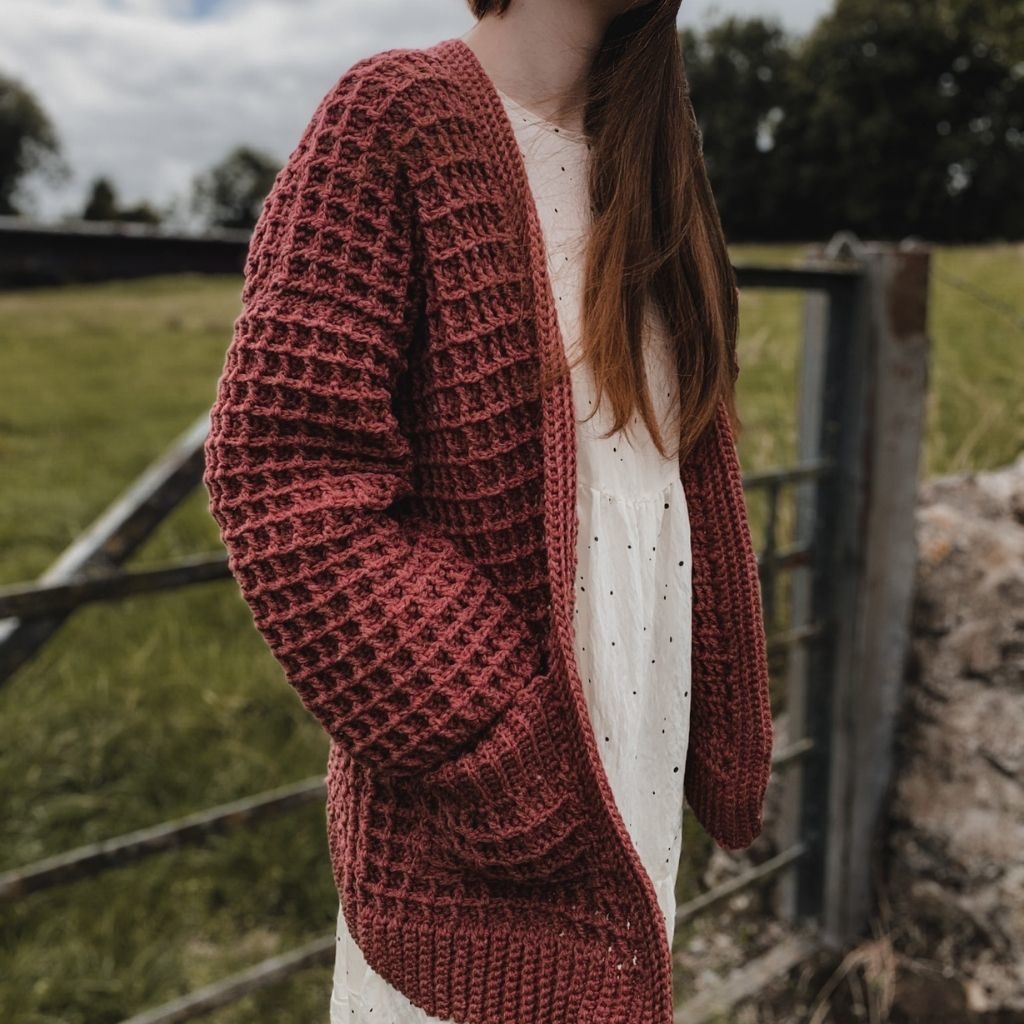
The word Fómhar [fo-ar] literally means autumn in the Irish language, a word I thought fitting for this cardigan. It is an oversized fit with loose slouchy sleeves, perfect for chilly fall or winter days ahead. Perfect paired with jeans, leggings or dresses, it really is the ideal cardigan to have in your wardrobe.
This easy crochet cardigan also features deep pockets which in my opinion is a must for any cardigan! Worked in primarily double crochets and front post double crochets, the Fómhar Cardigan will suit any level of crochet enthusiast.
The body of the cardigan is worked in three separate panels, the back and two identical front panels. Each of these panels are worked from the bottom up starting with the ribbed band. Likewise the sleeves are worked from the bottom up beginning with the ribbed cuffs. All pieces are then seamed together, followed by crocheting a few rows of back loop single crochet along the inner edge of the cardigan. Finally we crochet the pockets, which are made by crocheting the ribbed top section first then along the long edge of the ribbing we do a few rows of the waffle stitch. These pockets are then sewn onto the body of the cardigan.
YARN
For this project I used So Crafty Aran which I actually purchased in Aldi of all places. I’ve used their yarn for a few years now and I must say I really like it. You get a massive 800m ball for literally five euros! With the cooler months quickly approaching I’m sure Aldi will be fully stocked with their yarns soon enough.
If you can’t find some of this Aldi yarn I would suggest something like Hayfield Bonus Aran with Wool or Stylecraft Special Aran with Wool. Both of these yarns are also a firm favourite of mine and they come in so many beautiful shades.
MATERIALS
Yarn – So Crafty Aran or Hayfield Aran with Wool or Stylecraft Special Aran with Wool
Aran/ Worsted/Medium/weight 4/10 ply- 800m/400g per ball.
2(3,3,3,4,4) balls
5mm crochet hook
Stitch marker
Measuring tape
Darning needle
STITCHES & ABBREVIATIONS
Ch = chain
Sc = single crochet
Dc = double crochet
FPDC = front post double crochet
BLO = back loop only
St(s) = stitch(es)
Rep = repeat
GAUGE 5 waffle squares across by 5 waffle squares high = 4″
MEASUREMENTS & SIZING
The sizing guide follows S(M, L, XL, 2XL, 3XL
Width: 25( 27, 29, 31, 33, 35) inches.
Bust : 48(53, 57, 61, 65, 70) inches
Length: 26( 26, 27, 27, 28, 28) inches
FÓMHAR POCKET CARDIGAN PATTERN
BACK PANEL
Ch 11
ROW 1: sc in 2nd ch from hook, sc in each ch to end. Turn.
ROW 2: ch 1 , sc in BLO in each st across. Turn.
Rep row 2 until you have 87( 93, 102, 108, 114, 123) rows in total completed.
Now working along the long edge of the ribbing:
NEXT ROW: Ch 3 (counts as first dc) make a further 86( 92, 101, 107, 113, 122) dc across. 87(93,102,108,114,123).
NEXT ROW: Ch 2 (counts as first dc here and throughout), FPDC in next st, dc in each of next 2 sts, *FPDC in next st, dc in next 2 sts, rep from * across ending with FPDC in 2nd last st, dc on top of ch 3. Turn.
NEXT ROW: Ch 2, *dc in next st, FPDC in each of next 2 sts, rep from * across ending with a dc in 2nd last st, dc on top of ch 2. Turn.
Rep last 2 rows until back panel measures 26( 26, 27, 27, 28, 28) inches long. Fasten off.
FRONT PANELS (MAKE 2):
Ch 11
ROW 1: sc in 2nd ch from hook, sc in each ch across. Turn.
ROW 2: ch 1, sc in BLO in each st across. Turn.
Rep row 2 until you have 36(39, 45, 48, 51, 57) rows in total completed.
Now working along the long edge of the ribbing:
NEXT ROW: Ch 3 (counts as first dc) make a further 35(38, 44, 47, 50, 56) dc across. Turn.
NEXT ROW: Ch 2 (counts as first dc here and throughout), FPDC in next st, dc in each of next 2 sts, *FPDC in next st, dc in next 2 sts, rep from * across ending with FPDC in 2nd last st, dc on top of ch 3. Turn.
NEXT ROW: Ch 2, *dc in next st, FPDC in each of next 2 sts, rep from * across ending with a dc in 2nd last st, dc on top of ch 2. Turn.
Rep last 2 rows until front panel measures 26( 26, 27, 27, 28, 28) inches long. Fasten off leaving a long tail.
SLEEVES:
Ch 9
ROW 1: sc in 2nd ch from hook, sc in each ch across. Turn.
ROW 2: ch 1, sc in BLO in each st across. Turn.
Rep row 2 until you have a total of 30 rows for Small and Medium, 33 for Large and XL, 36 for 2XL and 3XL.
Now working along the long edge of the ribbing:
NEXT ROW: CH 3 (counts as first dc) and make a further 59 dc for Small and Medium, 65 for Large and XL and 71 for 2XL and 3XL. I find it easier to fit 2 dc at the end of each sc row. Turn. You will see your work curving but don’t worry it will sort itself out after a few rows!
NEXT ROW: Ch 2, *FPDC in next st, dc in each of next 2 sts, rep from * across ending row with FPDC in 2nd last st and then dc on top of ch 3. Turn.
NEXT ROW: Ch 2, *dc in next st, FPDC in each of next 2 sts, rep from * across ending row with dc in 2nd last st and then dc on top of ch 2. Turn.
Rep last 2 rows until sleeve measures 18 inches long. Fasten off leaving long tail.
ASSEMBY:
Lay your back panel on a flat surface with the right side facing up. Next lay the two front panels wrong side up on top of the back panel. With your yarn needle and tail ends seam the top of front panels to back panel.
Next lay the entire piece out flat with the wrong side facing up. Take a sleeve and mark the middle st with a stitch marker. Now line that stitch marker up with the shoulder seam and connect. With yarn needle and long tail seam sleeve to body of cardigan. Repeat for the other sleeve.
Fold cardigan over and seam along the under edge of sleeve and down along the side. Rep on other side.
Turn the cardigan right side out. Attach yarn to bottom right inner corner and sc all the way around the inner part of cardigan until you reach the other side. When you reach the other side ch 1 the sc BLO all the way around. Do a further 5(6, 7, 8, 9, 9) rows of sc BLO. Fasten off.
Weave in all ends.
POCKETS:
Ch 11
ROW 1: sc in 2nd ch from hook, sc in each ch across. Turn.
ROW 2: ch 1, sc in BLO in each st across. Turn.
Rep row 2 until you have a total of 24 rows completed.
Now working along the long edge of the ribbing:
NEXT ROW: ch 3 (counts as first dc) and make a further 23 dc across. Turn.
NEXT ROW: ch 2, *FPDC in next st, dc in each of next 2 sts, rep from * across ending the row with a FPDC in 2nd last st and then dc on top of ch 3. Turn.
NEXT ROW: ch 2, * dc in next st, FPDC in each of next 2 sts, rep from * across ending with a dc in 2nd last st, and then dc on top of ch 2. Turn.
Rep last 2 rows a further 6 more times. Fasten off leaving a long tail.
Now mark where you want to place your pockets on the cardigan and with a yarn needle and long tail sew the pockets to the cardigan.
You are now finished you Fómhar Cardigan!
um excuse me but I cannot believe that you are sharing these patterns for free! unbelievable generosity sharing your talent with us like this! I struggle to find modern, beautiful crochet patterns and to find so many in one place FOR FREE!? well it’s a dream come true. Thank you thank you thank you!
Thanks for sharing ! Love all your projects!
I am more than halfway through this pattern (my first garment!) and I adore it! Pattern plus video makes it so easy to understand. Thank you so so much for sharing:)
Thanks so much for sharing! You are truly talented! This (and all your work) is so beautiful! It has been so much fun working this project. I’m excited and inspired by your works. Thank you!
Just wanted to thank you for the beautiful patterns! This is the third cardigan I’ve done following your blog, and I couldn’t believe how quickly it worked up! Thank you for sharing with us! This one, plus one of the granine cardigans will be given for gifts for Christmas!
Hi! Beautiful pattern. I was wondering, do you know what the dimensions the panels should be? I was having trouble obtaining gauge and the ribbing for the back panel (small) came out to 18″. I know ribbing tends to be snugger than the test of the garment, but I’m wondering whether the back is supposed to be the full 25″ across and if I should frog and switch hook sizes before going any further. Thank you!
I just finished making this sweater and I absolutely love it. The this is my second pattern I followed from your designs and they are wonderful. Easy to follow and just beautiful work.
Thank you for sharing!
I would like to thank you for sharing this ive made it and love it ,video and instructions are made so easy to understand .I can’t wait to make something else from your collection.
All your stuff is so pretty.
Would love the option to buy a PDF version of patterns to have on my computer and to help support you.
Thank you!
I had just the same question and same dimensions as you for a small. How did it turn out? I’m thinking I will make the large size to be safe.