
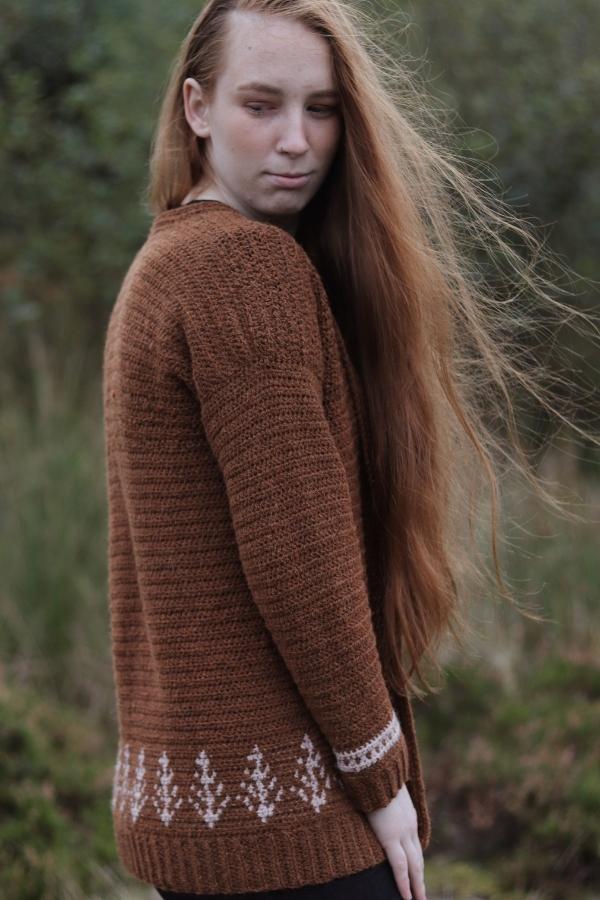
I designed this cardigan many months ago during the height of summer but was holding off sharing it until fall had arrived. Now we are well into October and the days are getting cooler and shorter I had to release it now. The Elm Cardigan is the perfect piece for anyone wishing to dip their toes into the world of crochet colorwork.
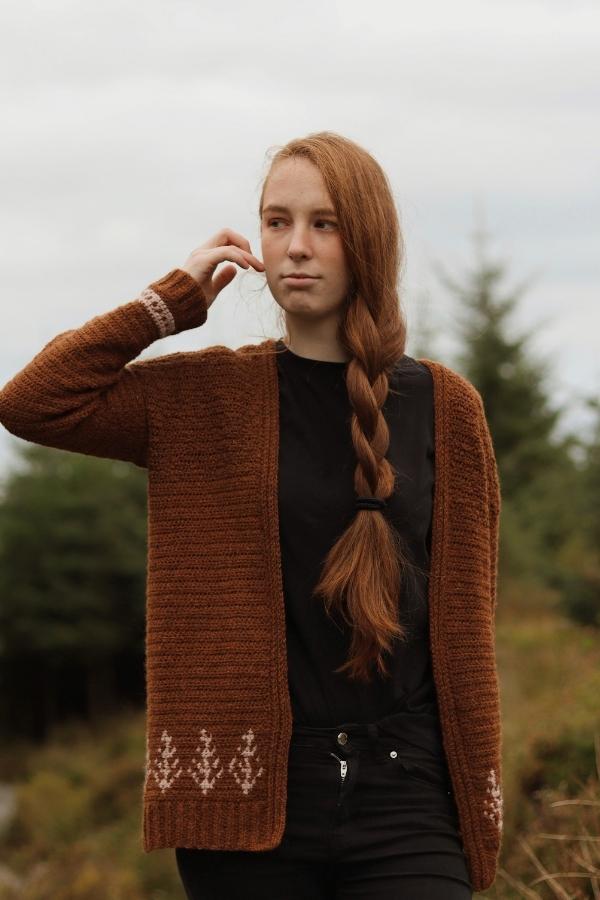
Now that the seasons are changing I’m seeing more and more designs with fairisle, but mostly in the knitting world. It’s not really something you see much of in the crochet community except maybe in cushions or sometimes hat, but not much when it comes to sweaters and cardigans. I’ve always wanted to do some colorwork in a sweater but I didn’t want it to be too complicated. I wanted something very simple and the Elm Cardigan is what I came up with.
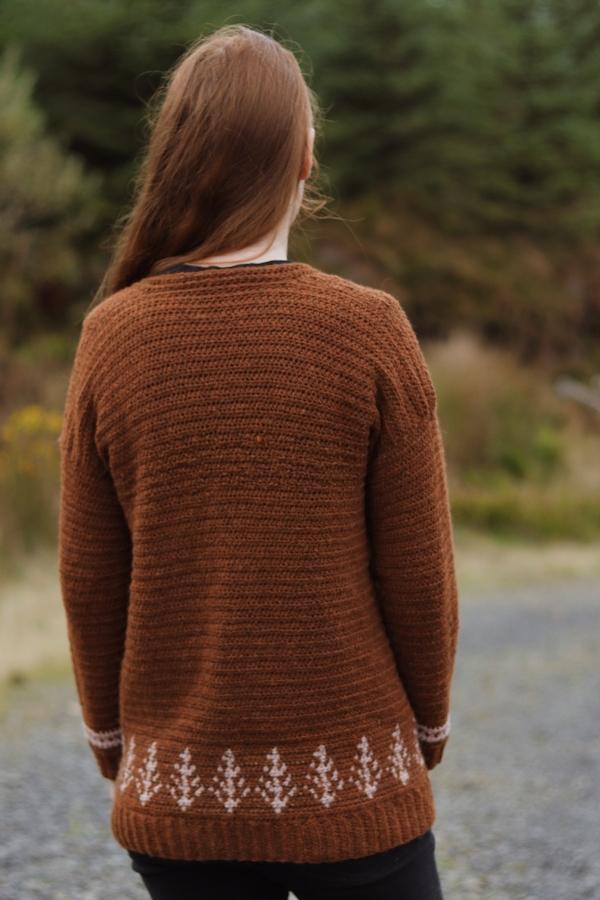
I made this cardigan pretty easy for beginners. There’s only about 2-3 inches of colorwork on the bottom hem of the cardigan and I just used one contrast color. I thought this would be an easy way for anyone to begin their new crochet colorwork journey.
CONSTRUCTION
The Elm Cardigan is crocheted in three panels – one body panel and two sleeves, and uses only one basic stitch, the half double crochet.
There is very little seaming involved with the making of this cardigan. The entire back and front panels are worked entirely in one piece beginning at the bottom ribbed hem and working our way up. Both sleeves are worked from the cuff up and then seamed to the armholes. Finally we will crochet some rows of half double crochet for the inner edge of the cardigan.
YARN
The Elm Cardigan uses Drops Sky, a weight 3/Dk chainette yarn made with a mix of baby alpaca, wool and polyamide. This yarn is super soft to the touch and in no way itchy, making it perfect for creating lots of garments with. The range of colors are absolutely stunning but I chose Hazelnut as the main color and Dusty Pink as the contrast. I think both of these colors are a dream made in heaven and perfect for fall/winter.
Of course you can choose any yarn of your choice but make sure it is a weight 3 or dk yarn and always check your gauge.
MATERIALS
Yarn – Drops Sky – weight 3/dk/light/8 ply – 190 m per 50 g ball –
Approximately 8(8, 9, 9, 9, 10) balls in main color (Hazelnut) and 1 ball (for all sizes) in contrast color (Dusty Pink).
Hook – 4 mm or size needed to obtain gauge
Notions – Tapestry needle for seaming, scissors
STITCHES & ABBREVIATIONS
Ch = chain
Hdc = half double crochet
Hdcblo = half double crochet back loop only
st(s) = stitch(es)
rep = repeat
MC = main color
CC = contrast color
RS = right side
WS = wrong side
SIZING & MEASUREMENTS
S(M, L, XL, 2XL, 3XL)
Finished bust 41(44, 48, 53, 56.5, 61)”.
Choose the size nearest to your bust measurements. For a slouchier cardigan go up a size.
Length: 25(26, 27, 28, 29, 30)”
GAUGE – 4 x 4″ (10 x 10cm) = 18 hdc x 15 rows
IMPORTANT NOTE: When working the colorwork section of the cardigan always carry unworked yarn on the wrong side of work and at the same time crochet over this strand of yarn to hide.
CROCHET ELM CARDIGAN PATTERN
BODY
Bottom hem
Ch 10
Row 1: hdc in 2nd ch from hook and in each ch across, turn. [9 hdc]
Row 2: Ch 1, hdcblo in each hdc across, turn.
Rep row 2 until you have a total of 106(120, 134, 146, 160, 166) rows completed.
Turn your work and start working along the ends of the rows you just completed.
Main body
Row 1: (RS) Ch 1, work 160(180, 200, 220, 240, 240) hdc into the ends of the rows you just completed, turn. I like to crochet 3 hdc into every 2 rows of the hem.
Row 2: (WS) Ch 1, hdc in each st across, turn
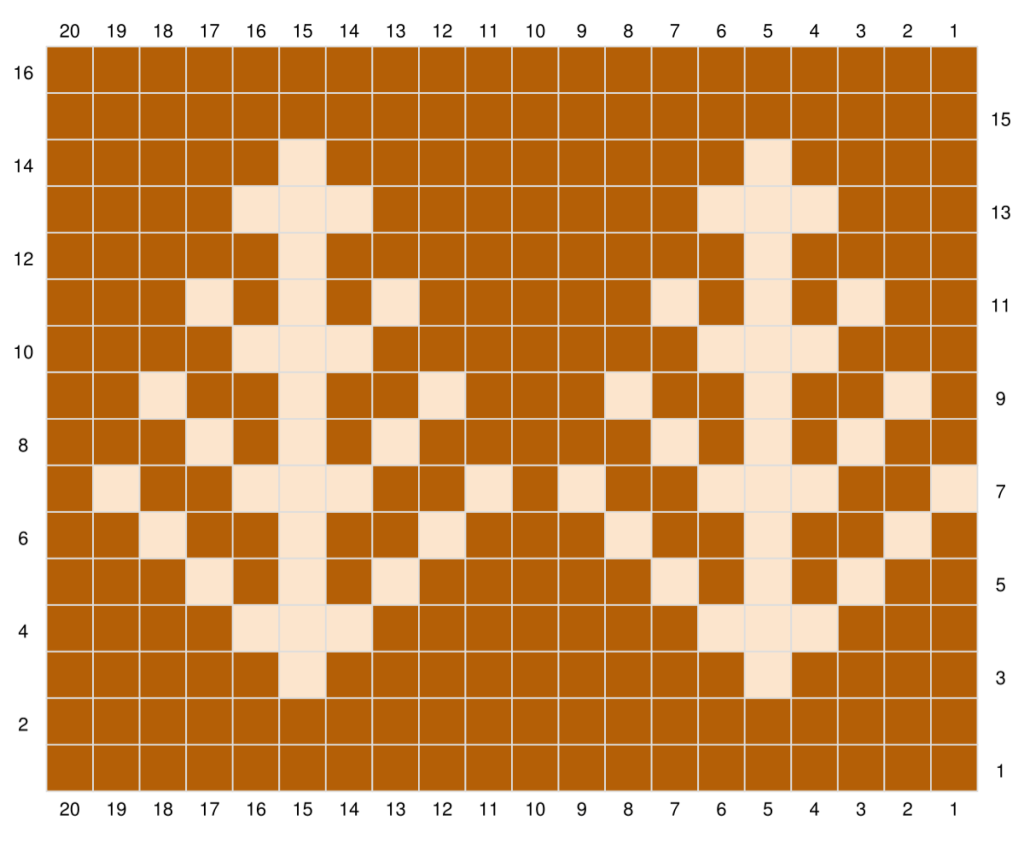
Row 3 – 14: follow chart from row 3-14 or read below.
Row 3: Using MC, ch 1, hdc 4, switch to CC and hdc 1, *switch to MC and hdc 9, switch to CC and hdc 1, rep from * across, ending switch to MC and hdc 5, rep from * across, turn.
Row 4: Using MC, ch 1, hdc 4, switch to CC, hdc 3, *switch to MC, hdc 7, switch to CC, hdc 3, rep from * across ending with a switch to MC, hdc 3, turn.
Row 5: Using MC, ch 1, hdc 2, switch to CC, hdc 1, switch to MC, hdc 1, switch to CC, hdc 1, switch to MC, hdc 1, switch to CC, hdc 1, *switch to MC, hdc 5, switch to CC, hdc 1, switch to MC, hdc 1, switch to CC, hdc 1, switch to MC, hdc 1, switch to CC, hdc 1, rep from * across ending with switch to MC, hdc 3, turn.
Row 6: Using MC, ch 1, hdc 2, switch to CC, hdc 1, switch to MC, hdc 2, switch to CC, hdc 1, switch to MC, hdc 2, switch to CC, hdc 1, *switch to MC, hdc 3, switch to CC, hdc 1, switch to MC, hdc 2, switch to CC, hdc 1, switch to MC, hdc 2, switch to CC, hdc 1, rep from * across, ending row with a switch to MC and hdc 1, turn.
Row 7: Using CC, ch 1, hdc 1, switch to MC, hdc 2, switch to CC, hdc 3, switch to MC, hdc 2, switch to CC, hdc 1, switch to MC, hdc 1, *switch to CC, hdc 1,switch to MC, hdc 2, switch to CC, hdc 3, switch to MC, hdc 2, switch to CC, hdc 1, switch to MC, hdc 1, rep from * across, turn.
Row 8: Using MC, ch 1, hdc 3, switch to CC, hdc 1, switch to MC, hdc 1, switch to CC, hdc 1, switch to MC, hdc 1, switch to CC, hdc 1, *switch to MC, hdc 5, switch to CC, hdc 1, switch to MC, hdc 1, switch to CC, hdc 1, switch to MC, hdc 1, switch to CC, hdc 1, rep from * across ending with MC, hdc 2, turn.
Row 9: Using MC, ch 1, hdc 1, switch to CC, hdc 1, switch to Mc, hdc 2, switch to CC, hdc 1, switch to MC, hdc 2, switch to CC, hdc 1, *switch to MC, hdc 3, switch to CC, hdc 1, switch to Mc, hdc 2, switch to CC, hdc 1, switch to MC, hdc 2, switch to CC, hdc 1, rep from * across, ending with MC, hdc 2, turn.
Row 10: Using Mc, ch 1, hdc 4, switch to CC, hdc 3, *switch to MC, hdc 7, switch to CC, hdc 3, rep from * across, ending with a switch to MC, hdc 3, turn.
Row 11: Using Mc, ch 1, hdc 2, switch to CC, hdc 1, switch to MC, hdc 1, switch to CC, hdc 1, switch to MC, hdc 1, switch to CC, hdc 1, *switch to MC, hdc 5, switch to CC, hdc 1, switch to MC, hdc 1, switch to CC, hdc 1, switch to MC, hdc 1, switch to CC, hdc 1, rep from * across, ending with a switch to MC, hdc 3, turn.
Row 12: Using MC, ch 1, hdc 5, switch to CC, hdc 1, *switch to MC, hdc 9, switch to CC, hdc 1, rep from * across ending with a switch to MC, hdc 4, turn.
Row 13: Using MC, ch 1, hdc 3, switch to CC, hdc 3, *switch to MC, hdc 7, switch to CC, hdc 3, rep from * across ending with a switch to MC, hdc 4, turn.
Row 14: Using MC, ch 1, hdc 5, switch to CC, hdc 1, *switch to MC, hdc 9, switch to CC, hdc 1, rep from * across ending with a switch to MC, hdc 4, turn. Cut CC off leaving long tail to weave in.
Row 15: Continuing on using MC, ch 1 and hdc across, turn.
Rep row 15 until the end of row 58(60, 62, 64, 66, 68). If you want more length add more rows here.
Row 59(61, 63, 65, 67, 69): Ch 1, hdc in next 36(40, 46, 50, 54, 58) sts, turn.
Row 60(62, 64, 66, 68, 70): rep previous row until the end of row 86(90, 94, 98, 102, 106).
Fasten off leaving a long tail.
Flip your cardigan to the right side and count 36(40, 46, 50, 54, 58) sts in from the edge and attach yarn to that st.
Row 1: Ch 1, hdc in same st, hdc in next 35(39, 45, 49, 53, 57) sts, turn.
Row 2: Ch 1, hdc across, turn.
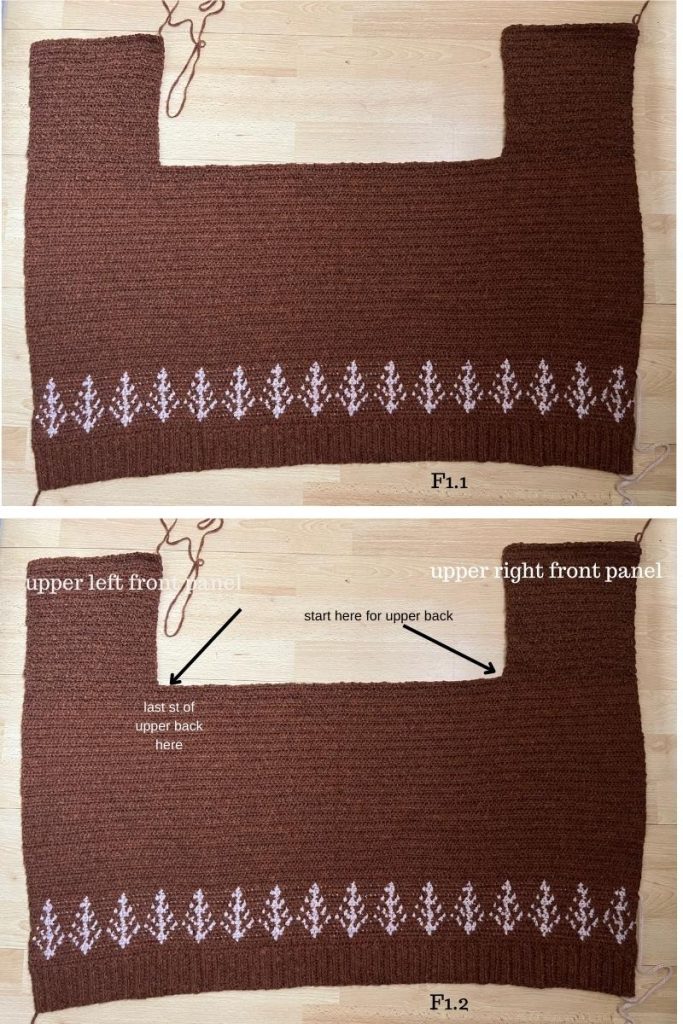
Rep row 2 until the end of row 28(30, 32, 34, 36, 38). Fasten off leaving long tail. (see F1.1 below to see what your work should look like now)
Upper Back
With right side facing attach yarn to next available stitch beside right front panel. (see F1.2 below)
Row 1: Ch 1, hdc in each st across, turn.
Rep row 1 until the end of row 28(30, 32, 34, 36, 38). Fasten off.
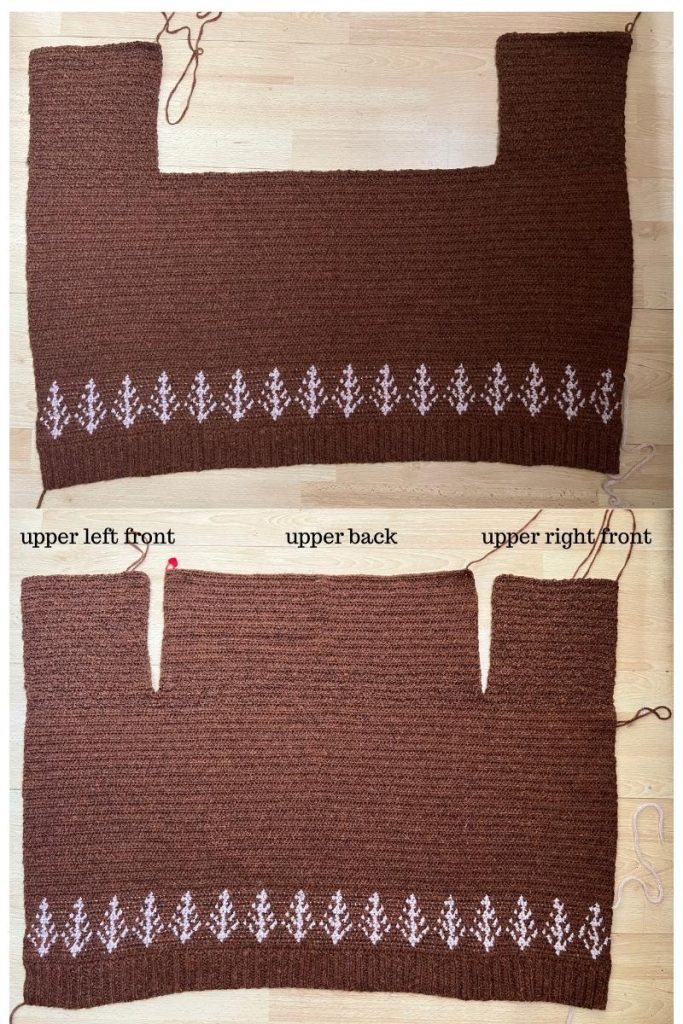
SLEEVES (Make 2):
Cuff
Using MC, Ch 10
Row 1: hdc in 2nd ch from hook and in each ch across, turn. [9 hdc]
Row 2: Ch 1, hdcblo in each hdc across, turn.
Rep row 2 until the end of row 26(26, 29, 29, 29, 30)
Turn your work to begin working along the ends of the rows you just completed.
Sleeve Body
Row 1: Ch 1, work 40(40, 44, 44, 44, 46) hdc across, turn. Attach CC.
Follow chart or read below
Row 2: Using CC, ch 1, hdc in each st across, turn.
Row 3: Using MC, ch 1, hdc first st, switch to CC, hdc 1, *switch to MC, hdc 1, switch to CC, hdc 1, rep from * across, turn.
Row 4: Using CC, ch 1, hdc in each st across, turn. Cut CC off.
Row 5: Using MC from now on, ch 1, 2hdc in first st, hdc in every st across until 1 st rem, 2hdc in last st, turn. [42(42, 42, 46, 46, 46, 48)] hdc.
Row 6-7: Ch 1, hdc in each st across, turn.
Row 8: Ch 1, 2hdc in first st, hdc in each st across until 1 st rem, 2hdc in last st, turn. [44(44, 44, 48, 48, 50)] hdc.
Rep rows 6-8 until you have 60(66, 70, 74, 78, 84) hdc.
Next row: Ch 1, hdc in each st across, turn.
Rep last row until you have 60(60, 60, 60, 64, 64) rows in total of the sleeve body completed. Fasten off leaving long tail.
ASSEMBLY
Fold the front panels inwards and with a yarn needle and long tails seam across tops of shoulders making sure you are seaming on the wrong side.
Fold your sleeves lengthwise and seam closed along the sides making sure you are seaming on the wrong side.
Next seam sleeves to armhole. You may have to stretch sleeve slightly to fit armhole but this is perfectly normal.
Turn cardigan right side out.
INNER COLLAR
Attach yarn to bottom corner and ch 1, hdc all the way around inner edge of cardigan until you reach other side, turn.
Next row: Ch 1, hdcblo in each st around, turn. Rep this row until the inner collar measures approximately 2″ wide.
Fasten off and weave in all your ends.
Beautiful! Can’t wait to try it. Just need to pick out yarn and decide on color.
WOW, I love this & it will be my after-Christmas project. Thank you so much for this pattern.
LOVE this cardigan! Will there be a tutorial for this? I have never made anything wearable, so thought I would ask. Thank you