
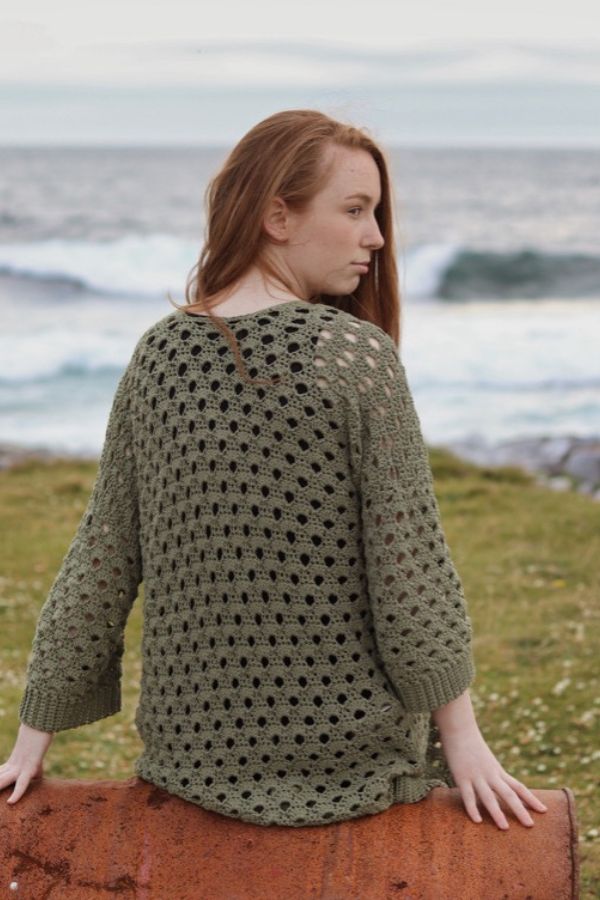
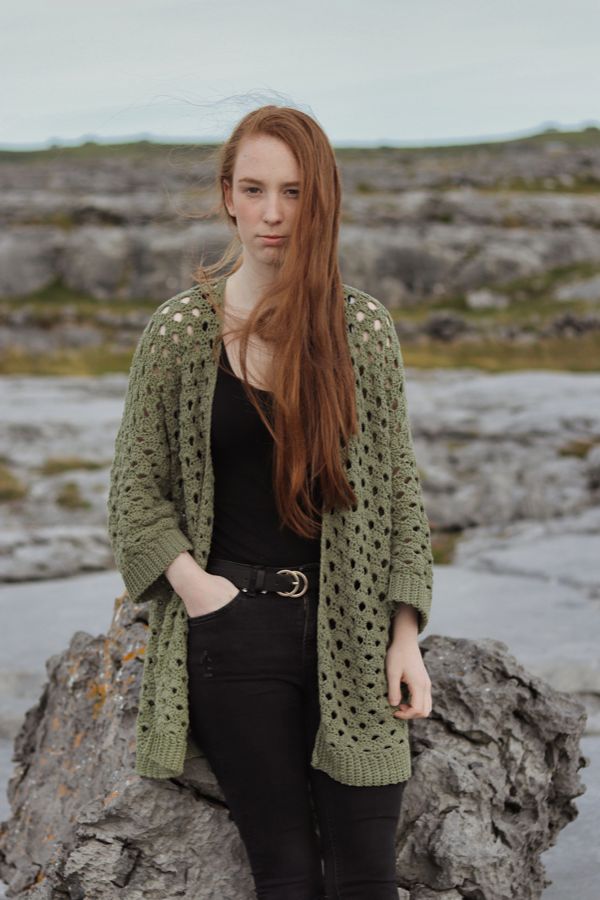
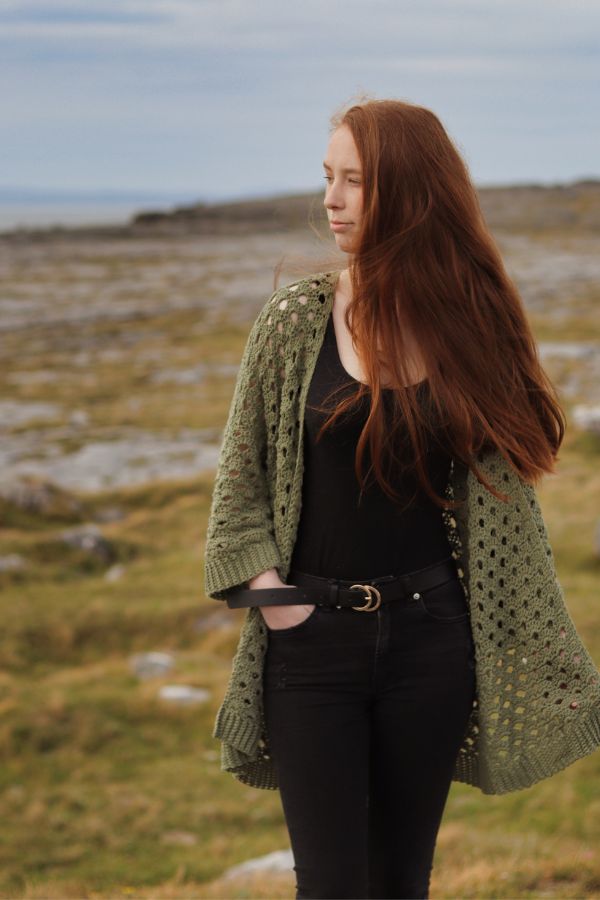
Introducing the Summer Breeze Cardigan, a quick yet beautiful airy crochet cardigan made entirely using beautiful shell stitches for a lovely summer feel.
This pattern is accompanied with a step by step video tutorial. Scroll down to view.
Don’t like ads? You can now purchase the ad-free pattern here
Summer has finally arrived and with that I designed this lovely open shell summer cardigan. Designed with plenty of positive easy for a loose and flowy feel, this cardigan will definitely be your most worn crochet piece this season.
Large open crochet shells make up the bulk of the cardigan while back loop single crochets form the body and sleeve ribbing. Combining these together give this cardigan a lovely drape, perfect for summer.
CONSTRUCTION
The cardigan is constructed by crocheting five separate pieces: the back panel, two front panels and two sleeves. Each of these pieces are worked from the bottom up beginning with the body ribbed hem or sleeve cuff. Once all pieces are made we will then seam across the shoulders and down along the sides leaving enough space open at the armholes. Each sleeve is seamed at the side to close and then attached to the armhole.
When everything is seamed together we will do a row of single crochets along the neckline to tidy up the edges.
MATERIALS
Yarn – Drops Cotton Light in colorway Khaki (shade 12) – light/dk/8 ply (50% cotton, 50% polyester)
105 m (115 yds) per 50g ball.
Yardage – 12(13, 13) skeins or 1300(1380, 1400) yds
Hook – Size U.S. H/8 (5 mm) or size needed to obtain gauge.
Notions – Tapestry needle, several locking stitch markers
STITCHES & ABBREVIATIONS
ch = chain
sc = single crochet
dc = double crochet
scBLO = single crochet back loop only
st(s) = stitch(es)
rep = repeat
ch-1 sp = chain 1 space
ch-3 sp = chain 3 space
tch = turning chain
SPECIAL STITCH: Shell = 5 dc in next ch-3 sp
GAUGE: 3 shells = 4″
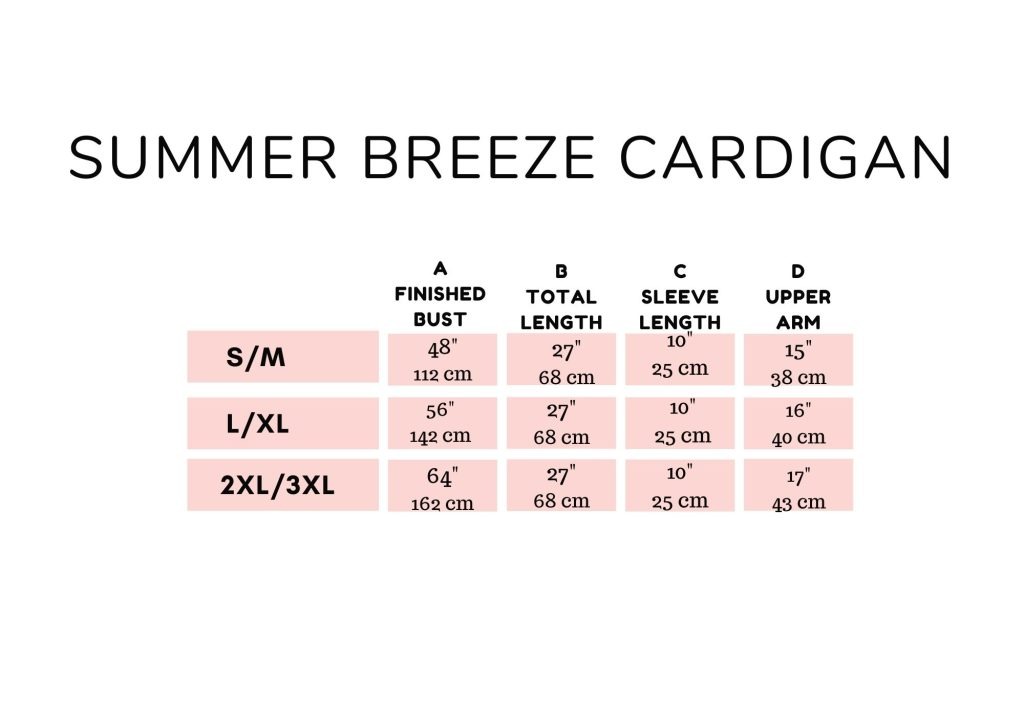
SIZING & MEASUREMENTS
S/M(L/XL, 2XL/3XL)
CROCHET SEA BREEZE CARDIGAN PATTERN
BACK PANEL
Bottom Hem
Ch 10
Row 1: sc in 2nd ch from hook and in each ch across, turn [9 sc]
Row 2: Ch 1, scBLO in each sc across, turn.
Rep Row 2 until you have a total of 91(106, 121) rows completed.
Turn your work to begin working across the ends of the rows you just completed.
Body
Row 1: Ch 1, work 1 sc into the ends of each row you just completed [91(106, 121) sc], turn.
Row 2: Ch 1, sc in each of the next 2 sc, *ch 3, skip 2 sc**, sc in next 3 sc, rep from * ending last rep at **, sc in last 2 sc, turn.
Row 3: Ch 1, sc in first sc, *skip next sc, Shell, skip next sc, sc in next sc**, rep from * across, ending last rep at **, turn.
Row 4: Ch 3 (counts as hdc+ch 1), skip next dc, *sc in next 3 dc**, ch 3, skip next (dc, sc, dc), rep from * across, ending last rep at **, ch 1, hdc in last sc, turn.
Row 5: Ch 3 (counts as dc), 2DC in first ch-1 sp, *skip next sc, sc in next sc**, Shell, rep from * across, ending last rep at **, 3DC in tch, turn.
Row 6: Ch 1, sc in first dc, sc in next dc, *ch 3, skip next (dc, sc, dc)**, sc in next 3 dc, rep from * across, ending last rep at **, sc in last 2 sts, turn.
Rep Rows 3-6 until end of row 62. For a shorter or longer cardigan simply do less or more rows but make sure to end on the end of row 6.
Fasten off and weave in any ends you might have.
FRONT PANEL (MAKE 2)
Bottom hem
Ch 10
Row 1: sc in 2nd ch from hook, and in each ch across, turn [9 sc]
Row 2: Ch 1, scBLO in each sc across, turn.
Rep Row 2 until you have a total of 41(46, 56) rows completed.
Turn your work to begin working across the ends of the rows you just completed.
Body
Row 1: Ch 1, work 1 sc into the ends of each row you just completed, turn [41(46, 56) sc]
Row 2: Ch 1, sc in each of the next 2 sc, *ch 3, skip 2 sc**, sc in next 3 sc, rep from * ending last rep at **, sc in last 2 sc, turn.
Row 3: Ch 1, sc in first sc, *skip next sc, Shell, skip next sc, sc in next sc**, rep from * across, ending last rep at **, turn.
Row 4: Ch 3 (counts as hdc+ch 1), skip next dc, *sc in next 3 dc**, ch 3, skip next (dc, sc, dc), rep from * across, ending last rep at **, ch 1, hdc in last sc, turn.
Row 5: Ch 3 (counts as dc), 2DC in first ch-1 sp, *skip next sc, sc in next sc**, Shell, rep from * across, ending last rep at **, 3DC in tch, turn.
Row 6: Ch 1, sc in first dc, sc in next dc, *ch 3, skip next (dc, sc, dc)**, sc in next 3 dc, rep from * across, ending last rep at **, sc in last 2 sts, turn.
Rep Rows 3-6 until end of row 62. For a shorter or longer cardigan simply do less or more rows but make sure to end on the end of row 6.
Fasten off leaving a long tail for seaming across the shoulders.
SLEEVES
Cuff
Ch 10
Row 1: sc in 2nd ch from hook, and in each ch across, turn [9 sc]
Row 2: Ch 1, scBLO in each sc across, turn.
Rep Row 2 until you have a total of 56(61, 66) rows completed.
Turn your work to begin working in the ends of the rows you just completed.
Sleeve body
Row 1: Ch 1, work 1 sc into the ends of the rows you just completed [56(61, 66) sc]
Row 2: Ch 1, sc in each of the next 2 sc, *ch 3, skip 2 sc**, sc in next 3 sc, rep from * ending last rep at **, sc in last 2 sc, turn.
Row 3: Ch 1, sc in first sc, *skip next sc, Shell, skip next sc, sc in next sc**, rep from * across, ending last rep at **, turn.
Row 4: Ch 3 (counts as hdc+ch 1), skip next dc, *sc in next 3 dc**, ch 3, skip next (dc, sc, dc), rep from * across, ending last rep at **, ch 1, hdc in last sc, turn.
Row 5: Ch 3 (counts as dc), 2DC in first ch-1 sp, *skip next sc, sc in next sc**, Shell, rep from * across, ending last rep at **, 3DC in tch, turn.
Row 6: Ch 1, sc in first dc, sc in next dc, *ch 3, skip next (dc, sc, dc)**, sc in next 3 dc, rep from * across, ending last rep at **, sc in last 2 sts, turn.
Rep rows 3-6 until the end of row 22.
Fasten off leaving a long tail. With your tapestry needle and long tail seam the sides of sleeve together.
ASSEMBLY
Lay the front panels over the back panel. You can use locking stitch markers to help line up the panels stitch-for-stitch along the shoulders and sides of the cardigan making sure to leave openings at the armholes for the sleeves. Use your tapestry needle and long tails to seam the pieces together.
Now you can lay the sleeves against the armholes with the seams facing downward. Seam to armhole.
FINISHING
Turn your cardigan the right side out and attach yarn to one of the bottom inside corners.
Ch 1, sc evenly around the entire collar, up around the neckline and down the opposite side. Once you have reached the other side fasten off and weave in any remaining ends.
Block your cardigan if needed to the dimensions needed in the above chart.
Absolutely stunning, thank you xxxx
Another lovely design. Thank you!
Lovely pattern.
I like the yarn but it keeps splitting and getting caught, is it me? Or my hook?
What would be a good substitute for this yarn? I live in the US and Drops Cotton Light is hard to find!
Hi, I would like to make this cardigan with a medium yarn (50/50 wool acryl) instead of your used light. Do you think that would work out well with the shells?
Hi Carrie, this looks like a gorgeous pattern. Is it possible to convert it to a child’s size? Do you have any tips on how I might do that?
Thank you.
What a lovely cardigan! I have never crocheted a garment before and would love for this to be my first project, but I am a bit confused on how to test the gauge. Could you please explain it in more detail? Thank you!!