
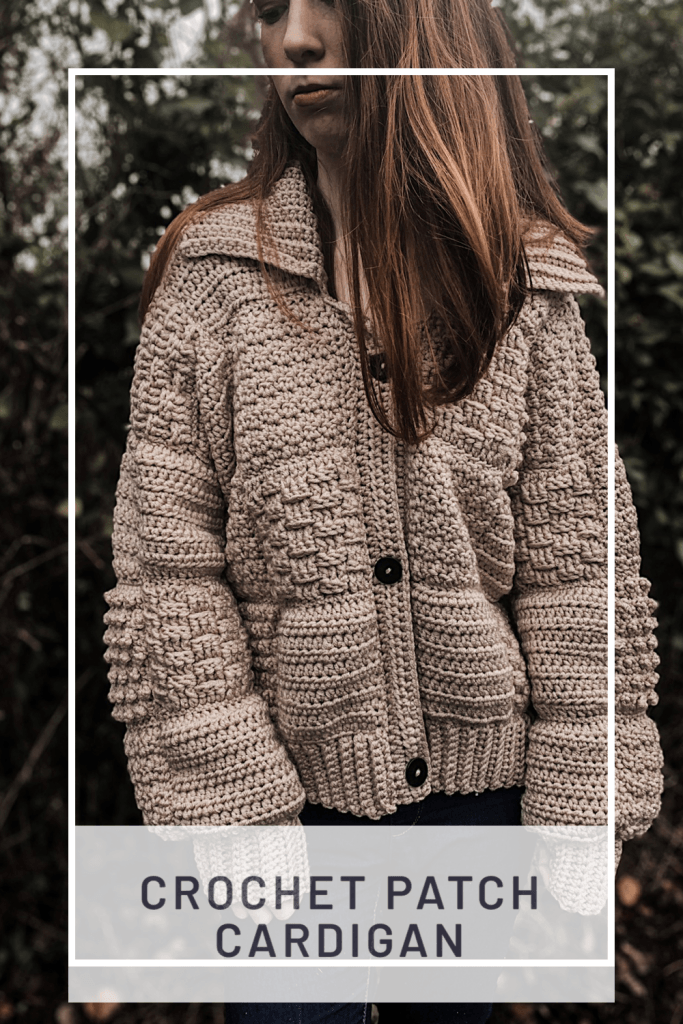
Learn to crochet this easy, bulky crochet patchwork winter cardigan. Designed with ample amounts of texture, this chunky cardigan is a must have this winter.
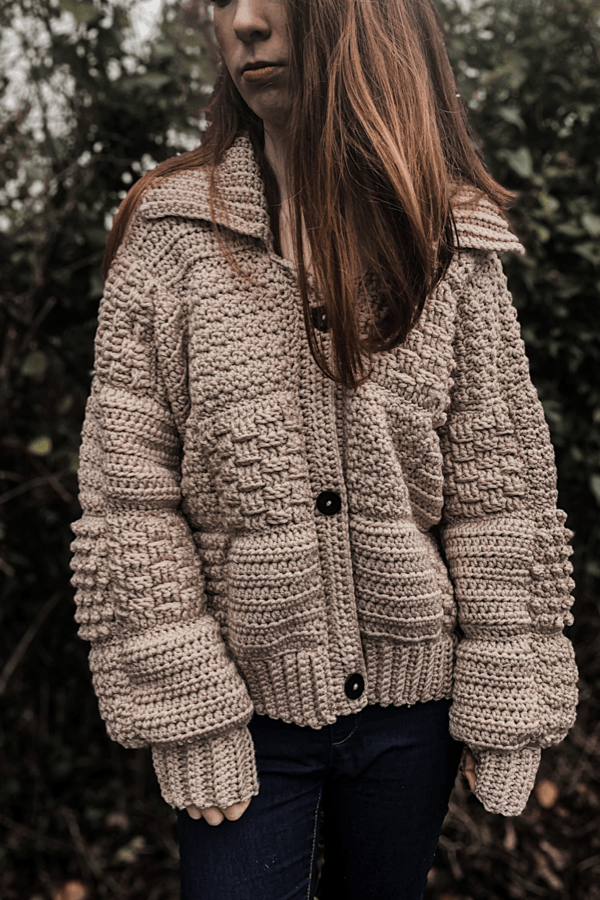
I’m sure most of you have seen the Harry Styles patchwork cardigan design by JW Anderson that has taken the internet by storm over these last few months. I loved it but I wanted to put my own twist on it. I’m not overly crazy about the super bright colors that were used in the original design, so I opted for a more muted color.
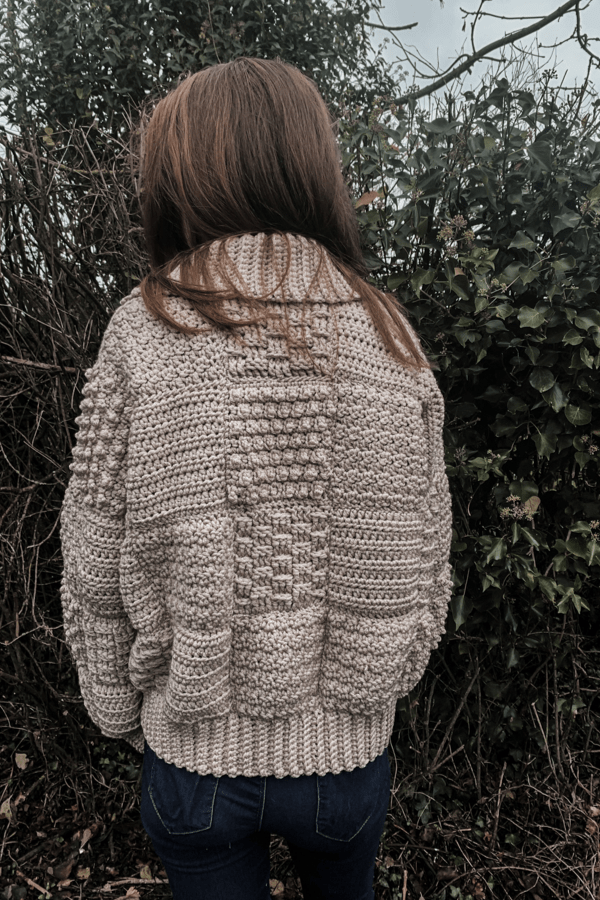
I also completely changed the stitching for each of the squares. You know me, I’m a sucker for anything that has texture! So I do admit that this cardigan looks nothing like the original cardigan, but it does share the same concept, the patchwork design.
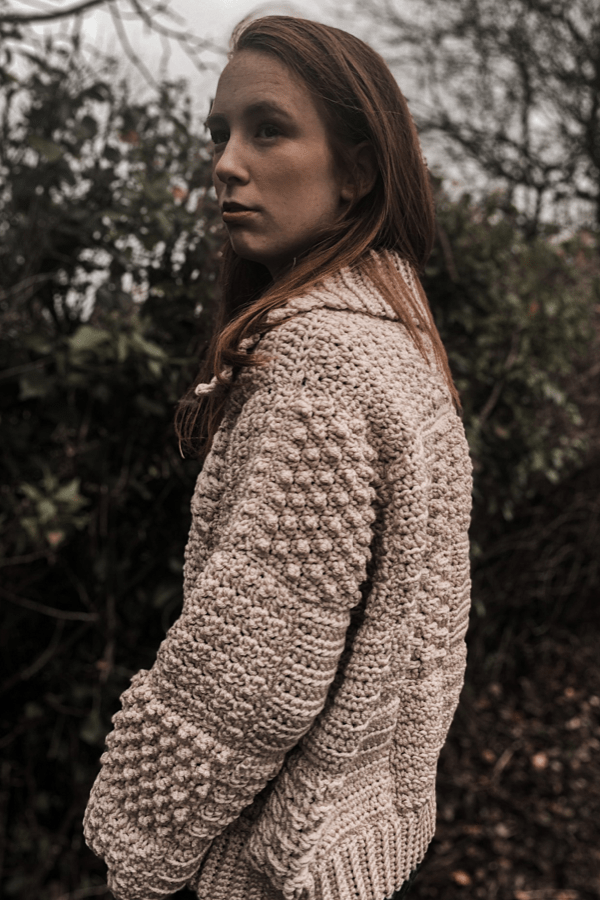
The cardigan is made up of a bunch of squares with four different designs. First we will sew some squares together to make the back panel. Then we will sew more squares together to make two front panels, and finally we will sew a few more squares together to make two sleeves.
Then we will sew all the panels together, along with the sleeves. Once that is done we will crochet a very long ribbed hem that will be sewn along the entire bottom edge of the cardigan. A ribbed cuff will be made for each of the two sleeves.
We will then make a ribbed collar long enough to go around the neckline, and finally we will make tow narrow strips for each side of the inner front panels. One of these strips will have buttons and the other one will have the button holes
YARN
***This post contains affiliated links for which I make a very small commission. It is of no extra cost to you but it does help me out, and makes shopping easier for you***
The yarn I used was Scheepjes Chunky Monkey. The yarn label states that it’s an aran weight yarn but in my opinion it is most definitely a bulky/weight 5 yarn.
Other yarns I would suggest that are similar in weight are Paintbox Simply Chunky or Stylecraft Special Chunky
You may use other yarn weights, however make sure each square measures 5 inches wide. Take into account the stitch multiples for each square.
NOTES
- The sizing guide is S/M(L/XL)
- This pattern uses standard American crochet terms
- Cardigan is designed to be oversized.
- To make a size 2XL-3XL I would suggest following the pattern for size L/XL but instead of using a 6mm hook, I would use a 6.5 or 7mm hook.
SPECIAL STITCHES
Berry Stitch (BST): insert hook into specified stitch, draw up a loop, ch 3, yarn over, draw yarn through both loops on hook.
GAUGE: each square should measure 5″x 5″. Add more stitches to each square if needed to get to the width of 5″ but make sure to pay attention to stitch multiples. You can also change hook size to get to the 5″ width if needed.
MEASUREMENTS
To fit bust 32-38(40-46)
Back width: 25(30) inches
Length (without ribbed hem) is 20″.
Sleeve length: 18 inches.
MATERIALS
Yarn – Scheepjes Chunky Monkey – Bulky/weight 5/chunky
Approximately 1392(1624) meters
6 mm crochet hook
3 buttons
3 stitch markers
Measuring tape.
STITCHES & ABBREVIATIONS
Ch = chain
Sc = single crochet
Hdc = half double crochet
Dc = double crochet
FPDC = front post double crochet
BPDC = back post double crochet
BLO = back loop only
BST = bobble stitch.
PIN IT FOR LATER!
CROCHET PATCHWORK WINTER CARDIGAN PATTERN
SIZE S-M. Scroll down to end of page for details on SIZE L-XL
HDC SQUARE x 21:
stitch multiples: any
Ch 14
Row 1: hdc in 2nd ch from hook, hdc in each ch across. Turn.
Row 2: ch 1, hdc in each stitch across. Turn.
Repeat row 2 until square measures 5″ in height.
Fasten off.
GRIDDLE SQUARE X 13:
stitch multiples: even number
Ch 14
Row 1: sc in 2nd ch from hook, *dc in next stitch, sc in next stitch, repeat from * across, ending the last stitch with a sc. Turn.
Row 2: ch 3 (counts as a dc), *sc in next stitch, dc in next stitch, repeat from * across ending last stitch with a dc. Turn.
Row 3: ch 1, sc in first st, *dc in next st, sc in next st, repeat from * across ending the row with a sc. Turn.
Repeat rows 2-3 until square measures 5″ in height.
Fasten off.
BOBBLE STITCH SQUARE X 7:
stitch multiple (any even number)
Ch 14
Row 1: sc in 2nd ch from hook, sc in each st across. Turn.
Row 2: ch 1, sc in first st, *BST in next st, sc in next st, repeat from * across row. Turn.
Row 3: ch 1, sc in each st across. Turn.
Row 4: ch 1, BST in first st, sc in next st, *BST in next st, sc in next st, repeat from * across row, ending with a sc in last st. Turn.
Row 5: ch 1, sc in each st across. Turn.
Repeat rows 2-5 until square measures 5″
Fasten off.
BASKETWEAVE SQUARE X 13:
stitch multiples: 6+5
Ch 17
Row 1: dc in 4th ch from hook, dc in each ch across. Turn.
Row 2: ch 2 (counts as a hdc), FPDC around each of next 2 sts, BPDC around each of next 3 sts, FPDC around each of next 3 sts, BPDC around each of next 3 sts, FPDC around next 2 sts, hdc on top of turning chain. Turn.
Repeat row 2 until square measures 5″ in height.
Fasten off.
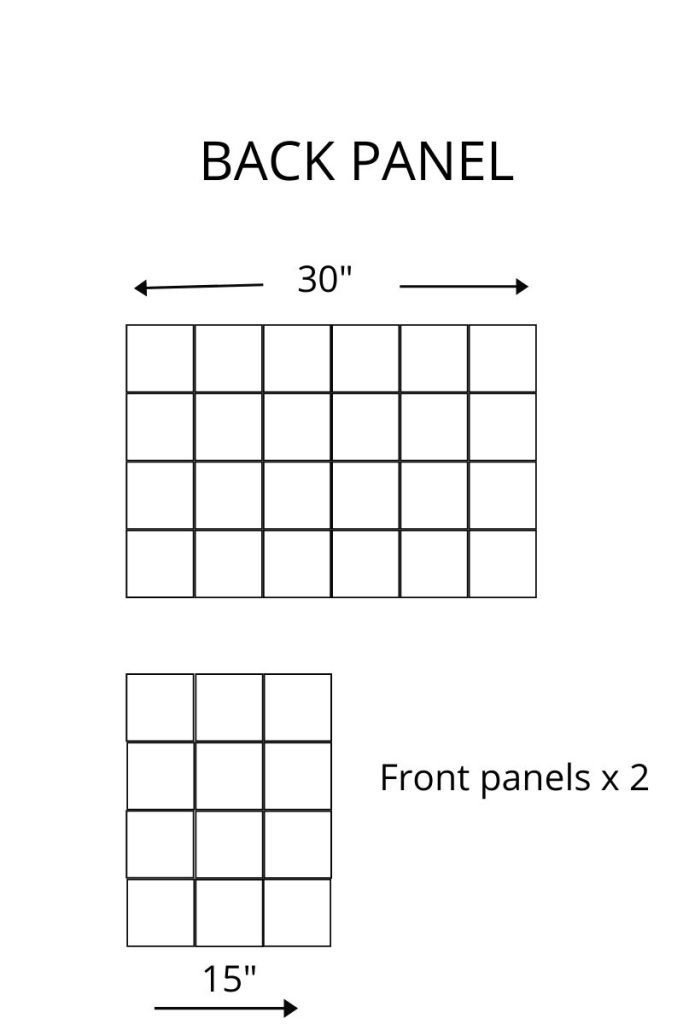
Back panel assembly
For the back panel you will need:
7 hdc squares; 5 griddle squares; 3 bobble squares; 5 basketweave squares
Assemble squares as follows:
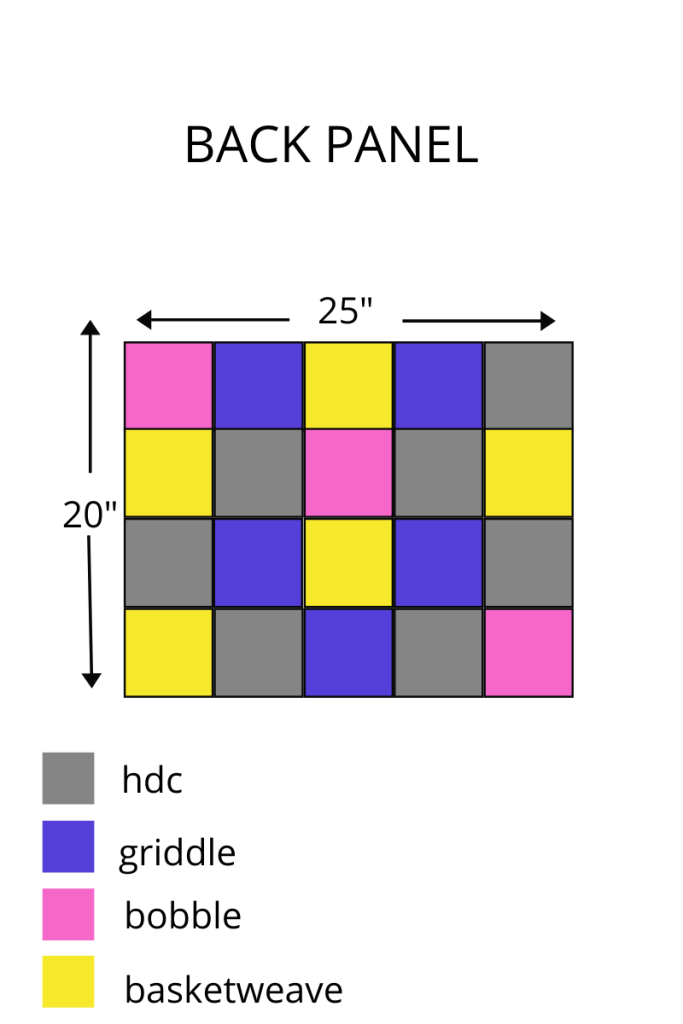
Using a yarn needle and some yarn sew all the squares together. Weave in all your ends and leave to one side.
Front panels assembly:
For the front panels you will need:
6 hdc squares; 4 griddle squares; 2 bobble squares; 4 basketweave squares.
Using a yarn needle and some yarn assemble the squares as follows:
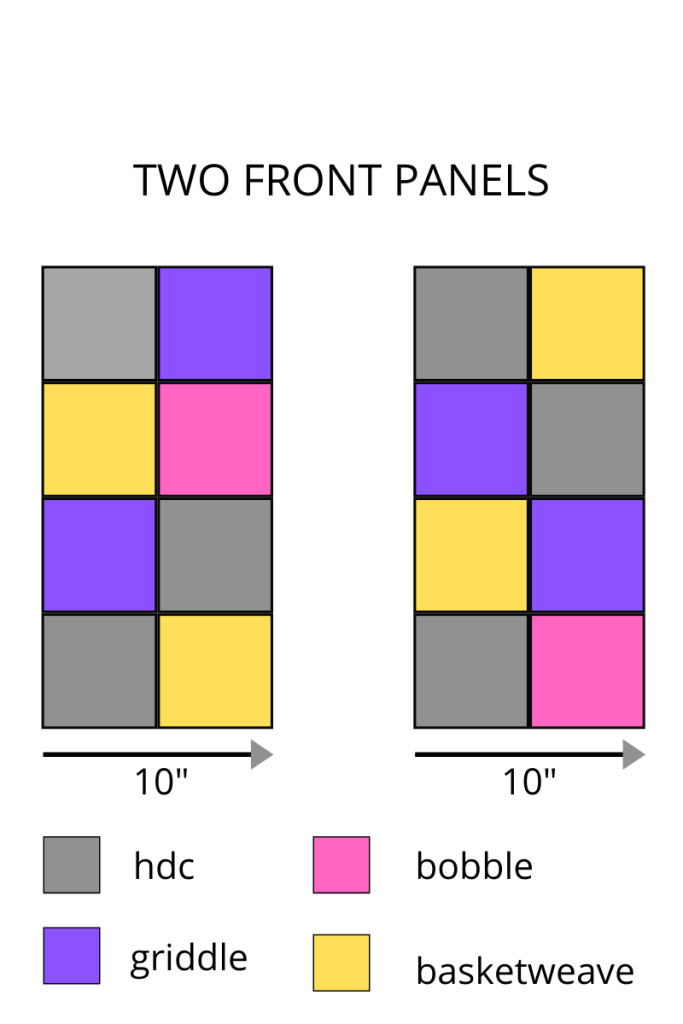
Using your yarn needle and some yarn sew the square like shown above. You will be making two front panels. Weave in all ends.
Sleeve assembly
For the sleeves you will need:
8 hdc squares; 4 griddle squares; 2 bobble squares; 4 basketweave squares.
You will assemble the squares like shown below:
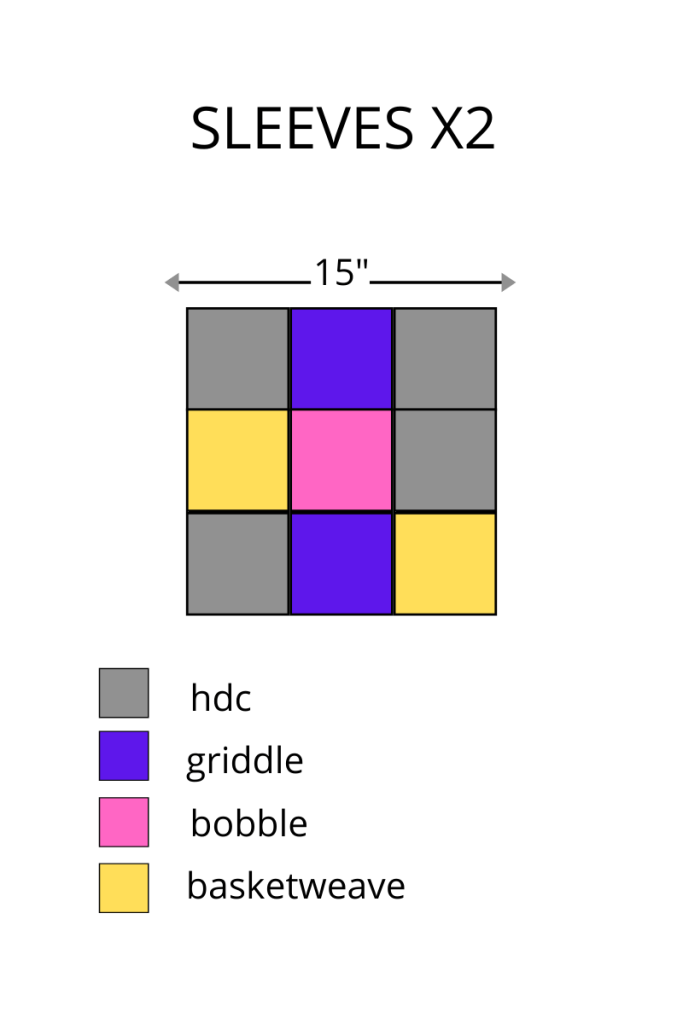
Using your yarn needle and hook sew all squares together. Weave in all ends.
Assembling the cardigan:
Lay your back panel on a flat surface with the right side facing up. Next lay both front panels with their right sides facing down. Using a yarn needle sew across the shoulders. Fasten off.
Next lay your entire piece out flat with the wrong side facing up. Grab a sleeve and with a stitch marker, mark the centre stitch of the sleeve. Now align that marker with the shoulder seam of the cardigan and connect. Sew across connecting the sleeve to the cardigan. Repeat on the other side with the other sleeve.
Fold your cardigan over and sew along the under edge of sleeves and down along the sides of the cardigan. Turn cardigan right side out now.
Ribbed hem
Ch 11
Row 1: sc in 2nd ch from hook, sc to end. Turn.
Row 2: ch 1, sc in BLO of each st across. Turn.
Repeat row 2 until ribbing is long enough to go around the entire bottom edge of cardigan (that includes the bottom edges of the two front panels and the bottom edge of back panel). Fasten off leaving a very long tail. With your yarn needle and long tail sew the ribbed hem to the bottom edge of cardigan.
Sleeve cuffs x 2
Ch 11
Row 1: sc in 2nd ch from hook, sc in each ch to end. Turn.
Row 2: ch 1, sc in BLO of each st across. Turn.
Repeat row 3 until ribbed cuff measures 11 inches. You can add more rows here if you want a wider cuff. Fasten off leaving a long tail. Now with your yarn needle and long tail, sew the cuff to the bottom of sleeve. You may have to cinch the bottom of the sleeve slightly for the cuff to fit around it. Repeat for the other sleeve.
Collar
Ch 22
Row 1: sc in 2nd ch from hook, sc in each ch to end. Turn.
Row 2: ch 1, sc in BLO in each st across. Turn.
Repeat row 2 until you have a total of 64 rows completed. You can add more rows here if needed. You just need to make the collar long enough to go around the neckline.
Fasten off leaving a long tail. Sew the collar to the neck of the cardigan.
Inner front panel edging
Make a chain long enough to go from beneath the collar to the bottom edge of cardigan. Then hdc into the 2nd ch from hook, hdc in each ch to end. At the end of the row ch 1, hdc in each st across. You will do a total of 5 rows in hdc. Fasten off leaving a long tail and sew to one of the inner front panel edges.
Now make another chain of the same length and do 3 rows of hdc. Then with three stitch markers lay out where you want your buttons to be.
Next row: ch 1, hdc in each st until you reach first stitch marker. When you reach the marker, ch 1, skip that st with the marker in it and continue placing a hdc in each st until you reach next stitch marker. When you reach the 2nd marker, ch 1, skip that stitch with the marker and continue on placing a hdc in each st until you reach final marker, ch 1, skip that stitch, hdc to end. Fasten off leaving a long tail.
Sew this button hole strip to the other inner front panel edge.
Sew buttons corresponding to the button holes on the other strip.
Your cardigan is now completed.
Sizes L-XL
The below diagram is a guide.
Just like the size S-M you will make 4 types of squares; hdc squares, griddle squares, bobble squares and basketweave squares. However you will need to make an extra 12 squares. These extra 12 squares can be 4 hdc, 3 griddle, 2 bobble and 3 basketweave. It’s entirely up to you.
Aim for 5×5 inches for each square.
The sleeves will be the same as for size S-M, however you can go 4×4 squares if you want a larger sleeve. Its up to you.
Sizes 2XL-3XL
Follow for sizes L-XL but use a larger hook. I would suggest a 6.5 hook or even a 7mm hook. The aim here is to make each square 5.5×5.5 inches.
I would suggest each sleeve to be 4 squares x 4 squares.
Gorgeous! I can’t wait to start! Thank you!
Hey Carrie! I’m totally obsessed, love at first sight. My head has to start thinking in color blocking. Kind of rich red, brown, chocolate, wine… something like that.
Thank you for sharing this. Is there a way to buy the pattern from you?
Take care.
Bonjour Carrie
J’adore tes créations !
Je suis très contente de t’avoir trouvée sur le net
Cette veste est sublime
Merci !
Christine de France 🙋
I so love this …. thank you , thank you !
Can’t wait to start it !!!!
Have a great Christmas 😊
Great sweater! I was really put off by the bright colors and couldn’t visualize i in more muted colors or a solid. This is terrific! I also greatly appreciate the suggestions for the Plus Sizes. Great squares! I love love love textures in solid colors. They are fun to make and look great.
I trying to find the affiliate link to get the yarn but I cannot find it.
Oh this is beautiful! I can’t wait to make this after the Christmas rush
Hi
Are instructions in UK or US terminology. Thank you
They are in USA terms.
I love this. Than you for the pattern. I have been looking for an oversized cardigan/jacket pattern for a while. This is perfect. This is going to be my Christmas crochet project/gift to myself. Merry Christmas Happy and Blessed New year. Stay safe.
Ellie.
Beautiful pattern thanks for sharing I am almost done making one for my niece in yellow and grey
I’ve been crocheting since I was a teen. These are BY FAR the clearest directions I’ve ever come across!! Detailing what will be made and in what order and how it all goes together is so incredible helpful. So many times is just do this now that with no what our point of reference. Well done. Thank you!
For the larger sizes is the collar chain the same? Do I still chain 22 or should it be a certain about of inches? Thank you.
Love love love this!!! So I’m planning on starting this cardi tomorrow😍 Wondering if any of you that have finished the cardigan, could tell me how many balls o’ yarn you used? Or approximate yd/g? I plan on using Caron sprinkle cakes in birthday cake…and maybe mocha rainbow as well 🤔
Around how many grams or balls or yarn did it take to make?
I used the better part of two of the Caron One Pound skeins.
Hi there,
Hope you are safe and well. I am making the XL size and am about to sew the front panels to the back. If I have done six squares at the back and three for each front panel as shown, how does the neck line work? If I sew across the shoulder line that won’t work out?
Am I missing something here?😊.
Thanks for any help.
Thanks Marie! 😀
Did you figure this out as this is where I’m stuck? Thanks
I too was wondering this? Has anyone worked it out yet? I’ve already started making this, such a wonderful design!!
Hi, I’m about to order my yarn for this project but I cannot find anywhere here how many skeins of the Chunky Monkey I need to get. I will be making the small. Can someone please help me? Thanks in advance!
Hi
Did anyone figure the neckline for the xl size?
Literally got to this point and have to stop,
Chose to do this in a shaded yarn. Going to do the ribbing and collar in a solid colour from one of the shades.
.
I watched a YouTube video for a similar cardigan and they only stitched half way across the middle rows of the front panels to the back so it created a neck hole. Thats what I’ve done with mine. Hope that makes sense!
Bonjour. Dès que j’ai vu le modèle il m’a énormément plu. Je n’ai pas attendu pour le commencer. J’ai hâte de le finir. Bravo et merci.
Love this! Want to make it for my son but can’t find where sizing guide is for XL sizes. He is 40 inch chest – would you recommend the L/XL or bigger?
Thanks!
I LOVE this sweater and can’t wait to start on it but need to know how many yards for a 2XL? I love your patterns and your tutorials are so clear that it makes trying something new that might be a bit challenging for a newbie like me easy and fun. I made your boyfriend sweater and just finished the chunky oversized cardigan with a collar, buttons and pockets; they turned out great. I just started crocheting a couple years ago and am addicted. Thank you for helping me broaden my skills AND my wardrobe! Will wait to hear from you so I can order my yarn. Thank you!
I am also confused about this.
I just came to this same problem!!! I’ve been sitting here like ummmmm what did I do wrong lolol. Let me know if you went with it and how it turned out!!
I’m currently making this cardigan but I can’t figure out how to sew across the shoulders for the Large. Am I to only sew across two patches on both sides, leaving the two in the middle unconnected? Or all the way across??
Hi, just wondering if you sell this chunky sweater? I love it so much but I cannot knit whatsoever? Do you make them or take orders?
will this fit mens too?
Hey Carrie! I’m confused about the griddle square:( I’m using chunky yarn so I only need 10 stitches to get a width of 5”. It says that row two is supposed to “start” with a chain 3 (dc), and then continue with sc in the last stitch of the previous row, but then it’s also supposed to end with a dc. I’m mixed up on the counting but wouldn’t that mean I would have to end with 11 stitches? I can’t seem to figure this out, help!!
Hi! I found this problem too – It works for me to: chain 3, skip one stitch (last stitch of last row) then sc in next st. This worked for me and I was able to finish the row with a dc – hope this helps 🙂
Hey carrie !! I’m having trouble with the griddle square, I’m using a yarn 4 and a crochet 5.5 and when i start doing the 2 row it doesn’t match, im trying doing 21 chains but it doesn’t work. Can you help me please?
Hi, I’ve done all my squares and I’m about to assemble, but I’ve noticed the sleeves in the photo are four squares long, and in the pattern it calls for 3×3. Which is correct please?
Your pattern doesn’t work for making a L-XL size because there isn’t the extra column between the shoulders. So following your instructions would make it unusable. How would you suggest sewing it together by following the number of squares you say to crochet?
Did you figure this out? I can’t figure it out either 😢