
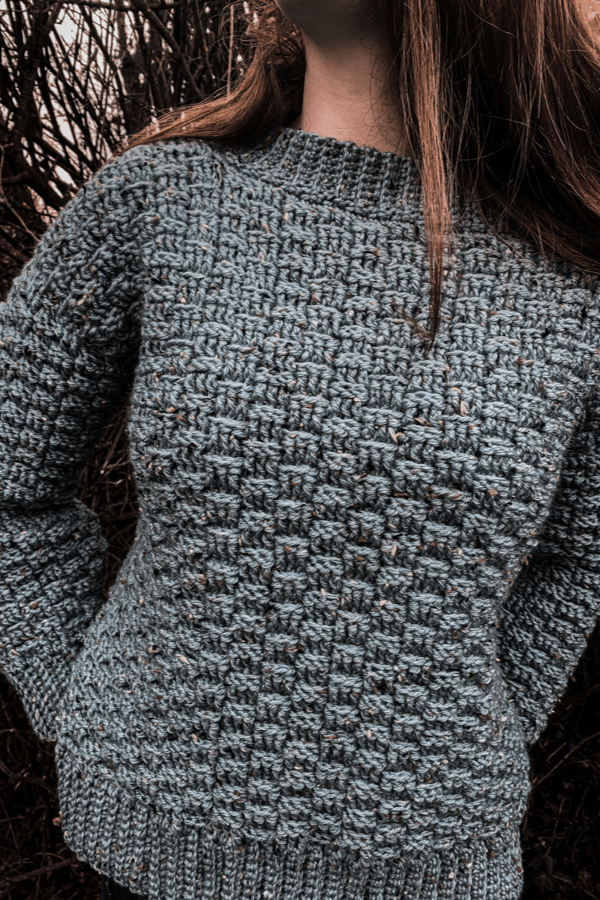
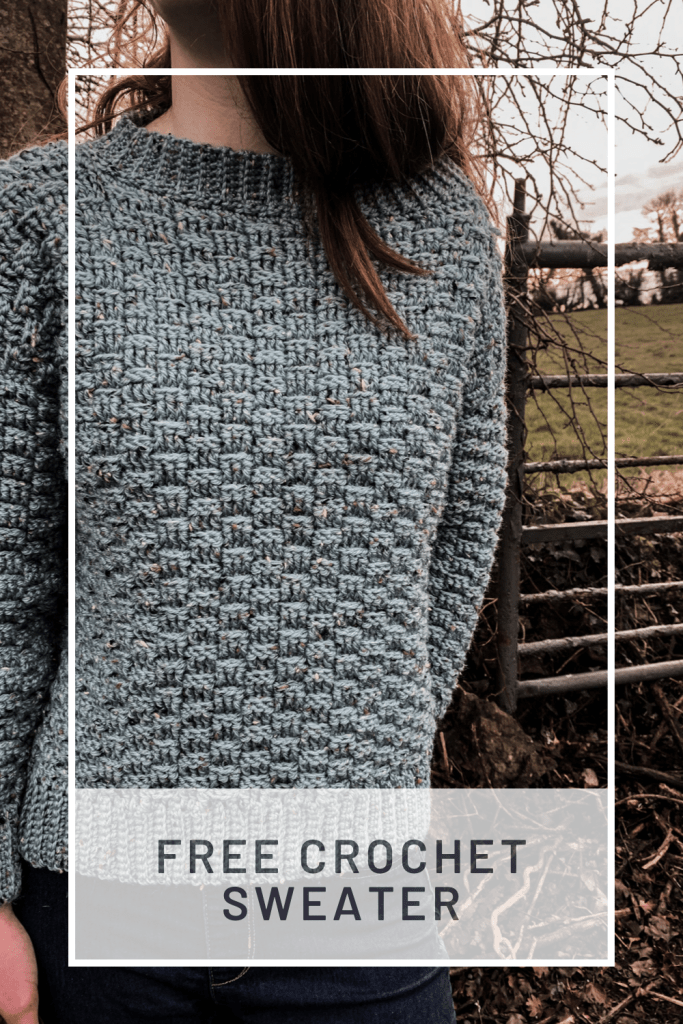
Learn how to make this quick and easy crochet basketweave sweater. If you are a lover of sweaters with lots of texture this easy crochet sweater will definitely not disappoint.
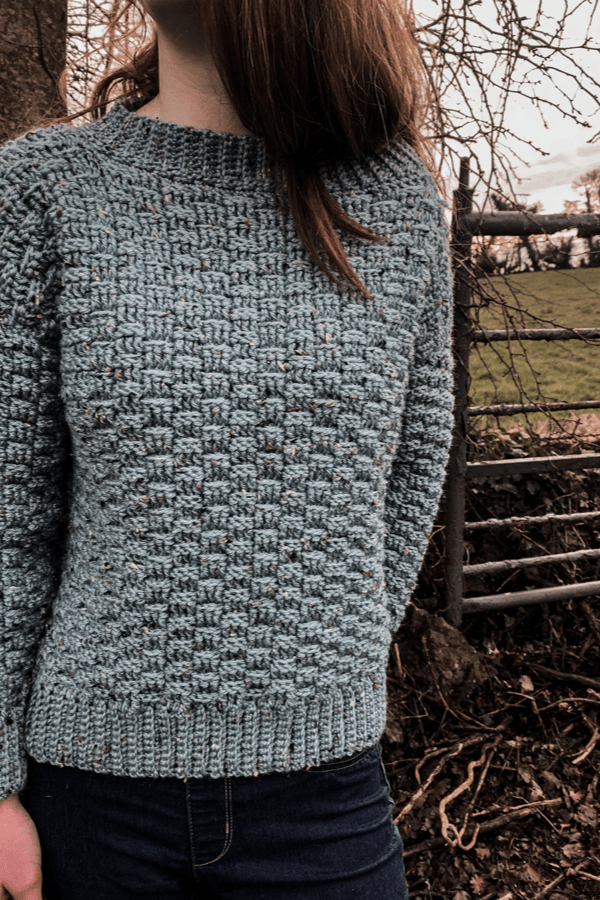
The stitch that I used reminds me of the knit basketweave stitch, and consists of just front post double crochets and back post double crochets.
This crochet sweater pattern is accompanied with a step by step video tutorial. Please scroll down to view it.
This crochet sweater is made up of a back panel, a front panel and two identical sleeves. Once each piece is made we will sew together with some yarn and a yarn needle.
Each panel and sleeve is worked from the bottom up, beginning with the ribbed hem or sleeve cuff. We will then crochet along the long edge of the ribbing.
Once all the pieces are crochet and stitched together we will the crochet the ribbed neckline. Easy peasy!
YARN
**This post contains affiliated links for which I make a small commission. It is no charge to you but it does help me out and makes shopping easier for you**
The yarn I used for this crochet sweater was Stylecraft Special Aran with wool in the shade Duck Egg. This yarn is a weight 4 acrylic/wool blend and comes in many shades. The color I chose is a beautiful blue tone with gorgeous flecks of blacks, creams and beiges.
Stylecraft Special Aran can be machine washed and put into a cool tumble dry setting. Perfect in my opinion.
NOTES
- The sizing guide is S(M, L, XL, 2XL, 3XL).
- The turning ch2 DOES count as a stitch.
- This pattern uses standard American crochet terms.
LEVEL
Easy
MEASUREMENTS
To fit bust 32-34(36-38, 40-42, 44-46, 48-50, 52-54) inches
Finished sweater bust size: 38(42, 46, 50, 54, 58) inches.
Back width: 19(21, 23, 25, 27, 29) inches
Length: 20(20.5, 21, 21.5, 22, 22.5) inches
MATERIALS
Yarn – Stylecraft Special Aran – weight 4/aran/10 ply
Approximately 1712(1819, 1926, 2033, 2140, 2247) yards
5mm crochet hook
Measuring tape
Yarn needle
Stitch marker

STITCHES & ABBREVIATIONS
Ch = chain
Sc = single crochet
Dc = double crochet
Hdc = half double crochet
FPDC = front post double crochet
BPDC = back post double crochet
Slst = slip stitch
BLO = back loop only
PIN IT FOR LATER!
CROCHET BASKETWEAVE SWEATER PATTERN
BACK PANEL
Ch 11
Row 1: sc in 2nd ch from hook, sc to end. Turn.
Row 2: ch 1, sc in BLO in each stitch across. Turn.
Repeat row 2 until you have a total of 75(81, 87, 93, 99, 105) rows.
Now we will start working along the long edge of the ribbing:
Next row: Ch 3 (counts as first dc), make another 74(80, 86, 92, 98, 104) dc across. Turn.
Next row: ch 2( counts as first hdc here and throughout), FPDC in next 2 dc, *BPDC in next 3 dc**, FPDC in next 3 dc, rep from * across ending last rep at **, FPDC in next 2 dc, hdc on top of turning ch. Turn.
Repeat last row for 20(20.5, 21, 21.5, 22, 22.5) inches. Take note of the number of rows you have completed. You can add more rows here if you want a longer sweater. Fasten off.
FRONT PANEL
Repeat as for the back panel but do 4 rows less.
Shoulder Shaping for sizes S, L, 2XL
With a stitch marker, mark the 21st(27th, 33rd) stitch in from where you are now:
Next row: ch 2, FPDC in next 2 sts, *BPDC in next 3 sts**, FPDC in next 3 sts, rep from * across ending last rep at **, FPDC in next 2 sts, hdc in the st with the stitch marker. Turn.
Next row: ch 2, FPDC in next 2 sts, *BPDC in next 3 sts**, FPDC in next 3 sts, rep from * across ending last rep at **, FPDC in next 2 sts, hdc on top of turning ch. Turn.
Repeat last row 2 more times. Fasten off leaving a long tail.
Now count 21(27, 33) sts in from the other edge. Attach yarn to that stitch:
Next row: ch 2, FPDC in next 2 sts, *BPDC in next 3 sts**, FPDC in next 3 sts, rep from * across ending last rep at **, FPDC in next 2 sts, hdc on top of turning ch. Turn.
Repeat last row 3 more times. Fasten off leaving a long tail.
Shoulder shaping for sizes M, XL, 3XL:
With a stitch marker mark the 24th(30th, 36th) st in from where you are now:
Next row: ch 2, FPDC in next 2 sts, *BPDC in next 3 sts, FPDC in next 3 sts, rep across ending with BPDC in next 2 sts, hdc in stitch with the marker. Turn.
Next row: ch 2, BPDC in next 2 sts, *FPDC in next 3 sts, BPDC in next 3 sts, rep from * across ending with FPDC in next 2 sts, hdc on top of turning ch. Turn.
Next row: ch 2, FPDC in next 2 sts, *BPDC in next 3 sts, FPDC in next 3 sts, rep from * across ending with BPDC in next 2 sts, hdc on top of turning ch. Turn.
Next row: ch 2, BPDC in next 2 sts, *FPDC in next 3 sts, BPDC in next 3 sts, rep from * ending with FPDC in next 2 sts, hdc on top of turning ch. Turn.
Fasten off leaving a long tail.
Now we will count 24(30, 36) sts in from the other edge and attach your yarn to that stitch:
Next row: ch 2, BPDC in next 2 sts, *FPDC in next 3 sts, BPDC in next 3 sts, rep from * across ending with FPDC in next 2 sts, hdc on top of turning ch. Turn.
Next row: ch 2, FPDC in next 2 sts, *BPDC in next 3 sts, FPDC in next 3 sts, rep from * across ending with BPDC in next 2 sts, hdc on top of turning ch. Turn.
Fasten off leaving a long tail.
SLEEVE FOR SMALL SIZE:
Ch 11
Row 1: sc in 2nd ch from hook, sc to end. Turn.
Row 2: ch 1, sc in BLO in every st across. Turn.
Repeat row 2 until you have a total of 39 rows.
Now we crochet along the long edge of the ribbing:
Next row: ch 3(counts as first dc), make 38 dc across. Turn.
Next row: ch 2, FPDC in next 2 dc, *BPDC in next 3 dc, FPDC in next 3 dc, rep from * across ending with FPDC in next 2 dc, hdc on top of turning ch. Turn.
Next row: ch 2, dc in same st, FPDC in next 2 sts, *BPDC in next 3 sts, FPDC in next 3 sts, rep from * across ending with FPDC in next 2 sts, dc+hdc on top of turning ch. Turn.
Next row: ch 2, dc in same st, *FPDC in next 3 sts, BPDC in next 3 sts, rep from * across ending with FPDC in next 3 sts, dc+hdc on top of turning ch. Turn.
Next row: ch 2, dc in same st, BPDC in next st, *FPDC in next 3 sts, BPDC in next 3 sts, rep from * across ending with BPDC in next st, dc+hdc on top of turning ch. Turn.
Next row: ch 2, dc in same st, BPDC in next 2 sts, *FPDC in next 3 sts, BPDC in next 3 sts, rep from * across ending with BPDC in next 2 sts, dc+hdc on top of turning ch. Turn.
Next row: ch 2, dc in same st, *BPDC in next 3 sts, FPDC in next 3 sts, rep from * across ending with BPDC in next 3 sts, dc+hdc on top of turning ch. Turn.
Next row: ch 2, FPDC in next st, BPDC in next 3 sts, *FPDC in next 3 sts, BPDC in next 3 sts, rep from * across ending with FPDC, hdc on top of turning ch. Turn.
Repeat last row until entire sleeve measures 17 inches in length. Fasten off leaving a long tail. Repeat pattern for the second sleeve.
SLEEVE FOR MEDIUM SIZE:
Ch 11
Row 1: sc in 2nd ch from hook, sc to end. Turn.
Row 2: ch 1, sc in BLO in every st across. Turn.
Repeat row 2 until you have a total of 39 rows.
Now we crochet along the long edge of the ribbing:
Next row: ch 3(counts as first dc), make 38 dc across. Turn.
Next row: ch 2, FPDC in next 2 dc, *BPDC in next 3 dc, FPDC in next 3 dc, rep from * across ending with FPDC in next 2 dc, hdc on top of turning ch. Turn.
Next row: ch 2, dc in same st, FPDC in next 2 sts, *BPDC in next 3 sts, FPDC in next 3 sts, rep from * across ending with FPDC in next 2 sts, dc+hdc on top of turning ch. Turn.
Next row: ch 2, dc in same st, *FPDC in next 3 sts, BPDC in next 3 sts, rep from * across ending with FPDC in next 3 sts, dc+hdc on top of turning ch. Turn.
Next row: ch 2, dc in same st, BPDC in next st, *FPDC in next 3 sts, BPDC in next 3 sts, rep from * across ending with BPDC in next st, dc+hdc on top of turning ch. Turn.
Next row: ch 2, dc in same st, BPDC in next 2 sts, *FPDC in next 3 sts, BPDC in next 3 sts, rep from * across ending with BPDC in next 2 sts, dc+hdc on top of turning ch. Turn.
Next row: ch 2, dc in same st, *BPDC in next 3 sts, FPDC in next 3 sts, rep from * across ending with BPDC in next 3 sts, dc+hdc on top of turning ch. Turn.
Next row: ch 2, dc in same st, FPDC in next st, BPDC in next 3 sts, *FPDC in next 3 sts, BPDC in next 3 sts, rep from * across ending with FPDC in next st, dc+hdc on top of turning ch. Turn.
Next row: ch 2, dc in same st, FPDC in next 2 sts, BPDC in next 3 sts, *FPDC in next 3 sts, BPDC in next 3 sts, rep from * across ending with FPDC in next 2 sts, dc+hdc on top of turning chain. Turn.
Next row: ch 2, *FPDC in next 3 sts, BPDC in next 3 sts, rep from * across ending with FPDC in next 3 sts, hdc on top of turning ch. Turn.
Repeat last row until entire sleeve measures 17 inches in length. Fasten off leaving a long tail. Repeat pattern for the second sleeve.
SLEEVE FOR LARGE SIZE
Ch 11
Row 1: sc in 2nd ch from hook, sc to end. Turn.
Row 2: ch 1, sc in BLO in every st across. Turn.
Repeat row 2 until you have a total of 39 rows.
Now we crochet along the long edge of the ribbing:
Next row: ch 3(counts as first dc), make 38 dc across. Turn.
Next row: ch 2, FPDC in next 2 dc, *BPDC in next 3 dc, FPDC in next 3 dc, rep from * across ending with FPDC in next 2 dc, hdc on top of turning ch. Turn.
Next row: ch 2, dc in same st, FPDC in next 2 sts, *BPDC in next 3 sts, FPDC in next 3 sts, rep from * across ending with FPDC in next 2 sts, dc+hdc on top of turning ch. Turn.
Next row: ch 2, dc in same st, *FPDC in next 3 sts, BPDC in next 3 sts, rep from * across ending with FPDC in next 3 sts, dc+hdc on top of turning ch. Turn.
Next row: ch 2, dc in same st, BPDC in next st, *FPDC in next 3 sts, BPDC in next 3 sts, rep from * across ending with BPDC in next st, dc+hdc on top of turning ch. Turn.
Next row: ch 2, dc in same st, BPDC in next 2 sts, *FPDC in next 3 sts, BPDC in next 3 sts, rep from * across ending with BPDC in next 2 sts, dc+hdc on top of turning ch. Turn.
Next row: ch 2, dc in same st, *BPDC in next 3 sts, FPDC in next 3 sts, rep from * across ending with BPDC in next 3 sts, dc+hdc on top of turning ch. Turn.
Next row: ch 2, dc in same st, FPDC in next st, BPDC in next 3 sts, *FPDC in next 3 sts, BPDC in next 3 sts, rep from * across ending with FPDC in next st, dc+hdc on top of turning ch. Turn.
Next row: ch 2, dc in same st, FPDC in next 2 sts, BPDC in next 3 sts, *FPDC in next 3 sts, BPDC in next 3 sts, rep from * across ending with FPDC in next 2 sts, dc+hdc on top of turning chain. Turn.
Next row: ch 2, dc in same st, *FPDC in next 3 sts, BPDC in next 3 sts, rep from * across ending with FPDC in next 3 sts, dc+hdc on top of turning ch. Turn.
Next row: ch 2, dc in same st, BPDC in next st, FPDC in next 3 sts, *BPDC in next 3 sts, FPDC in next 3 sts, rep from * across ending with BPDC in next st, dc+hdc on top of turning ch. Turn.
Next row: ch 2, BPDC in next 2 sts, FPDC in next 3 sts, *BPDC in next 3 sts, FPDC in next 3 sts, rep from * across ending with BPDC in next 2 sts, hdc on top of turning ch. Turn.
Repeat last row until sleeve measures 17.5 inches in length. Fasten off leaving a long tail. Repeat pattern for the second sleeve.
SLEEVE FOR XL SIZE:
Ch 11
Row 1: sc in 2nd ch from hook, sc to end. Turn.
Row 2: ch 1, sc in BLO in every st across. Turn.
Repeat row 2 until you have a total of 39 rows.
Now we crochet along the long edge of the ribbing:
Next row: ch 3(counts as first dc), make 38 dc across. Turn.
Next row: ch 2, FPDC in next 2 dc, *BPDC in next 3 dc, FPDC in next 3 dc, rep from * across ending with FPDC in next 2 dc, hdc on top of turning ch. Turn.
Next row: ch 2, dc in same st, FPDC in next 2 sts, *BPDC in next 3 sts, FPDC in next 3 sts, rep from * across ending with FPDC in next 2 sts, dc+hdc on top of turning ch. Turn.
Next row: ch 2, dc in same st, *FPDC in next 3 sts, BPDC in next 3 sts, rep from * across ending with FPDC in next 3 sts, dc+hdc on top of turning ch. Turn.
Next row: ch 2, dc in same st, BPDC in next st, *FPDC in next 3 sts, BPDC in next 3 sts, rep from * across ending with BPDC in next st, dc+hdc on top of turning ch. Turn.
Next row: ch 2, dc in same st, BPDC in next 2 sts, *FPDC in next 3 sts, BPDC in next 3 sts, rep from * across ending with BPDC in next 2 sts, dc+hdc on top of turning ch. Turn.
Next row: ch 2, dc in same st, *BPDC in next 3 sts, FPDC in next 3 sts, rep from * across ending with BPDC in next 3 sts, dc+hdc on top of turning ch. Turn.
Next row: ch 2, dc in same st, FPDC in next st, BPDC in next 3 sts, *FPDC in next 3 sts, BPDC in next 3 sts, rep from * across ending with FPDC in next st, dc+hdc on top of turning ch. Turn.
Next row: ch 2, dc in same st, FPDC in next 2 sts, BPDC in next 3 sts, *FPDC in next 3 sts, BPDC in next 3 sts, rep from * across ending with FPDC in next 2 sts, dc+hdc on top of turning chain. Turn.
Next row: ch 2, dc in same st, *FPDC in next 3 sts, BPDC in next 3 sts, rep from * across ending with FPDC in next 3 sts, dc+hdc on top of turning ch. Turn.
Next row: ch 2, dc in same st, BPDC in next st, FPDC in next 3 sts, *BPDC in next 3 sts, FPDC in next 3 sts, rep from * across ending with BPDC in next st, dc+hdc on top of turning ch. Turn.
Next row: ch 2 , dc in same st, BPDC in next 2 sts, FPDC in next 3 sts, *BPDC in next 3 sts, FPDC in next 3 sts, rep from * across ending with BPDC in next 2 sts, dc+hdc on top of turning ch. Turn.
Next row: ch 2, dc in same st, * BPDC in next 3 sts, FPDC in next 3 sts, rep from * across ending with BPDC in next 3 sts, dc+hdc on top of turning ch. Turn.
Next row: ch 2, FPDC in next st, BPDC in next 3 sts, *FPDC in next 3 sts, BPDC in next 3 sts, rep from * across ending with FPDC in next st, hdc on top of turning ch. Turn.
Repeat last row until entire sleeve measures 17.5 inches in length. Fasten off leaving a long tail. Repeat same pattern for second sleeve.
SLEEVE FOR 2XL SIZE:
Ch 11
Row 1: sc in 2nd ch from hook, sc to end. Turn.
Row 2: ch 1, sc in BLO in every st across. Turn.
Repeat row 2 until you have a total of 39 rows.
Now we crochet along the long edge of the ribbing:
Next row: ch 3(counts as first dc), make 38 dc across. Turn.
Next row: ch 2, FPDC in next 2 dc, *BPDC in next 3 dc, FPDC in next 3 dc, rep from * across ending with FPDC in next 2 dc, hdc on top of turning ch. Turn.
Next row: ch 2, dc in same st, FPDC in next 2 sts, *BPDC in next 3 sts, FPDC in next 3 sts, rep from * across ending with FPDC in next 2 sts, dc+hdc on top of turning ch. Turn.
Next row: ch 2, dc in same st, *FPDC in next 3 sts, BPDC in next 3 sts, rep from * across ending with FPDC in next 3 sts, dc+hdc on top of turning ch. Turn.
Next row: ch 2, dc in same st, BPDC in next st, *FPDC in next 3 sts, BPDC in next 3 sts, rep from * across ending with BPDC in next st, dc+hdc on top of turning ch. Turn.
Next row: ch 2, dc in same st, BPDC in next 2 sts, *FPDC in next 3 sts, BPDC in next 3 sts, rep from * across ending with BPDC in next 2 sts, dc+hdc on top of turning ch. Turn.
Next row: ch 2, dc in same st, *BPDC in next 3 sts, FPDC in next 3 sts, rep from * across ending with BPDC in next 3 sts, dc+hdc on top of turning ch. Turn.
Next row: ch 2, dc in same st, FPDC in next st, BPDC in next 3 sts, *FPDC in next 3 sts, BPDC in next 3 sts, rep from * across ending with FPDC in next st, dc+hdc on top of turning ch. Turn.
Next row: ch 2, dc in same st, FPDC in next 2 sts, BPDC in next 3 sts, *FPDC in next 3 sts, BPDC in next 3 sts, rep from * across ending with FPDC in next 2 sts, dc+hdc on top of turning chain. Turn.
Next row: ch 2, dc in same st, *FPDC in next 3 sts, BPDC in next 3 sts, rep from * across ending with FPDC in next 3 sts, dc+hdc on top of turning ch. Turn.
Next row: ch 2, dc in same st, BPDC in next st, FPDC in next 3 sts, *BPDC in next 3 sts, FPDC in next 3 sts, rep from * across ending with BPDC in next st, dc+hdc on top of turning ch. Turn.
Next row: ch 2 , dc in same st, BPDC in next 2 sts, FPDC in next 3 sts, *BPDC in next 3 sts, FPDC in next 3 sts, rep from * across ending with BPDC in next 2 sts, dc+hdc on top of turning ch. Turn.
Next row: ch 2, dc in same st, * BPDC in next 3 sts, FPDC in next 3 sts, rep from * across ending with BPDC in next 3 sts, dc+hdc on top of turning ch. Turn.
Next row: ch 2, dc in same st, FPDC in next st, BPDC in next 3 sts, *FPDC in next 3 sts, BPDC in next 3 sts, rep from * across ending with FPDC in next st, dc+hdc on top of turning ch. Turn.
Next row: ch 2, dc in same st, FPDC in next 2 sts, BPDC in next 3 sts, *FPDC in next 3 sts, BPDC in next 3 sts, rep from * across ening with FPDC in next 2 sts, dc+hdc on top of turning ch. Turn.
Next row: ch 2, *FPDC in next 3 sts, BPDC in next 3 sts, rep from * across ending with FPDC in next 3 sts, hdc on top of turning ch. Turn.
Repeat last row until entire sleeve measures 18 inches in length. Fasten off leaving a long tail. Repeat the pattern for the second sleeve.
SLEEVE FOR 3XL SIZE:
Ch 11
Row 1: sc in 2nd ch from hook, sc to end. Turn.
Row 2: ch 1, sc in BLO in every st across. Turn.
Repeat row 2 until you have a total of 39 rows.
Now we crochet along the long edge of the ribbing:
Next row: ch 3(counts as first dc), make 38 dc across. Turn.
Next row: ch 2, FPDC in next 2 dc, *BPDC in next 3 dc, FPDC in next 3 dc, rep from * across ending with FPDC in next 2 dc, hdc on top of turning ch. Turn.
Next row: ch 2, dc in same st, FPDC in next 2 sts, *BPDC in next 3 sts, FPDC in next 3 sts, rep from * across ending with FPDC in next 2 sts, dc+hdc on top of turning ch. Turn.
Next row: ch 2, dc in same st, *FPDC in next 3 sts, BPDC in next 3 sts, rep from * across ending with FPDC in next 3 sts, dc+hdc on top of turning ch. Turn.
Next row: ch 2, dc in same st, BPDC in next st, *FPDC in next 3 sts, BPDC in next 3 sts, rep from * across ending with BPDC in next st, dc+hdc on top of turning ch. Turn.
Next row: ch 2, dc in same st, BPDC in next 2 sts, *FPDC in next 3 sts, BPDC in next 3 sts, rep from * across ending with BPDC in next 2 sts, dc+hdc on top of turning ch. Turn.
Next row: ch 2, dc in same st, *BPDC in next 3 sts, FPDC in next 3 sts, rep from * across ending with BPDC in next 3 sts, dc+hdc on top of turning ch. Turn.
Next row: ch 2, dc in same st, FPDC in next st, BPDC in next 3 sts, *FPDC in next 3 sts, BPDC in next 3 sts, rep from * across ending with FPDC in next st, dc+hdc on top of turning ch. Turn.
Next row: ch 2, dc in same st, FPDC in next 2 sts, BPDC in next 3 sts, *FPDC in next 3 sts, BPDC in next 3 sts, rep from * across ending with FPDC in next 2 sts, dc+hdc on top of turning chain. Turn.
Next row: ch 2, dc in same st, *FPDC in next 3 sts, BPDC in next 3 sts, rep from * across ending with FPDC in next 3 sts, dc+hdc on top of turning ch. Turn.
Next row: ch 2, dc in same st, BPDC in next st, FPDC in next 3 sts, *BPDC in next 3 sts, FPDC in next 3 sts, rep from * across ending with BPDC in next st, dc+hdc on top of turning ch. Turn.
Next row: ch 2 , dc in same st, BPDC in next 2 sts, FPDC in next 3 sts, *BPDC in next 3 sts, FPDC in next 3 sts, rep from * across ending with BPDC in next 2 sts, dc+hdc on top of turning ch. Turn.
Next row: ch 2, dc in same st, * BPDC in next 3 sts, FPDC in next 3 sts, rep from * across ending with BPDC in next 3 sts, dc+hdc on top of turning ch. Turn.
Next row: ch 2, dc in same st, FPDC in next st, BPDC in next 3 sts, *FPDC in next 3 sts, BPDC in next 3 sts, rep from * across ending with FPDC in next st, dc+hdc on top of turning ch. Turn.
Next row: ch 2, dc in same st, FPDC in next 2 sts, BPDC in next 3 sts, *FPDC in next 3 sts, BPDC in next 3 sts, rep from * across ening with FPDC in next 2 sts, dc+hdc on top of turning ch. Turn.
Next row: ch 2, dc in same st, *FPDC in next 3 sts, BPDC in next 3 sts, rep from * across ending with FPDC in next 3 sts, dc+hdc on top of turning ch.
Next row: ch 2, dc in same st, BPDC in next st, FPDC in next 3 sts, *BPDC in next 3 sts, FPDC in next 3 sts, rep from * across ending with BPDC in next st, dc+hdc on top of turning ch. Turn.
Next row: ch 2, BPDC in next 2 sts, FPDC in next 3 sts, *BPDC in next 3 sts, FPDC in next 3 sts, rep from * across ending with BPDC in next 2 sts, hdc on top of turning ch. Turn.
Repeat last row until entire sleeve measures 18.5 inches in length. Fasten off leaving a long tail. Repeat pattern for the second sleeve.
SEWING IT ALL TOGETHER:
Lay your back panel on a flat surface and place the front panel on top of it. With your yarn and yarn needle sew across the shoulders stitching the two panels together.
Next lay the entire piece out flat with the wrong side facing you. Grab a sleeve and mark the middle stitch with a stitch marker. Line this marker up with the shoulder seam and connect the two pieces together. Sew together. Repeat for the other sleeve.
Now fold the sweater over and sew along the edge of the sleeve and down along the sides of the sweater.
Turn the sweater right side out now.
Attach yarn to the side of the neck hole. I like to connect it near the shoulder seam.
Round 1: ch 1, sc all the way around the entire neck hole. Slst to the first sc to close the round.
Round 2: ch 8, sc in 2nd ch from hook, sc in next 6 chains, slst into next 2 sc (on the neck hole), *turn, skip 2 slsts, sc in BLO in next 7 sc, turn, ch 1, sc in next 7 sc BLO, slst into next 2 sc on neck hole, rep from * all the way around the entire neck hole. Fasten off leaving a long tail. With your yarn and yarn needle, sew the two ends of the ribbed neckline together. Fasten off and weave in all ends.
You are now done making your crochet sweater. Enjoy
I absolutely love your tutorials Carrie!!!!
Hi Carrie, loving the new basket weave sweater ,am I working it out right though 9balls for the xl size.
Thanks annette
Hi Carrie! I don’t work well from videos, is there a printable version of this pattern? I would gladly pay for it!
Thanks, Toni
[email protected]
Beautiful
It’s for free, hard beleaving! Thank you so…… much!
I love the look of this! Would this work for a man as well? I’m thinking of matching sweaters for my son & his wife.
Could this pattern be used for a man.? I’m thinking matching sweaters for my son & wife
Hi Carrie, this is a stunning pattern, thank you so much for sharing it with us! I just wondered whether there is a guage available for this pattern? I have a tendency to crochet a little tightly so making a guage swatch is really helpful for me to see if I should change hook size. Thank you so much.
I love this pattern, but am having a problem with the shoulder, HELP!!
What is the gauge of the pattern?
Was there a response about the gauge used in this sweater. My stitches can get very loose if I don’t have a gauge to test with.
I love this pattern so much! Just finished making this for my daughter and it turned out beautifully. Thank you.
Hi, did you get a response to this question?
Hi Carrie , I would love to do the basket weave jumper but I am in the uk how does this transfer to our needle sizes and yarn . Thank you , Anita
Cannot find a print button. How do I print the pattern? Thank you for sharing.
Hello! Is the a gauge for this pattern? Thanks so much!
This pattern is wonderful! It’s fitting true to size and really easy to do!
Thank you!