
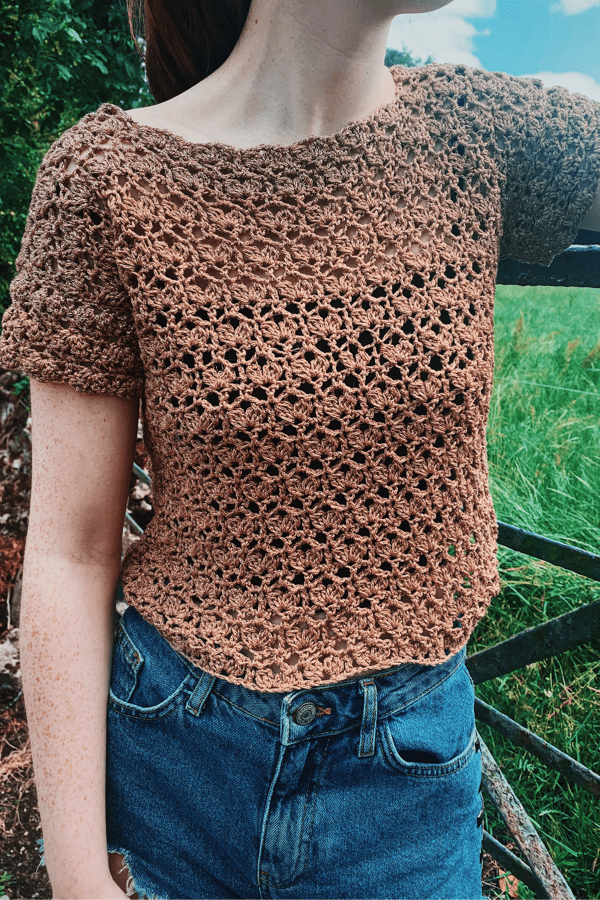
I’m so in love with my latest design, the Darling Buds Top. I think the stitch reminds me of little flowers budding. It is so pretty and already I can think of many fun projects to make with this stitch.
I made my top slightly cropped but if you want to make it longer simply add more rows. In my opinion I think this top is simple, beginner friendly with no increasing or decreasing making it a quick project to get finished.
The crochet top was designed with two identical front and back panels that are sewn at the shoulders, and two identical short sleeves that are sewn in at the end. For a longer sleeve…you guessed it…simply add more rows!
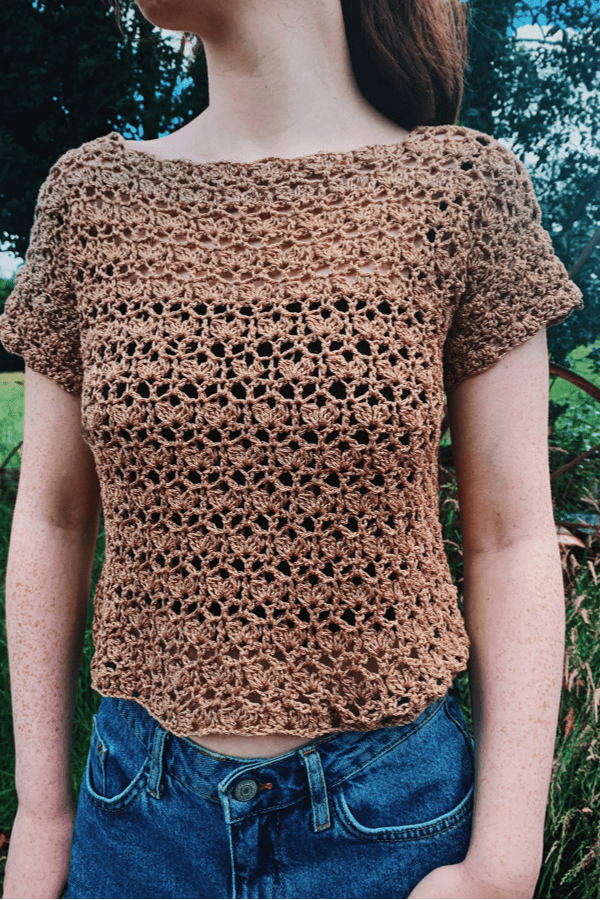
The yarn I used was B&M Glamorous Sparkle DK. This yarn is a metallic acrylic blend and the texture is chainette. I know this yarn is pretty easy to come by here in Ireland and the UK but I’m not sure about other parts of the world. But you can use any Dk yarn that you like.
MATERIALS
- Weight 3 Light/Dk/8 ply yarn
- I used B&M Glamorous Sparkle Dk/375m/100g per ball
- 5 mm crochet hook
- Scissors
- Yarn needle
- Stitch markers
ABBREVIATIONS
- ch = chain
- sc = single crochet
- dc = double crochet
- sp = space
- sk = skip
SPECIAL STITCHES:
- Dc3tog = yarn over. insert hook in designated st, yarn over and pull up loop, yarn over, draw through 2 loops, [yarn over, insert hook into same st, draw up loop, yarn over, draw through 2 loops] twice, yarn over, draw through 4 remaining loops on hook.
- Bud stitch = (Dc3tog, ch3, dc3tog) in designated stitch.
NOTES:
- This crochet top is made in sizes S(M, L, XL, 2XL)
- Made using two panels (front and back are identical)
- Made from bottom up
- Stitch multiple is 6+3
YARN AMOUNTS:
780( 860, 920, 1000, 1060) yards
GAUGE:
1 bud stitch = 1″
MEASUREMENTS:
To fit bust 34( 36, 38, 40, 42) inches
PANELS ( MAKE 2 )
Ch 87( 99, 105, 117, 129)
Row 1: Bud stitch in 6th ch from hook, sk 2 ch, *dc in next ch, sk 2 ch, Bud stitch in next ch, sk 2 ch, rep from * across, dc in last ch. Turn.
Row 2: Ch 5 (counts as dc and ch 2 throughout), *sc in next ch-3sp, ch 2, dc in next dc**, ch 2, repeat from * ending last repeat at **. Turn.
Row 3: Ch 5, dc3tog in same stitch, *dc in next sc**, Bud stitch in next dc, rep from * across ending last repeat at **, sk 2 ch of ch-5 turning ch, (dc3tog, ch 2, dc) in the 3rd ch of the turning ch. Turn.
Row 4: Ch 1, sc in first st, *ch 2, dc in next dc, ch 2, sc in next ch-3sp, repeat from * across, placing last sc in 3rd ch of the ch 5 turning ch. Turn
Row 5: Ch 3 (counts as dc) *Bud stitch in next dc, dc in next sc, repeat from * across.
Repeat rows 2-5 6 more times. For more length add more rows but your last row should be row 3 or row 5. DO NOT FASTEN OFF.
Next grab two stitch markers. From where your hook is now, count 4( 5, 6, 7, 8) Bud stitches in. Mark the dc after that. For the other side of the top grab your second stitch marker and count 4( 5, 6, 7, 8) bud stitch in from the edge and mark the dc directly after.
Now continuing on from where your hook is now:
Next row: Ch 5, *sc in next ch-3sp, ch 2, dc in next dc**, ch 2, repeat from * across, ending last repeat at ** and placing last dc into stitch with stitch marker. Turn.
Next row: Ch 1, sc in same st, *2sc in next ch-2sp, sc in next sc, 2sc in ch-2sp, sc in next dc, repeat from * across, ending with 2 sc in ch-5sp, and sc in 3rd ch of ch 5 turning chain.
Fasten off leaving a long tail.
Flip your piece to the other side and attach yarn to the other stitch with the stitch marker.
Next row: Ch 5, *sc in next ch-3sp, ch 2, dc in next dc**, ch 2, repeat from * across, ending last repeat at ** and placing last dc into stitch with stitch marker. Turn.
Next row: Ch 1, sc in same st, *2sc in next ch-2sp, sc in next sc, 2sc in ch-2sp, sc in next dc, repeat from * across, ending with 2 sc in ch-5sp, and sc in 3rd ch of ch 5 turning chain.
Fasten off leaving long tail.
SLEEVES ( MAKE 2 ):
Ch 63( 63, 75, 75, 81)
Repeat rows 1-5 of front/back panel. For a longer sleeve add more rows but make sure to end on either row 3 or row 5.
ASSEMBLY:
Lay the back panel on a flat surface right side facing up, then place the front panel (wrong side facing up) on top. With a yarn needle and some yarn stitch at the shoulders.
Now lay your entire piece out flat, wrong side facing up.
Take a sleeve and with the bud stitches facing downward mark the middle stitch with a stitch marker. Now attach same stitch marker to the seam along one of your shoulders. With yarn needle and thread stitch together. Repeat on other side.
Next fold your top over and stitch along the under edge of sleeves and down along edge of top.
You are now finished your new crochet top!
If you are more of a visual learner please click on the video below. It will take you to the video tutorial on my Youtube chanel.
I think it is very pretty and looks comfortable.
Hello Carrie!
Is your pattern written in UK stitches or US? As in, I think I remember a US single crochet is a double crochet in UK.
Thank you!
Laurie
Carrie, so glad to meet you in your crochet corner of the internet. I started your Darling Buds Top using your video. You are an excellent teacher – excellent pacing and voice.
My grandmother taught me to crochet but not to read patterns. This will be my first attempt at a top with sleeves. I was just about to give up on ever making a top until your website. Thank you so much.
Lynn from USA
I love all your patterns! They really fit my taste and lifestyle!
Thank you so much x
Thanks so much going to try making for my granddaughters the pocket shawls love them
Is this pattern in American terms? Love it
I love your crocheted patterns can’t wait to start old
I absolutely love your designs. I’ve done a few crop tops for my girls but now I’m planning on making each one of your gorgeous cardigans for Christmas. The Darling Buds top is next on my list of things to make ‘just for me’ (as opposed to the many projects that find their way into my daughters’ closets. Do you use UK or US terms?
As I watched the video, she is using US terms for the work.
Thanks for the pattern! It was easy to follow. I made the top for my daughter. She loves it.
Approximately how many yards to make the 2x top using a 4 weight yarn
Carrie,
I started your Darling Buds Top and am loving the pattern. I am using a 50% bamboo, and 50% cotton yarn from Yarn Bee called Bambo-tiful. It appears to have a scrumptious drape and great stitch definition. Definitely brings out those buds. I will post a pic of it on your instragram when finished. Thank you for your easy to follow, well written pattern. Thank you for sharing your talent and love of crochet. I love the style of your creations, and am sure to be making more of them.
Absolutely great tutorial! A lovely top and really well explained