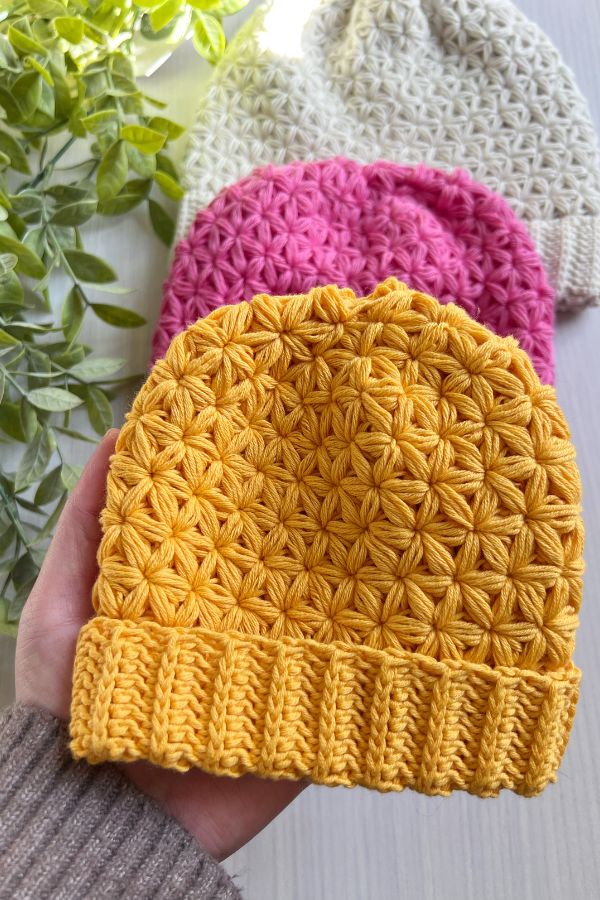
There’s something really charming about the jasmine stitch. It has that fluffy, petal-like texture that instantly adds softness and warmth to any project. This Pink Jasmine Beanie is worked from the bottom up, beginning with a stretch ribbed brim, working the jasmine stitch in the round and finally finishing with a gentle decrease to shape the crown. The result is a cozy winter hat with beautiful texture and a snug, comfortable fit.

The pattern is available in newborn, baby, toddler, child, adult and large adult sizes, so you can make one for everyone. Whether you’re gifting, selling at markets, or treating yourself, this beanie has that handmade elegance that always gets compliments.
Construction Overview
We’ll start with the ribbing, worked in half double crochet in the third loop. This creates that classic knit-look stretch and helps the hat fit comfortably around the head without being too tight. Once the ribbing is joined, we begin working the jasmine stitch in the round.
Our Pink Jasmine Beanie is entirely customizable in that you can change your stitch choice for the bottom ribbing. If you find working into the third loop a little difficult you can simply opt for a simpler half double crochet worked into the back loop only. You can even use single crochet too! Simply crochet the ribbed band until it is long enough to go around the head making sure the number of rows you end with is in multiples of two. After joining the ribbing together, we will count the number of rows we made for the ribbing. If you have, say 50 rows of ribbing you will work 50 single crochet around the edge of the ribbing just created.
The Jasmine stitch is known for its puffed, petal-like clusters. Worked in the round, it forms a beautifully textured fabric that looks more complicated than it is. Once we have reached the desired height for the size you are making we shape the crown with a few gentle decreases. The decreases blend neatly into the stitch pattern, giving a smooth, finished crown.
Why You’ll Love This Pattern
- Beautiful, full texture without being heavy
- Easily customizable
- Stretchy ribbed brim for a comfortable fit
- Worked in the round (no seaming)
- Comes in sizes from newborn to large adult
- A lovely winter gift or market stall favorite
This beanie looks especially sweet in pink, but it also works beautifully in natural neutrals, snowy whites or even deep jewel tones for winter.
Skill Level
Confident Beginner to Intermediate
If you’re new to the jasmine stitch, don’t worry. Once you get the rhythm of drawing up loops to create the puffed flower clusters, the stitch repeats smoothly. It’s very forgiving and looks impressive right away.

The Fit and Style
This hat has a cozy, slightly snug fit with the option to adjust for a bit more slouch if you prefer. The ribbing hugs the head gently, while the jasmine stitch builds upward with soft texture and warmth. It’s the kind of hat that looks good on everyone!
Watch The Video Tutorial
We highly recommend that you follow our free step by step Youtube video tutorial. Watching this video will give you a better understanding on how to create the crochet jasmine stitch. One of the trickiest things when working the jasmine stitch might be holding the base of the working yarn before pulling it through all of the loops on the hook. The video tutorial will help you to understand this so much better, so it is highly recommended that you go and watch that first.
Purchase The Ad-Free PDF Pattern
Are you looking for the ad-free version of the Pink Jasmine Beanie? You can find it in my Etsy store! When you purchase this pattern you will be able to download it and then print it if you like. So now you can bring the pattern with you, wherever you go!
Yarn and Materials Needed
For the Pink Jasmine Beanie I used a weight 2 yarn. I didn’t want a very chunky hat so I opted for a lighter yarn. The jasmine stitch is worked by crocheting lots of crochet puff stitches and by doing this you create a chunky stitch. I recommend you use sport or some of the lighter dk yarns. Sometimes some dk yarns can be slightly on the heavier side so be careful when choosing. If you have nothing on hand other than a heavier dk yarn I would suggest you change the construction of you puff stitches. What do I mean by that? In this pattern I crochet a puff stitch by doing a yarn over, insert hook into the designated st, pull up a loop, (yarn over, insert hook into the same stitch and pull up a loop) x 2 times. When using a heavier yarn I suggest you work your puff stitch as follows: yarn over, insert hook into the designated stitch, pull up a loop, yarn over, insert hook into the same stitch and pull up a loop. This creates a less chunkier stitch when using heavier yarns. But all of this is completely your choice. If you are looking for a chunkier hat by all means use you heavier yarn and do the first puff stitch option given above.
Here are some yarn ideas:
Drops Fabel, Drops Nord, Lionbrand Baby Alpaca, Lionbrand Superwash Merino, Paintbox Dk, KnitPicks Palette, KnitPicks Stroll Fingering, Scheepjes Stone Washed.
Crochet Hooks 3.5mm and 4mm
Notions stitch marker, measuring tape, yarn needle
Sizing and Measurements
Newborn (Baby, Toddler, Child, Adult, Large Adult)
Newborn: 13-14″
Baby: 16-17″
Toddler: 18-19″
Child: 20-21″
Adult: 22-23″
Large adult: 24-26″
Abbreviations
ch = chain
hdc = half double crochet
hdc3l = half double crochet in the third loop
scblo = single crochet back loop only
Pst = puff stitch
slst = slip stitch
rem = remaining
st(s) = stitch(es)
rep = repeat
yo = yarn over
sp = space
Special stitch: Puff Stitch (Pst): yo, insert hook into designated st, pull up a loop, (yo, insert hook into same sp, pull up a loop)x 2. Keep all loops on hook until otherwise specified
Crochet Pink Jasmine Beanie Pattern
Brim
Using smaller hook
Ch 17(19, 21, 23, 25, 27) or whatever height you want keeping in mind it will be folded over.
Row 1: hdc in 2nd ch from the hook and in each ch across, turn. [16(18, 20, 22, 24, 26) sts]
You can choose to crochet your ribbing in scblo if you choose.
Row 2: Ch 1, hdc3l in each st across, turn.
Rep Row 2 until the end of Row 40(48, 52, 60, 64, 70) or until the ribbed hem measures 10.5(13, 14, 16, 17.5, 19.5)” in length but at the same time keeping this number in multiples of 2.
Slst the short ends together to form a circle.
Main Body of Hat
Change to bigger hook
Round 1: Ch 1, sc at the end of each ribbed row around. [40(48, 52, 60, 64, 70) sts or whatever number of rows you had for the brim. Slst to 1st sc to join.
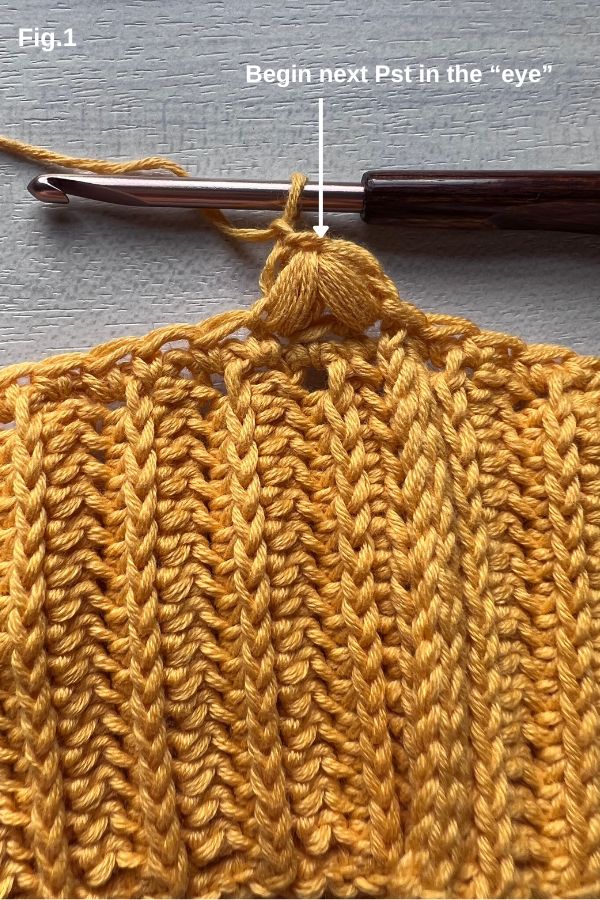
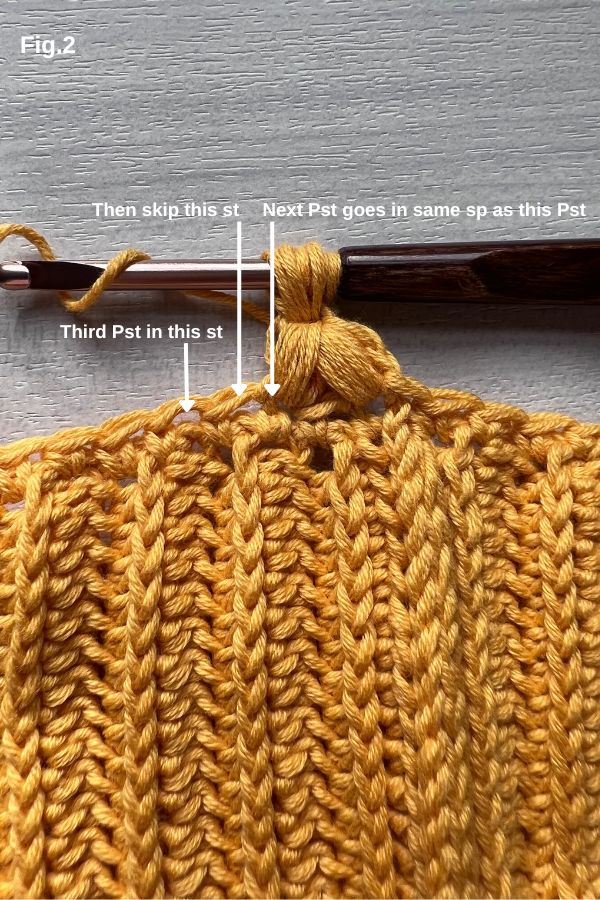
Round 2: Ch 1, pull loop to a height of 0.5″, Pst in same st (7 loops on hook now) skip next st, Pst in the next st (13 loops on hook now), hold working yarn at the base of the st creating a small loop, yo, pull through all 13 loops, place the loop of yarn on hook and pull yarn slightly, yo, pull through rem 2 loops. Place marker in the “eye” of the st to mark beg of round.
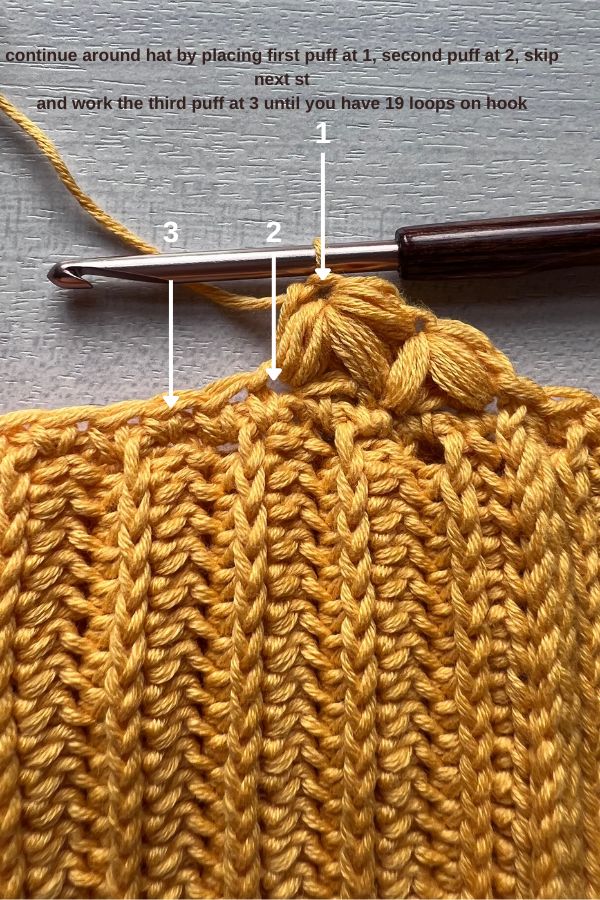
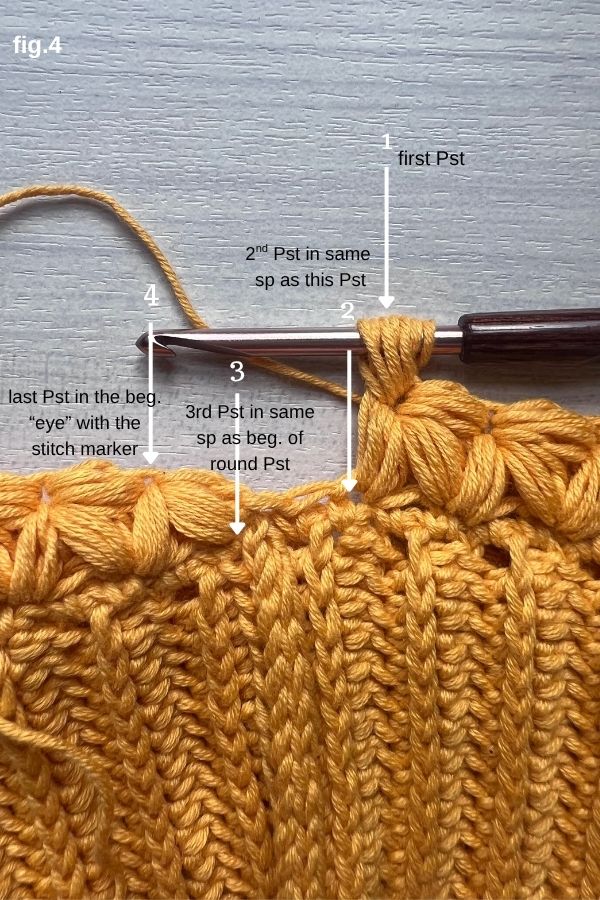
Ch 1 and pull st to the height of 0.5″, Pst in the “eye” created on top of two Psts just created (see fig.1 below) (7 loops on hook now), Pst in same sp as next Pst [fig.2] (13 loops on hook now), skip next st, Pst in the next st (19 loops on hook now) hold working yarn at the base of the st creating a small loop, yo, pull through all 19 loops, place the loop of yarn on hook and pull yarn slightly, yo, pull through rem 2 loops. *Ch 1, Pst in the “eye” (7 loops on hook now), Pst in same sp as next Pst (13 loops on hook now), skip next st, Pst in the next st (19 loops on hook now), hold yarn at the base of st creating a small loop, yo pull through all 19 loops, place the loop of yarn on hook, pull yarn slightly, yo, pull through rem 2 loops. Rep from * around. Finish the round [fig.4] with a ch 1, Pst in the “eye” (7 loops on hook) Pst in same sp as next Pst (13 loops on hook now), skip next st, Pst in the same sp as the first Pst created at beg of round(19 loops on hook now), Pst in the next “eye” (this is where you placed the marker)(25 loops on hook now) hold yarn at base of st creating a small loop, yo, pull through all 25 loops, place the loop of yarn created at base back onto the hook and pull yarn slightly, yo, pull through 2 rem loops.
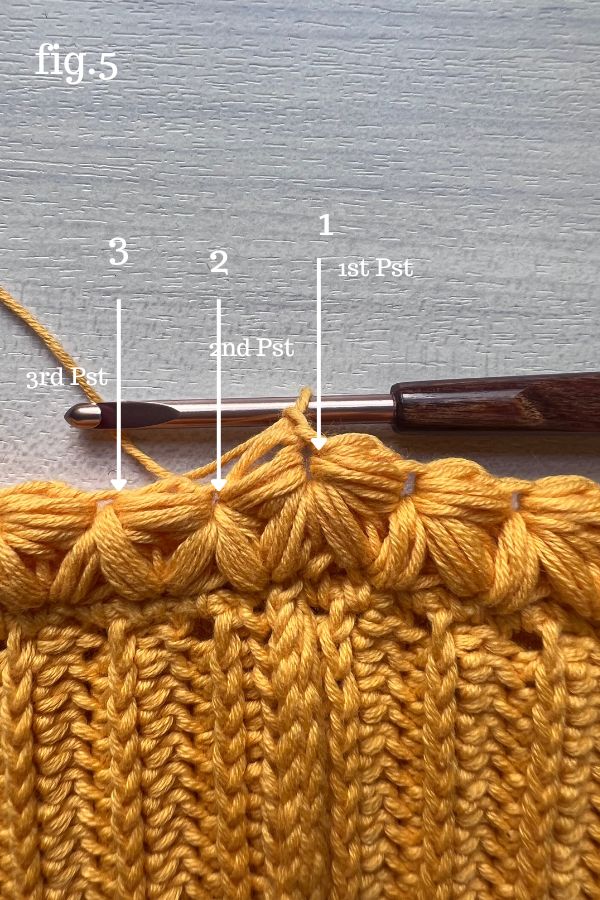
Round 3: Ch 1 and pull st to the height of 0.5″. Pst in 1st “eye, (7 loops on hook now) Pst in same sp as next Pst, (13 loops on hook now).Hold yarn at base of st creating a small loop, yo and pull through all 13 loops. Place loop created on hook and pull yarn slightly, yo and pull through 2 rem loops. Place marker in the “eye” to marker beg of round.
Fig.5 shows where to place the 3 Psts for this round
*Ch 1, pull st to height of 0.5″, Pst in “eye” (7 loops on hook), Pst in same sp as next Pst (13 loops on hook), Pst in next “eye” (19 loops on hook). Hold yarn at base of st creating a loop, yo, pull through all 19 loops. Place loop created at base of st on the hook and pull yarn slightly. Yo and pull through 2 rem loops. Rep from * around the hat.
Finish the round with a ch 1, pull st to height of 0.5″, Pst in “eye” (7 loops on hook), Pst in same sp as ext Pst (13 loops on hook), Pst in same sp as 1st Pst of the round (19 loops on hook), Pst in the next “eye” with the stitch marker (25 loops on hook). Hold yarn at base of st creating a small loop, yo, and pull through all 25 loops. Place loop created at base of st onto the hook and pull the yarn slightly. Yo and pull through 2 rem loops.
Rep Round 3 until hat (including folded over brim) measures approximately 4(4.5, 5.5, 6, 7.5, 9)” or about 1-1.5″ below your preferred height.
Crown Decreasing
Round 1: Ch 1 and pull st to the height of 0.5″, Pst in same st (7 loops on hook now) skip next st, Pst in the next st (13 loops on hook now), hold working yarn at the base of the st creating a small loop, yo, pull through all 13 loops, place the loop of yarn you created at the base of the st on hook and pull yarn slightly, yo, pull through rem 2 loops. Place marker in the “eye” of the st to mark beg of round.
*Ch 1, pull st to height of 0.5″, Pst in “eye” (7 loops on hook), Pst in same sp as next Pst (13 loops on hook), Pst in next “eye” (19 loops on hook), Pst in next “eye” (25 loops on hook). Hold working yarn at the base of the st creating a small loop, yo, pull through all 25 loops, place the loop of yarn you created at the base of the st onto the hook, yo and pull through the 2 rem loops. Rep from * around the hat.
Finish the round with a ch 1, pull st to the height of 0.5″, Pst in “eye, (7 loops on hook), Pst in same sp as next Pst, (13 loops on hook), Pst in next “eye” (19 loops on hook), Pst in beg “eye” of round with the stitch marker (25 loops on hook). Hold working yarn at base of st creating a small loop, yo, ppull through all 25 loops. Place loop created at base of st onto the hook, pull yarn slightly, yo and pull through 2 rem loops.
Round 2: Ch 1 and pull st to the height of 0.5″, Pst in same st (7 loops on hook now) skip next st, Pst in the next st (13 loops on hook now), hold working yarn at the base of the st creating a small loop, yo, pull through all 13 loops, place the loop of yarn you created at the base of the st on hook and pull yarn slightly, yo, pull through rem 2 loops. Place marker in the “eye” of the st to mark beg of round.
*Ch 1, pull st to height of 0.5″, Pst in “eye” (7 loops on hook), Pst in same sp as next Pst (13 loops on hook), Pst in next “eye” (19 loops on hook), Pst in next “eye” (25 loops on hook). Hold working yarn at the base of the st creating a small loop, yo, pull through all 25 loops, place the loop of yarn you created at the base of the st onto the hook, pull yarn slightly, yo and pull through the 2 rem loops. Rep from * around the hat.
Finish the round with a ch 1, pull st to the height of 0.5″, Pst in the “eye” (7 loops on hook), Pst in same sp as next Pst (13 loops on hook), Pst in next “eye” (19 loops on hook), Pst in next “eye” (25 loops on hook), Pst in beg of round “eye” (the st with a stitch marker) (31 loops on hook). Hold working yarn at the base of the st creating a small loop, yo and pull through all 31 loops. Place loop created at the base of the st onto the hook, pull yarn slightly, yo and pull through the 2 rem loops. Ch 1 and fasten off leaving a long tail.
Closing the Top of Hat
With the long tail and a yarn needle, weave in and out of each “eye” all the way around the top of hat. Once you have weaved all the way around pull the yarn tightly to close the hole. Secure with a few stitch in the inside of the hat. Add your favorite pom pom and enjoy.
More Patterns That might Interest You