
I’m so excited to share with you all my latest crochet design- the Crochet V Neck Sweater.
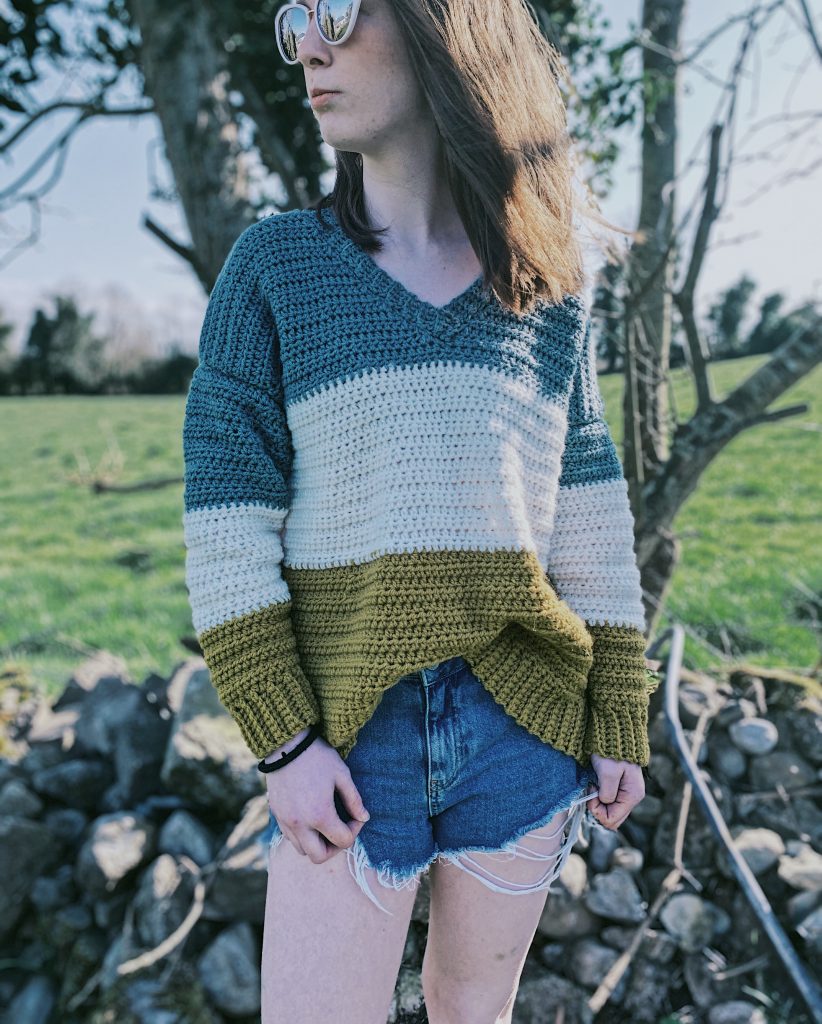
This crochet v neck sweater is designed bottom up and made with four panels; the back, front and two sleeves. The sweater is designed to be over sized, with a 10″ positive ease so please keep that in mind when choosing your size. For a more fitted crochet sweater I suggest you go down a size or use a smaller hook.
Sizing: S(M,L,XL,2XL,3XL,4XL,5XL)
To fit bust: 34(38,42,46,50,54,58,62)”
Materials:
Any weight 4 yarn. I used about 600g for the size small. More yarn will be needed for larger sizes. I would suggest 600g for M, 650-700g for L and XL, 700-750g for 2XL and 3XL, and 750-800g for 4XL and 5XL.
6mm crochet hook
Yarn needle, stitch markers and a measuring tape.
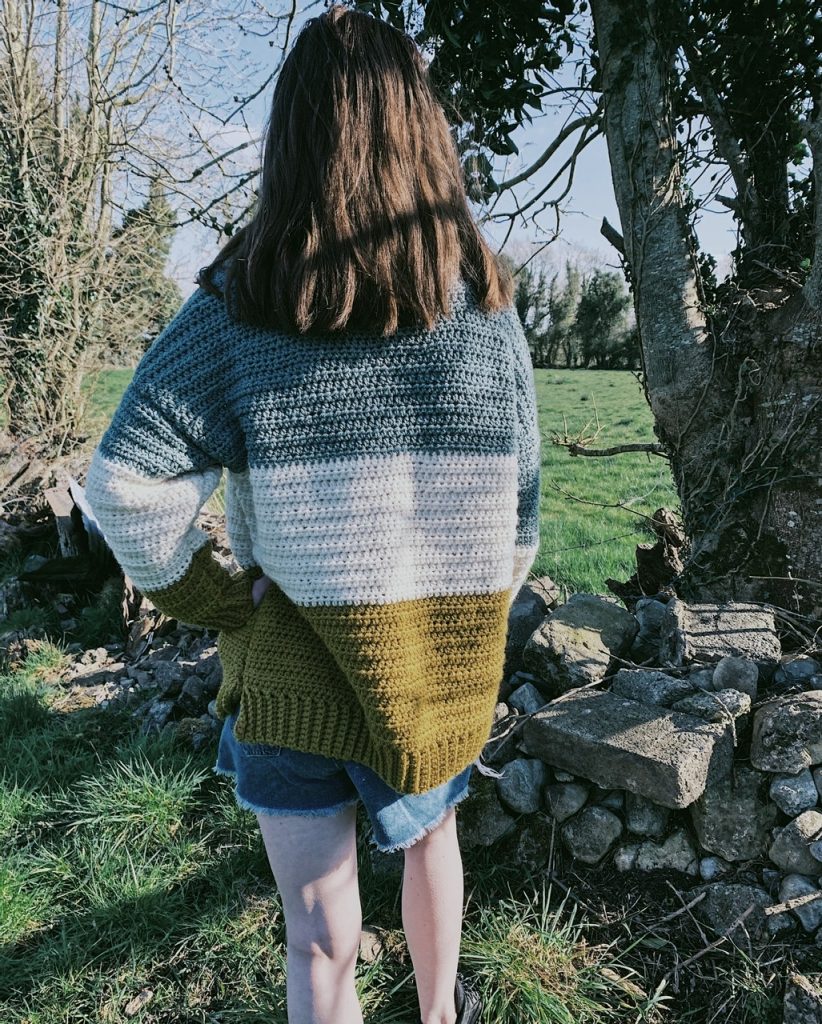
Back panel:
Row 1: Ch 9, sc into 2nd ch from hook, sc in every chain across. Turn.
Row 2: Ch 1, sc in BLO in every st across. Turn.
Repeat row 2 until you have a total of 66(72,78,84,90,96,102,108) rows.
Now we will work along the long side of the ribbed band:
Ch 1 (never counted as a stitch), and make 66(72,78,84,90,96,102,108) hdc evenly across. Turn.
Next row: Ch 1, hdc in every st across. Turn.
Repeat last row until you have a total of 52 rows of hdc completed. Fasten off leaving a long tail.
Front panel:
Do the same as for the back panel but stop at row 34.
Now place a stitch marker on stitch number 33(36,39,42,45,48,51,54). You are essentially marking the middle stitch.
Next row: Ch 1, hdc into next 31(34,37,40,43,46,49,52) sts, then hdc2tog over last 2 sts. Turn.
Next row: Ch 1, hdc in every st across. Turn.
Next row: Ch 1, hdc across until 2 sts remain, hdc2tog. Turn.
Next row: Ch 1, hdc in every st across. Turn.
Repeat last 2 rows for a further 14 rows. Fasten off leaving a long tail.
For the other side:
Attach your yarn to the 2nd stitch from the other side (the centre to where the “v” will be.
Row 1: Ch 1, hdc into remaining 32(35,38,41,44,47,50,53) sts. Turn.
Row 2: Ch 1, hdc in every stitch across. Turn.
Row 3: Ch 1, hdc2tog, hd in all remaining sts. Turn.
Row 4: Ch 1, hdc in every st across. Turn.
Repeat rows 3-4 for a further 14 rows. Fast off leaving a long tail.
Sleeves (make 2):
Ch 9
Row 1: sc in 2nd ch from hook, sc to end. Turn.
Row 2: Ch 1, sc in BLO in every st across. Turn.
Repeat row 2 for a total of 26 rows. This will be the ribbed sleeve cuff. If you need it bigger add more rows here but make sure you have an even number of rows.
Now working along the long side of the ribbed cuff, ch 1, and make 26 hdc evenly across. Turn.
Next row: Ch 1, 2hdc into first st, hdc in every st across until 1 st remains, 2hdc into last st. Turn.
Next row: Ch 1, hdc in every st across. Turn.
Repeat last 2 rows until you have 54(56,60,62,68,74,78,78) sts.
Next row: Ch 1 hdc in every st across. Turn. Repeat this row until your sleeve measures about 17 inches long. Fasten off leaving a long tail.
Assembly:
Lay the back panel on a flat surface. Place the front panel on top and slip st the two pieces together at the top of the shoulders. Now lay the entire piece out flat and grab a sleeve. FInd the middle st of the sleeve and place a stitch marker into that stitch. Now line the marker up with one of the shoulder seams and attach. Now slip stitch the sleeve to the main body of the sweater. Do the same for the other side. Next fold your sweater over and slip st up along the sides. Fasten off and weave in all ends. Turn your sweater right side out now.
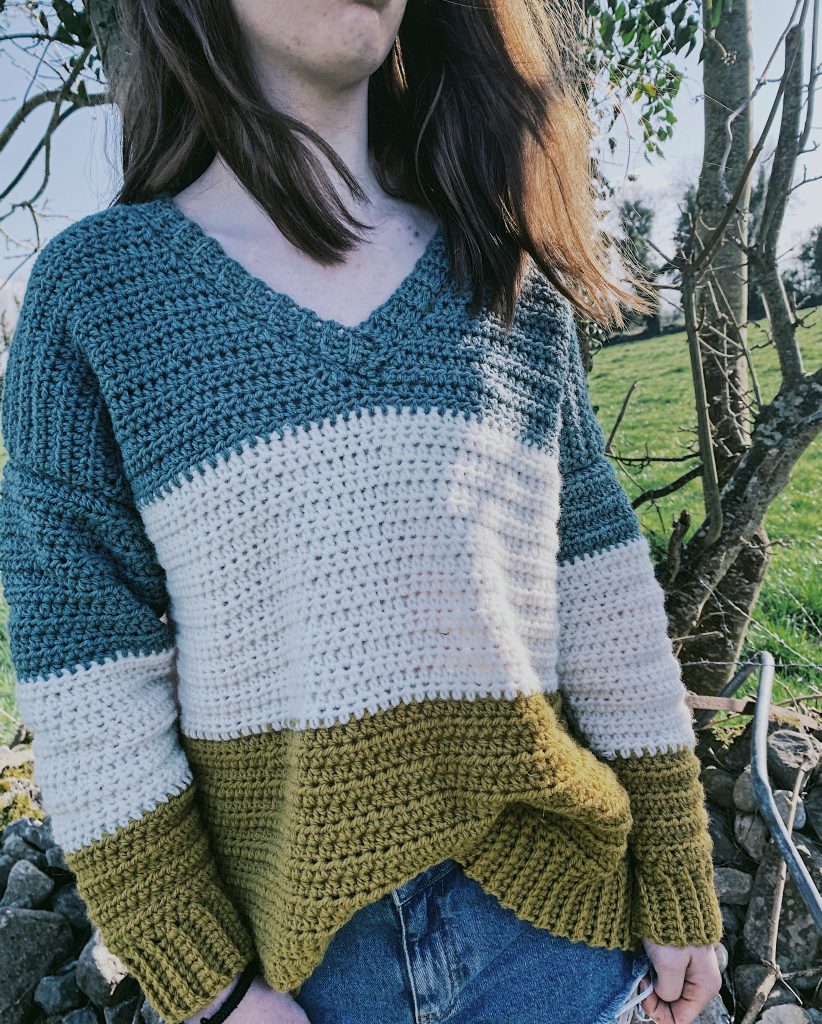
Neck ribbing:
Attach yarn to the centre stitch of the “v”. Ch 1 and sc evenly along the neck opening. When you have gone all the way around slip stitch into the first sc you made.
Continuing from where you are now ch5. Sc into 2nd ch from hook, sc into next 3 chains, slip st into next 2 sc. Turn.
Next row: sc in BLO of next 4 sc. Turn.
Next row: Ch 1, sc in next 4 sts BLO, slip st into next 2 sc. Turn.
Repeat last 2 rows all the way around the neck line.
When you get all the way around fasten off and leave a long tail for sewing. Attach a yarn needle to your long tail. Make a criss cross with the 2 “flaps” and sew into place.
Weave in all your ends and you are now finished.
Thank you for sharing your pattern. It is beautiful.
Im not a confident crocheter but your YT video and your written instructions are so easy to understand. Im actually going to give this a go!
Thank you so much this is just what I was looking for
Susan
Just getting back into crocheting after a long hiatus. I’ve never made a sweater, and yours looks exactly like something I’d love to wear. Thank you for sharing 🙂
Could you tel us what brand and color of yarn you used for this project? Thank you
Thank you so much for this lovely pattern, can’t wait to give it a go!
This is the the sweater I’ve been looking for, for cooler nights here in the Midwest as we slowly are getting our Spring on here. Thank you so much for this pattern, a stash buster for sure. I’m so over making hats, ear warmers and scarves. A Beautiful piece to switch to, and I love your tutorial videos. They definitely do come in handy
Thank you for posting such an easy pattern. I’ve never crocheted a garment before but after going thru your video tutorial, I’m confident enough about crocheting one. 😍
Did I miss something? I missed how you finished the front panel after decreasing for the v-neck??
Hey I am so glad I found your blog page, I really found you by accident,
while I was looking on Bing for something else, Anyways I
am here now and would just like to say cheers for
a incredible post and a all round exciting blog (I
also love the theme/design), I don’t have time to read it all at the minute but I have book-marked it
and also added in your RSS feeds, so when I have time I will be back to read
a great deal more, Please do keep up the excellent b.
Thank you for sharing your pattern and also the tutorial, I am making this as I type I’m going to use different colours though. Thanks again.
Like!! I blog frequently and I really thank you for your content. The article has truly peaked my interest.
Hi – do you think that this sweater would be suitable for a man? Perhaps made in earth tones or in a solid color?
Hi. I love this sweater but I’m stuck on the second half of the v neck. On your written pattern you seem to decrease on the beginning of the row but on your video you decrease on the end of the row. Could you explain this a bit more please as I seem to be confusing myself and just can’t seem to get the two sides of the v neck equal
Could you tell us after how many rows did you change colour?
Look into my homepage :: pdf
Thank You So Much 💓
Thank you for this wonderful pattern. I have made several to sell. They are quick and easy to throw together. I changed the stitch to sc, dc alternately throughout each row to give it a bit of texture. My adult daughter who doesn’t like homemade stuff actually wears this. Thank you.
Beautiful sweater ! Love the colors. Would you explain how to make this with a crew neck instead of the v-neck, Carrie?
Thank you !
love the pattern just wish you would advise for like the bigger sizes how mny rows to do as i did exact;y what it said for 3 xl but looked short on me
Thank you for your beautiful pattern I just wish there was a link so I could print it out. It is hard to crochet at my computer. I’m kind of tech illiterate and don’t know how to print without the link.
Just curious what rows to switch colors in, or if its just by eye? The pattern doesn’t specify when to switch colors.
Is there a gauge? This will be my first garment and I wanted to make sure I have the sizing right.
I made this with elbow-length sleeves. Very well-written pattern, easy for me to adapt. Followed the pattern otherwise to a T.
I would have liked the overall sweater length to be about 4 rows longer, but it is absolutely wearable and cute! I made a medium. For the sleeves, I made the cuffs 6 wide and 40 rows long. Then I increased every other row til I got to the 56 stitches called for in the medium size. Easy peasy!
i did 14 rows of the bottom color and 19 rows of each of the top colors
Hi Carrie!
I just recently found your site and your creations are beautiful, I like them because they are easy, simple but no plain. The instructions are very easy to follow without that much information hard to understand. Less is more for me.
This sweater is going to be my first project of yours. I already have the yarn in a soft shade of blue, it caught my eye as soon as I saw it.
Thank you!
Thank you so much. Just finished the sweater, bust size 38, and it is a perfect fit. Both thumbs up for this awesome pattern 😀
Hi, thanks for the pattern. I noticed that the hook you used in the YouTube video is different than the one listed here. What hook did you use in the video? When I use the 6mm listed it doesn’t turn out as floppy and I have to do a lot more rows to get a decent length.
I’m now in the process of making your sweater can’t wait to see it finished
How many should I chain for XS size when we are working alongside the ribbing?
I’m done with the sweater!! I’m so happy and I can’t wait for the weather to cool down so I can wear it. Thank you for the free pattern. Take care.
Hey Carrie! I’m done with the sweater and I can’t wait for the weather to cool down. I love it! First time crocheting a sweater for me. Thank you for the free pattern. Take care.
This was my very first time crocheting a sweater, and it’s lovely! Thank you.
One problem: the ribbing around the neck turned out floppy. Any sense of what I did wrong? I want to try again. 🙂
I made an XL but I also thought it was too short. For future I’m going to add rows for all sizes other than small. I had my daughter try the sweater on too and she also thought it was too short (she normally wears a medium and also wants a sweater, but longer)
How long is a “long tail”? Without definition, this part of the pattern is relative. Every time I come to it, I’m unsure how much yarn to leave. Otherwise, I love it!
is there a VIDEO TUTORIAL FOR THIS PATTERN THANK YOU MARTA
Hi! I love this pattern. I was wondering if I could use single crochet? I started a sweater and got to the end of my first ball before I realized that I accidentally used single crochet instead of half-double. Is there any benefits to using half-double crochet instead of single crochet?
Hi. I did your sweater exactly to the instructions however my neck opening ended up huge and my neck ribbing even bigger. I’m not sure where I went wrong as the rest of the garment seems the right size. Also I’m not the smallest person and I found it to be way too big on the smallest set if instructions (despite that it is supposed to be oversized)
Any ideas?
Hello there, I love this pattern so much. I have completed or for myself and my younger sister, and she loves hers as well. I made the Small for her and just extended both panels, because she has a longer torso. Still worked perfectly with all the other measurements. I made the 2 xl size for myself based on the bust size, and I still love the pattern, but it was a bit huge for myself. I will just make it on the large size next time. Thank you for your awesome content and your patterns can’t wait to try out the next one.
i loved making this sweater – HOWEVER, it was too short for the size that I was making for even though I had done the correct amount of stitches and rows. It may have been something to do with my tension and type of yarn I was using. I found the pattern very easy to do and even managed to do a V neckline for the first time. Thank you for sharing the pattern.
Thank you Carrie for the design and very easy steps and descriptions to follow, also the video is extremely helpful. I love the technique you used to make the neckline it made the sweater look very neat and professional. My sweater was a bit shorter and puffier than yours but I believe this is because my yarn was a bit dense. I used caron one pound, and I am going to try it again with loops and threads baby rainbow both are weight 4 but completely different thickness. Overall I love it.
I have been leaving about two arms length for the tails that will be used to attach pieces, just finished stitching it all together and had ends about an index finger long to weave in when it was all done. I am using a chunky wool.
First time I have ever made anything that isn’t a scarf or a square and I am very new crocheter but this pattern was so well explained I actually managed to make something I can wear!
I am terrible at keeping my tension even and I miscounted some rows so my front panel is shorter than my back but it actually looked kinda cute so I didn’t change it.
I’ll be coming back for more patterns!
Thanks for sharing the pattern for this sweater. I would like to purchase the written pattern. Is one available? Thanks!
I’m attempting to make this for 2xl,and just a heads up to people who are also doing this for plus size people 52 rows will make this sweater look like a crop top on you. So just a heads up for women like me who have to make it longer to fit like normal sweater.
How many rows did you do? I am almost to 52 and realizing it will be way too short. I’m also a 2XL I was thinking of adding 4 extra rows but not sure if that will be enough.
It’s on the video
what size are you wearing in the photos and how do you know what size to make it doesnt have measurements in your write up
Thank you! I can’t wait to give this a try!
I love the way you show how to make the sweater .I never made one yet but would love to try to make one for me .I love your sweatef it real pretty lovr the colours of your yarn .
hello, are these sizes based on unisex measurements? For men’s size small, would the small size work?
Does anyone have the direction to make this sweater for a toddler? I’m making one for myself(1st time) using up yarn I have laying around the house!
Thanks
Hello Stacey!
Your pattern seems so easy. I have some leftover #4 yarn and I will try your sweater with it. Can’t wait to see the final result.
🙂
In making a 3x but how do you gage how long?? If you hold it up to you do you start at shoulders?? Also can i make a stright or a cow collier instead of the V?? This be great for a man sweater too. Thank you! This my first sweater.
So I followed this pattern to a T and ended up with a crop top sweater? I thought this pattern was for a oversized sweater. Did I miss understand the pattern? It says 52 rows. Or do you mean inches? I made the XL version.
I made this sweater last year. I love it, but it was WAAAAAAYYYYY to big. I am currently taking the sweater apart (why waste the yarn) and plan on remaking it again in a smaller size. I made it 2xl the 1st time, I think I will try large this time 😄
I wish it had this info posted too 🤷♀️ Hope I guesstimate right, lol.
Hii, how much yarn did you use per color?
Thank you in advance!
Hii, how much yarn did you use per color?
Thank you in advance!
You can easily adjust the length on this to fit. Do a gauge swatch in your yarn, then measure the length you want. I made mine tunic style, so I literally doubled the amount of rows on the back. The trick is the front. The yoke and shoulder work comes in the top 18 rows, so work front as for back, for example, I did 104 rows for the back, so I started working the front top changes at row 86.
Hi this is my first sweater I’ve crochet. I made the 1x and the body is short and the sleeves are really really long. I followed the pattern and the video. I guess I went wrong somewhere, but I thought I followed it exactly
I made this sweater and I truly love it, so much I am making another!
same happened to me, i was hoping and oversize but i got a crop sweater =/
How many yards of worsted weight yarn are needed for the medium and large. I can’t tell by grams. I don’t think weight to length can be converted. Thanks! Looking forward to making this. I think I’m going to use lion brand landscapes yarn. Maybe a solid color for vneck and sleeve cuffs. What do you think?
I love this sweater-it was the first time I ever crocheted a sweater. Thank you for the wonderful pattern and video. Before this I was always afraid I would never be able to crochet a sweater! I made one for me and one for my daughter using a lovely teal color. Thank you!
I would love to try this pattern. I have some #5 bulky yarn that I would like to use. What adjustments would need to be made to use a #5 yarn?
Thank you for your help.
Hi Carol, Lion brand Landscape yarn, is 134m for each 100g ball. (as stated on the ball band). You would probaly need about 7 balls, maybe your local yarn store can ‘reserve’ a ball or 2 in case you need more. Looking at the rib effect edging, bottom egde, cuffsan neckband, I would say that is one ball of 100g in a solid colour. (maybe count that as an extra ball), you can always make a hat or fingerless gloves with any leftovers 🙂
Just finished this in purple & black stripes, I love it. Made it a bit longer by 20 rows but pattern was easy to read & the video was helpful, thank you!