
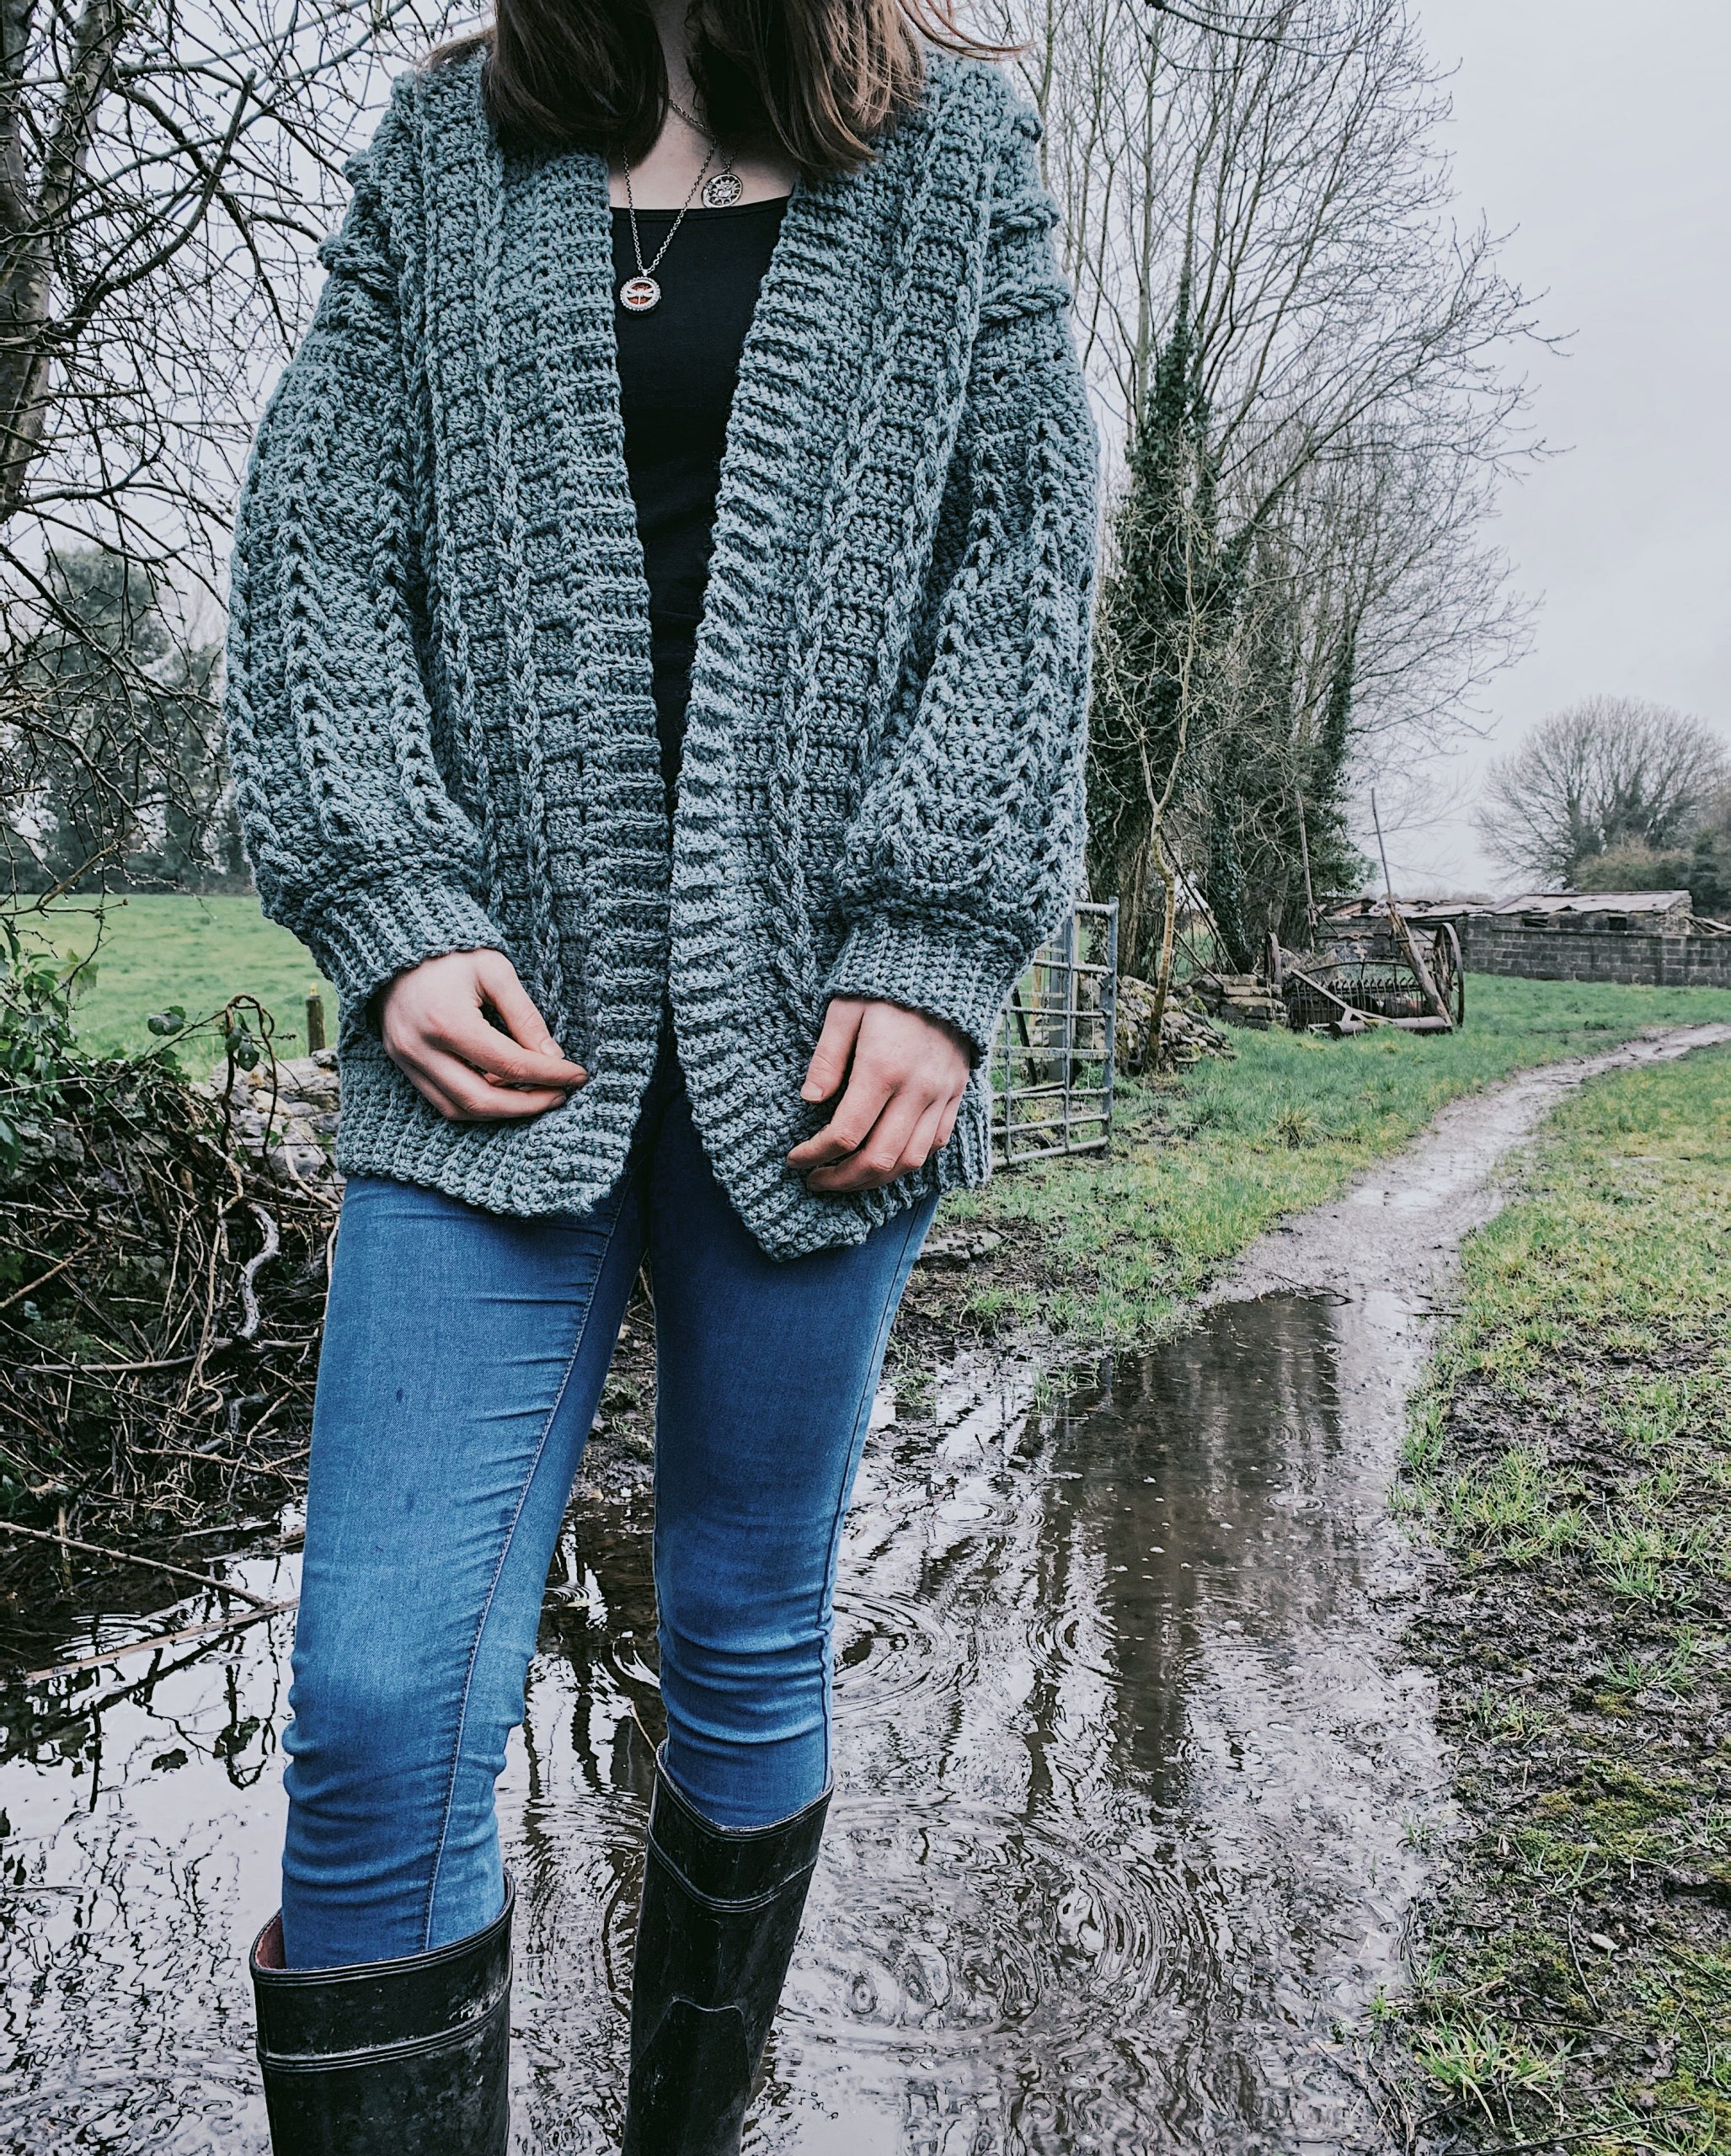
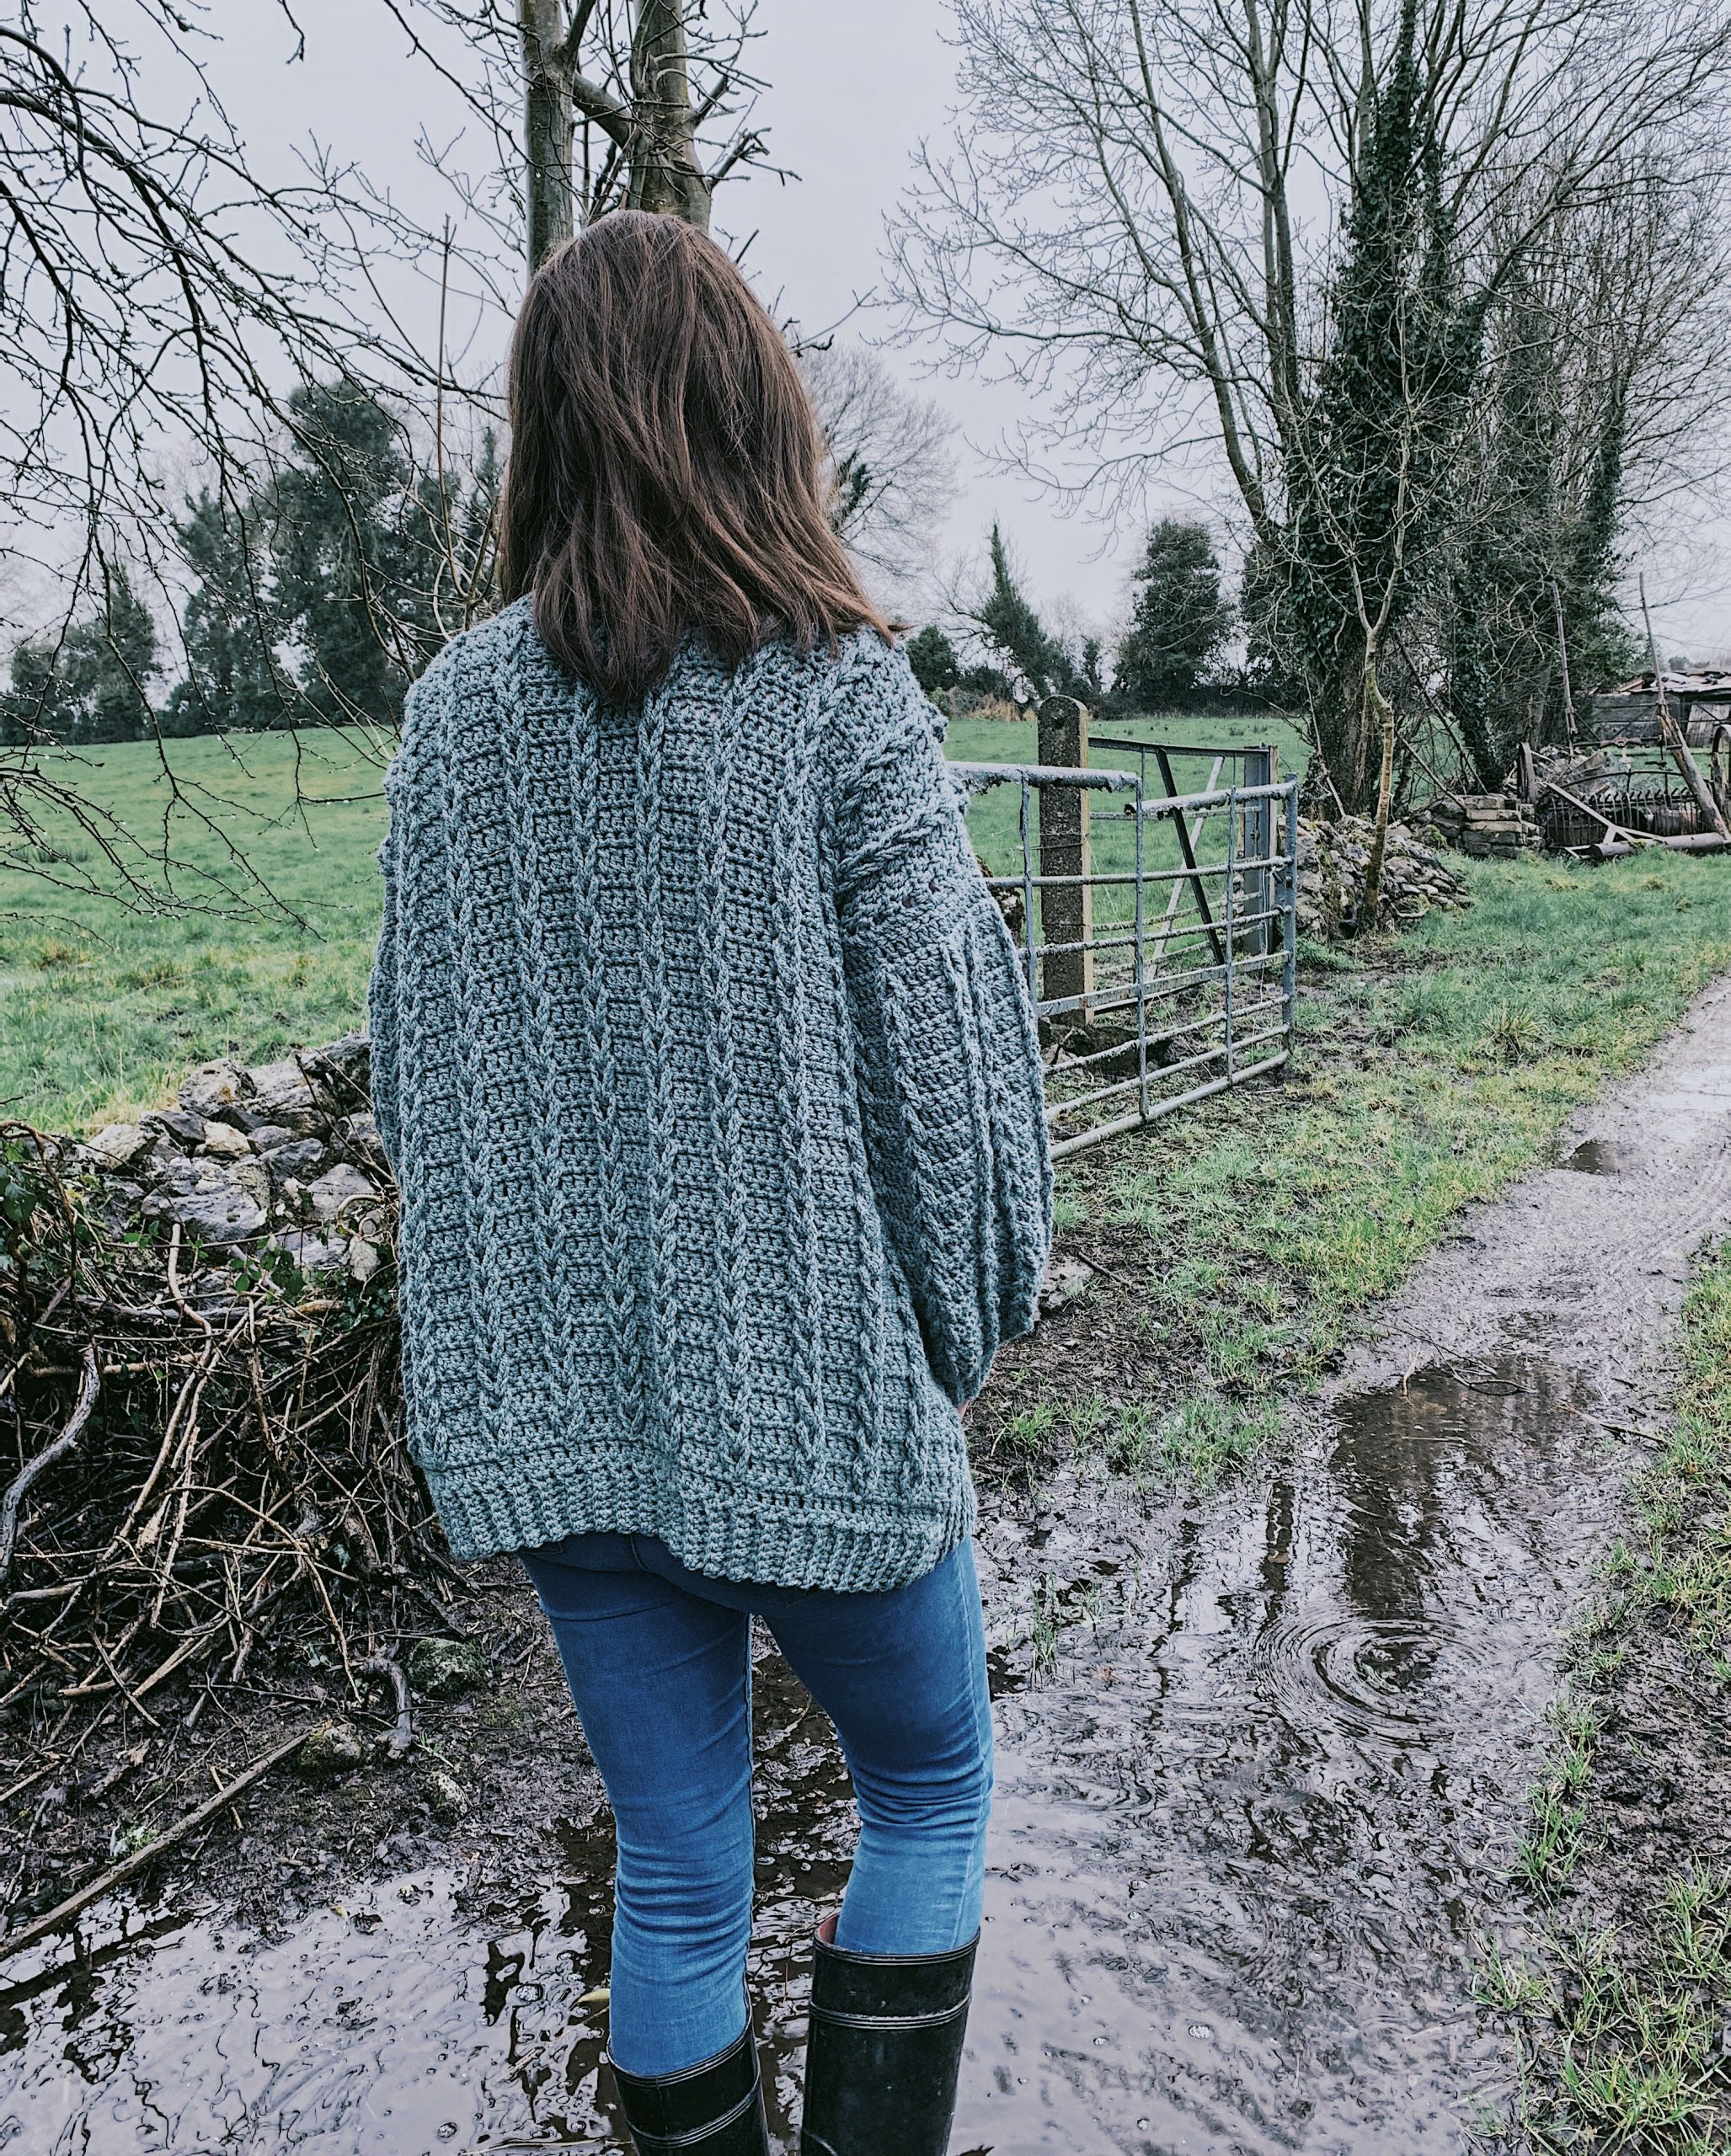
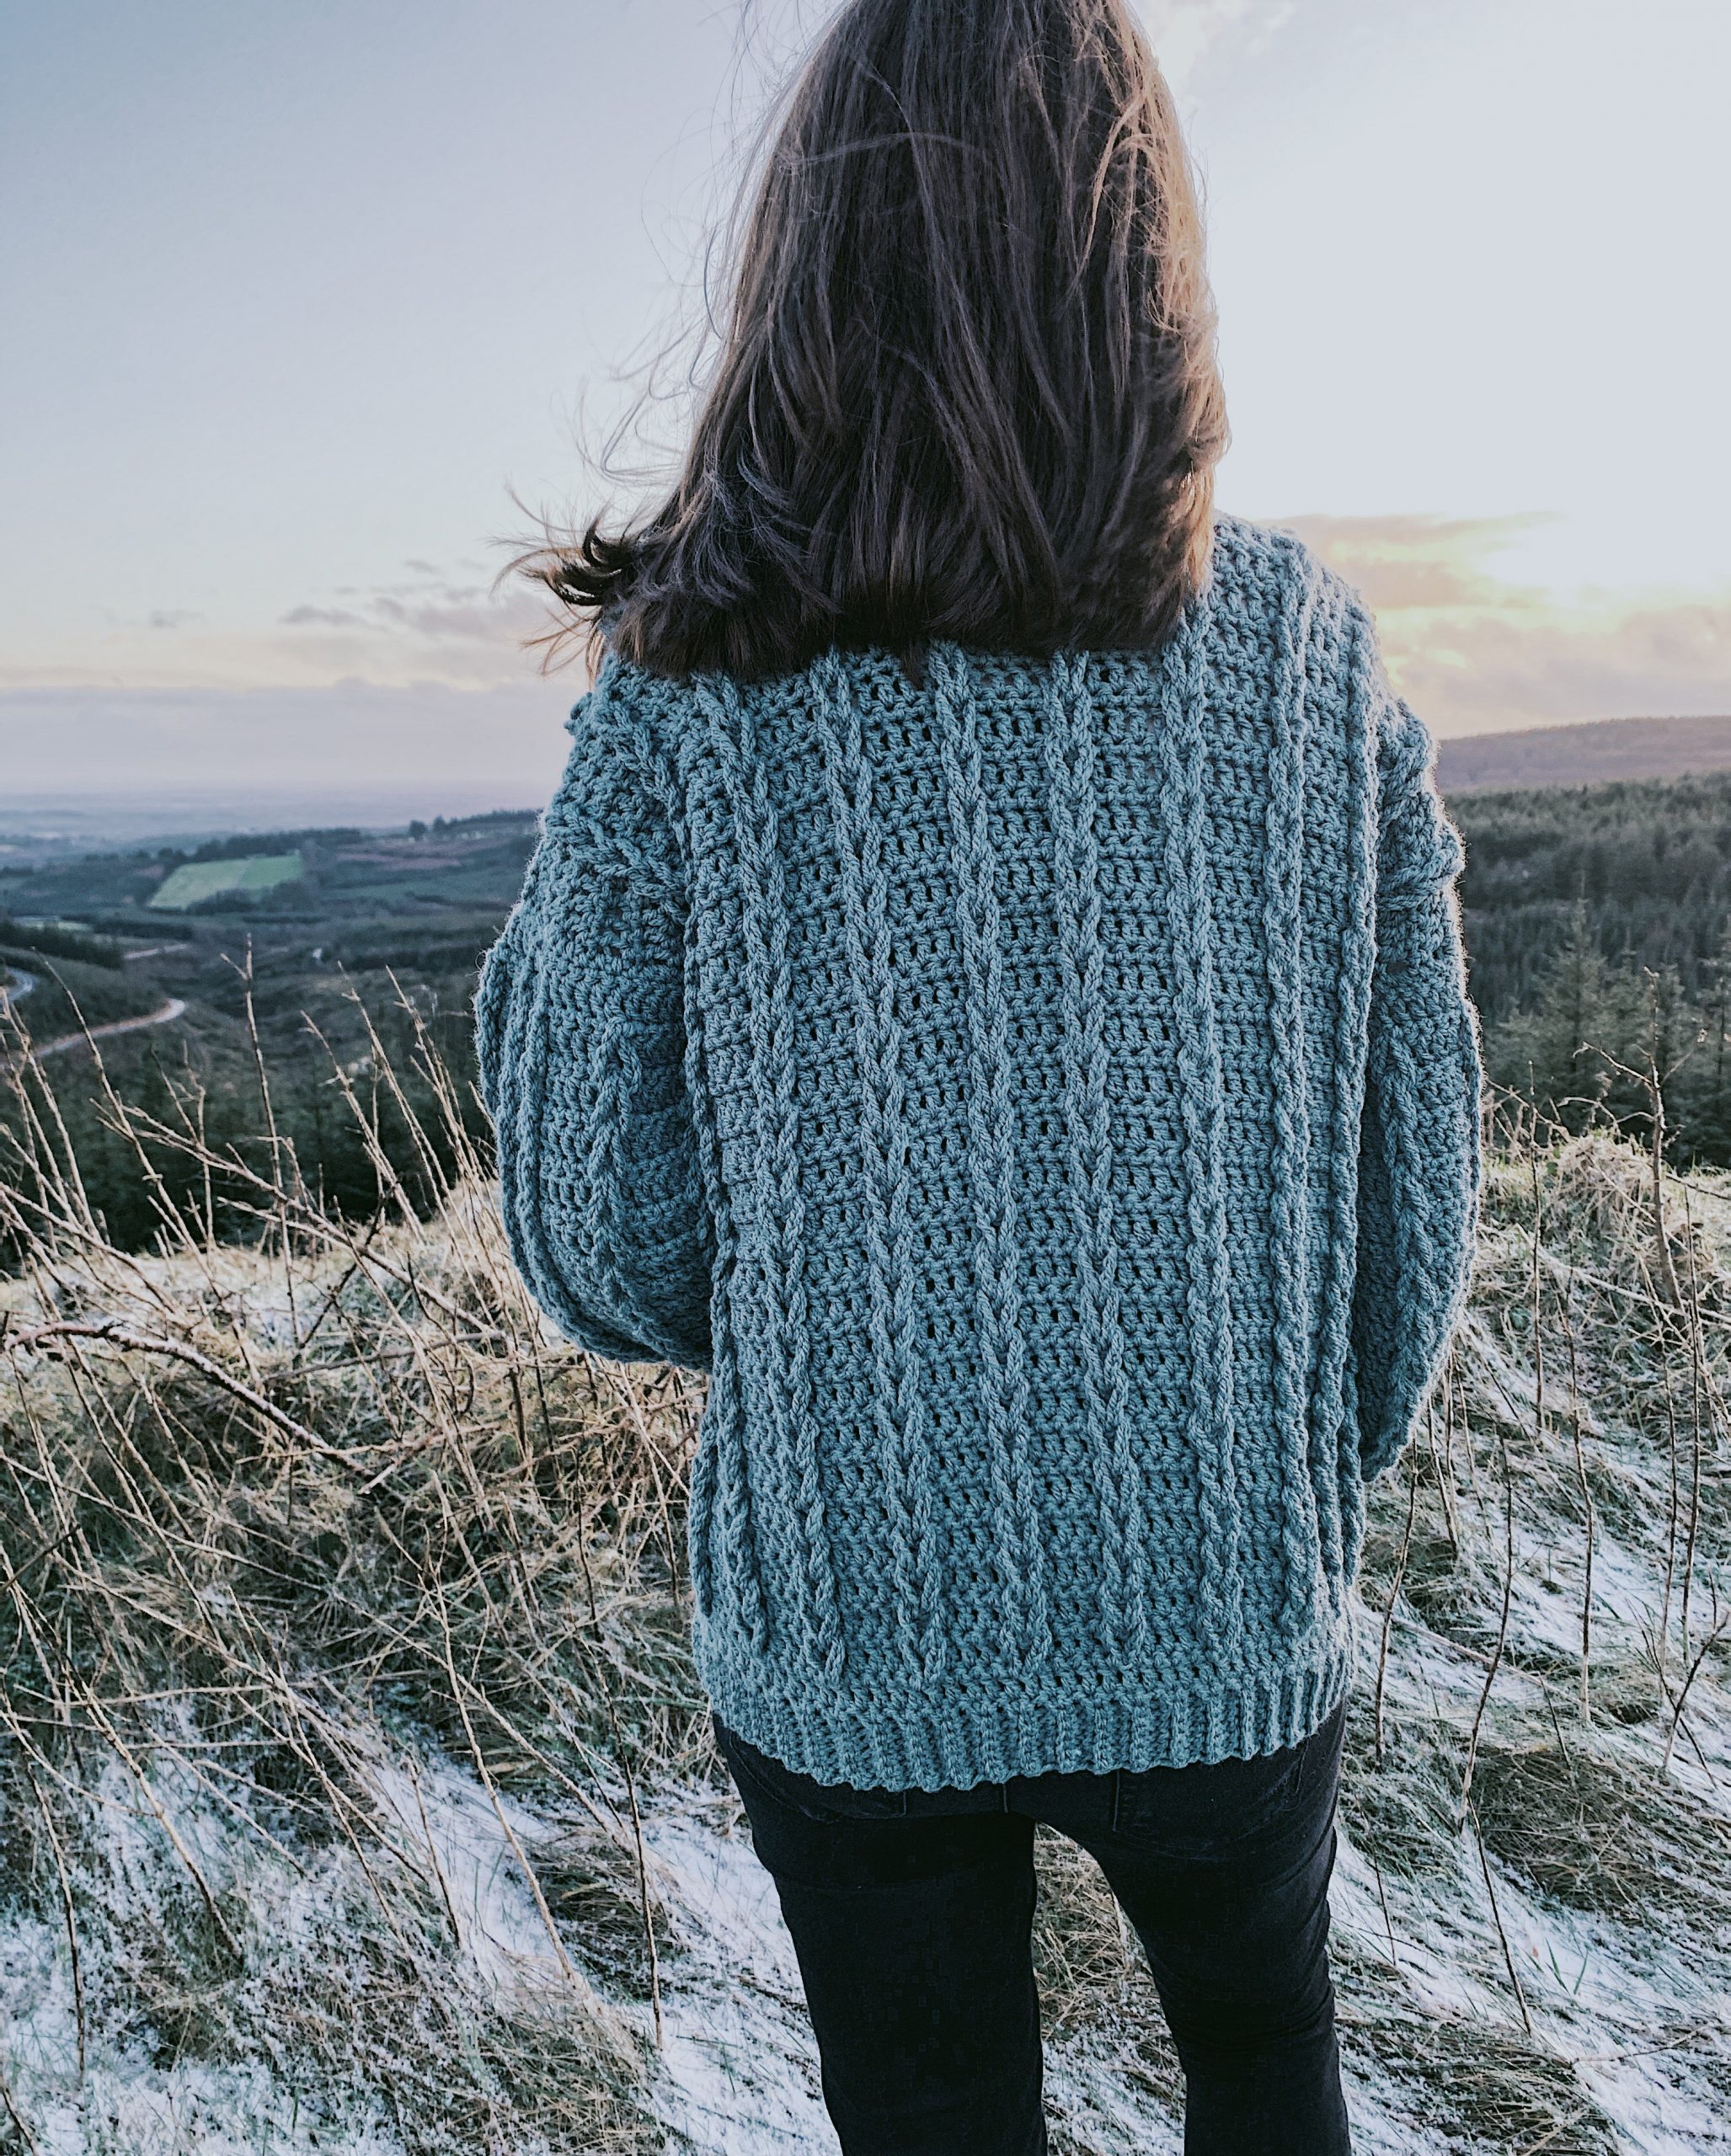
I am so excited to share with you all the Crochet Cable Cardigan. If you can remember a while back I designed the Crochet Cable Sweater. I got so much love for the YouTube video that I decided to create the cardigan version, but with even more cables, or as I call them, braids!
Sizes:
S-M( L-XL, 2XL-3XL, 4XL-5XL)
The cardigan is created with 5 separate panels, the back, two front panel, and two sleeves.
Materials:
Any weight 4 yarn 650g ( 700g, 750g, 800g )
6mm crochet hook
Back panel:
Ch 8
Row 1: Sc in 2nd ch from hook, sc to end. Turn.
Row 2: Ch 1, sc in BLO across to end. Turn.
Repeat row 2 until you have 60 (65, 70, 75) rows in total.
Next row: Ch 1, and make 60 ( 65, 70, 75 ) sc across long edge of the ribbed band.
Next row: Ch 3 (counts as 1st dc) then dc into next 4 sts, ch 10, slst into front loop of last worked dc, *5 dc, ch 10, slst into front loop of last worked dc, repeat from * across row. End the row with 5 dc. Turn.
Next row: Ch 1 (not counted as st), sc into every dc across row to end. 60(65,70,75) sc. Turn.
Repeat last 2 rows until piece measures 21-22″ depending on how long you want it.
Next row: Ch 3 ( counts as 1st dc ), dc into every st across. Turn.
So at this stage you should have one big square full of crazy loops. So let’s braid these bad boys!
Start by grabbing a loop on the bottom corner with one hand, then take a loop directly on top of that with the other hand and feed it through the first loop. Continue feeding the loops through each other until you reach the top. Now start from the bottom again and work another braid. Continue in this manner until your entire back panel has rows of braids.
Next row: Ch 1, *1sc into each of next 4 sts, insert hook into 5th st then grab the ch10 loop from behind onto your hook and finish off a sc. Repeat from * across.
Fasten off leaving a long tail.
Front panels:
Make 2!
Ch 8
Row 1: Sc in 2nd ch from hook. Sc in each ch across. Turn
Row 2: Ch 1 sc in BLO in each st across. Turn.
Repeat last row for a total of 20(25,30,35) rows.
Next row: Ch 1, make 20 (25, 30, 35 ) sc evenly across long edge of ribbed band. Turn.
Next row: Ch 3 (counts as 1st dc), 1 dc into each of next 4 sts, ch 10, slst into last worked dc, *5 dc, ch 10, slst into front loop of last worked dc, repeat from * across row. End the row with 5 dc. Turn.
Next row: Ch 1 (not counted as st), sc into every dc across row to end. 20 (25, 30, 35)sc. Turn.
Repeat last 2 rows until piece measures 21-22″ depending on how long you want it.
Next row: Ch 3 ( counts as 1st dc ), dc into every st across. Turn.
Now you will repeat the same process for braiding the loops as you did for the back panel.
Next row: Ch 1, *1sc into each of next 4 sts, insert hook into 5th st then grab the ch10 loop from behind onto your hook and finish off a sc. Repeat from * across.
Fasten off leaving a long tail.
Sleeves:
Make 2!
Ch 46 ( 51, 61, 66 )
Row 1: Ch 1, sc in 2nd ch from hook, sc across to end. Turn
Row 2: Ch 3 (counts as 1st dc), 1 dc into each of next 4 sts, ch 10, slst into last worked dc, *5 dc, ch 10, slst into front loop of last worked dc, repeat from * across row. End the row with 5 dc. Turn.
Next row: Ch 1 (not counted as st), sc into every dc across row to end. Turn.
Repeat last 2 rows until piece measures 17 inches.
Next row: Ch 3 ( counts as 1st dc ), dc into every st across. Turn.
Now you will repeat the same process for braiding the loops as you did for the back panel.
Next row: Ch 1, *1sc into each of next 4 sts, insert hook into 5th st then grab the ch10 loop from behind onto your hook and finish off a sc. Repeat from * across.
Next row: Ch 1, *sc 3 sts, then sc2tog, repeat from * to end of row. Turn.
Next row: Ch 1, *sc 2 sts, then sc2tog, repeat from * to end of row. Ch 8.
Sc into 2nd ch from hook, sc into next 6 ch, slst into next 2sc (the sts on the last row you worked before the ch 8. Turn
***Sc in BLO of next 7 sts. Turn.
Ch 1, sc in BLO of next 7 sts, slst into next 2 sts (the sts on the last row you worked before the ch 8. Turn.
Repeat from *** across the sleeve.
Fasten off leaving a long tail for sewing.
Assembly:
Lay the back panel face down on a flat surface. Then place the 2 front panels on top face down too. Sc the top of one front panel to the back panel and repeat for the other front panel on the other side.
Lay your piece out flat. Grab a sleeve and find your middle st. Align that st with the shoulder seam and connect with a st marker. Sc to attach. Repeat for the other side.
Now fold over and seam along the edge of sleeve and down along the side of the cardigan.
Now turn your cardigan right side out.
Attach yarn to the bottom right corner and sc all the way along the inner edge of the cardigan until you reach the other side.
When you reach the other side ch 6, sc into 2nd ch from hook, sc into next 4 chains, slst into next 2 sc, turn.
**Sc into BLO into next 5 sc, turn.
Ch 1, sc in BLO into next 5 sts, slst into next 2sts. Turn. Repeat from ** all the way along the inner edge of cardigan.
Fasten off and weave in all ends.
You have now completed your cardigan.
I love this sweater design. I just ordered some yarn and this is what im making. I love the color of your yarn. What yarn brand is it? Thx for the free pattern. It’s gorgeous💖
Can you advise what the little girls jumper pattern is please.
if you use a DK yarn with the same size hook will it turn out the same size or do I need the medium weight?
Love the pattern thank you.
You could use Dk yarn but maybe go up a size in the cardigan. I’m sure that will work.
I really like the design of the cardigan. I never make a cardigan before, but I will try this one. I want to make it for my mom. She will absolutely love it. Wish I can make it right,,,,
What are the measurements for the sizes please? Love the pattern.
I have some 3wt. multicolor ball, which I will use. Yes I would go up a size , plus down 1size for hook. Maybe we should do a swatch first. I trust swatches a lot. can’t wait to make this. Good luck everyone. I’m in USA
I love this sweater!! I want to make it but the yarn required to make it only shows how many grams of the yarn to get. How many yards total does it take to make the sweater? I want to make sure I get enough to complete it. Thx for the pattern!
Dona
I’m making the crochet cardigan the first one that shows on the wen page. Trying to work the sleeve and it isn’t making any sense. It says make 2….
it says ch 51, (I’m making the large size)
Row.1 ch 1 sc across, turn
Row 2 ch 3 work the row.
Then it goes on to next row: which doesn’t make sense. Please explain it.
Yes, I am very confused as well! For the smallest sized cardigan it says to chain forty-six for the sleeve, but row three says that at the end of single crocheting into every stitch you should have 20 stitches in all. I tried to watch the youtube pattern as well, but she didn’t go into anymore detail then the pattern has. If anyone has any luck on figuring this out please let me know!
Sorry guys I made an error. You most definitely won’t have 20 sts. I’ve made changes to the pattern now. Thanks for pointing that out to me
She must have gotten the numbers confused. You just need to work a sc into every stitch from the previous row, much like you did for the back and front panels. In your case it would 50 sc. Hope I could help.
I’m sorry, it didn’t show your reply.
Can you specify the type of yarn and how much is required to make this project?
I would be very helpful to have the finished measurements for all the sizes. Although I love the pattern, I won’t attempt it without knowing what size to make.
Hi!
Do you think you could add the gauge and measurements to your instructions? I’m in the process of making the S-M size and am now fearing that it’ll be too small😟.
Thanks for posting these!
I started making the cable cardigan for size 2x-3x. I’m afraid it’s going to be too small. Do you have measurements?
Well, with no response I guess I won’t be trying this pattern. I know you’re busy and I appreciate that. I just don’t want to waste my time if it’s going to be too small.
God bless you for sharing..Thank you.
How much yarn did you use for the sweater.
Thank you.very grateful.. you explain so well
Thx for this lovely pattern. What would the gauge be on the garment?
Looking forward to hear from you.
Hanlie
What is the gauge of this pattern per 10 cm x 10 cm?
I love the look of this cardigan but I don’t see any swatch or measurements to give me a idea as to the finished size, I will be making the 3xl, so any help would be great, I’ve only been crocheting for a year now and only made blankets.
Hi in the front panel must hace 5 more rows. With 20 rows it’s to small. And in the video has 4 braid. Thank you!
Hi!
I’ve just started and am looking forward to doing this pattern. I am a bit stuck on what size to do – do you have more information about the sizes as in dimensions as it seems you haven’t added this information to any of your platforms and I can’t find a reply to a comment asking about this.
Thank you!
Hi, what type of yarn is a 4 weight yarn please? I’d love to make this cardigan but want to make sure I get the right yarn! Thanks 🙂
Acrylic yarn is #4 weight
I can not wait to make this. Can I use a #3 weight yarn and if so will i need to make any adjustments to the sizing. I want to make the small. Thank you
I would like to know this as well.
I love your cable sweater design and plan on trying very soon, thank you for sharing
Can I follow this pattern with the bernant velvet pattern 5?
Hi,
I’ve just finished the two front panels and I made the small size – I crochet loosely. But they seem a bit small and when I looked at the video you have 4 braids and I only have three. I can’t figure it out as I followed your instructions. Now I am not sure about the sleeve as it says do 46 chains but you have much more in the video. Can you explain.
You can find this pattern on u tube. You just repeat the pattern like you did for the back
I went up 1 size than I would normally wear on the body and sized on my sleeves. So I made a 2x with 1x sleeves and it’s perfect. I just found the 2x sleeve too bulky looking on me for my liking
Carrie,
Thanks for the free pattern, but I have a question.
The patter says, when you end the back panel: Ch 1, *1sc into each of next 4 sts, insert hook into 5th st then grab the ch10 loop from behind onto your hook and finish off a sc. Repeat from * across.
But on YouTube you take 2 sc in the loop.
Which is the right one: the pattern or the one on YouTube?
Hi, you’ve probably found this out by now lol, but I’m in the UK and googled it and it’s an Aran yarn. I’m toying with the idea of a chunky yarn.
I really love the look of this cardigan. Would you be able to send some instructions to add a hood to this one?
I’m not the author, but she does specify that a medium weight/worsted weight 4 is what she used.
Amazing design! Is it possible to make toddlers version?
Hey carrie
I love your patterns. I made the cardigan it seems like the sleeves are wide on the bottom. I guess I could decrease more. Do you agree? The other thing I did different was stitching the back and panels. I had the back with the front facing me and the side panels facing down. If I did it the other way i would have the wrong side facing the back. Not sure if I miss something. But I got the correct results doing it my way. Just want your thoughts Im not criticizing I love your videos
Thank
You !
Sincerely
Marisa
What size is in the pictures? Idk what size I should make for myself
that’s what I’m using
Marisa, I made the mistake of following the directions and it’s not right. It can’t be put together like that. The video shows doing it the same as the written directions says, but then when you see her join the sleeve, the back and front are the right way. Now I have to take mine apart and do it my way. I should have thought it through more. Just adds a bunch of extra time to finish it. I love this sweater, but a little disappointed that the video and written directions must not be right.
I tried to reply before, but not sure it went. I am making this sweater now and the assembly part seems to be wrong. So much so that I had to take mine apart as I did as the pattern and video said. You can’t attach the back and front panels like they said. Now I have to make repairs to my brand new sweater because I did like they said and it’s wrong. On the video it shows how to put the front and back together the wrong way, but a little later in the video it shows the front and back together the right way. Don’t make sense to me.
I thought the same thing so I did the 65 stitches and hopefully will be a medium-large!!
hi im so confused here i have been crocheting and knitting for over 40 years..i loved this grey cardigan.i made it .just finished it. I dont understand .i put 1 inch longer in back fronts and its so short nothing like on the picture. The sleeves are so so big. I have to take it apart and start it back but ill make changes cause cant even wear this ..Ive notice in the pattern something was wrong i should fixed it right away . lol all that work to start all over again
Hi Anne I found discrepancies the same as many of you. I was lucky though I noticed as I was making it so I was able to tweak the pattern as I went along. I made the large back & front panels with the s/m sleeves. I also decreased the sleeves a couple of rows before the cuffs to make it tighter. I always put garments together in my own way so I didn’t notice the mistake on the video that others did. It was perfect! I’m just about to start my second one for a friend.
I, too, want to know the gauge, sizes, and the yardage of yarn used for the different sizes. It seems the designer can’t be bothered to answer all these basic types of questions. Also, the sweater looks lovely, but I won’t be making it until the “kinks” are worked out. It seems she should have had a few testers do the pattern to make sure the directions are correct like other designers do.
A 4 weight yarn is generally called a worsted weight.
I’m making this one for my daughter in law in a her favorite color burgundy. I love the stitching on this one and the cables. Thank you for sharing your designs.
Love this pattern – i made a few modifications so that the direction of cable is the same as body of the sweater. It has come out so well. My husband loves it. My friend saw it and loved it too so made one for her son. Thank you so much for this wonderful way of creating cables.
What size is the pattern for
Thanks for the braided sweater pattern. Can’t wait to make it! I’ve started working on Xmas gifts already so I get them all done. Keep designing!!
Hello!I want to make that cardigan for my daughter,he’s 7 years.How many sts I should make less?
Thanks!
I’ve made this cardigan twice and both times have been very successful. No problem following the pattern. Thank you for such a beautiful design. I’ll be making this my go-to pattern from now on.
Just wanted to thank you. I made this cardigan oversized for my holiday to Norway. It was beautiful, cosy and warm. Lots of people commented on it. Thank you for a lovely pattern. Would love to send you a picture of how it turned out.