
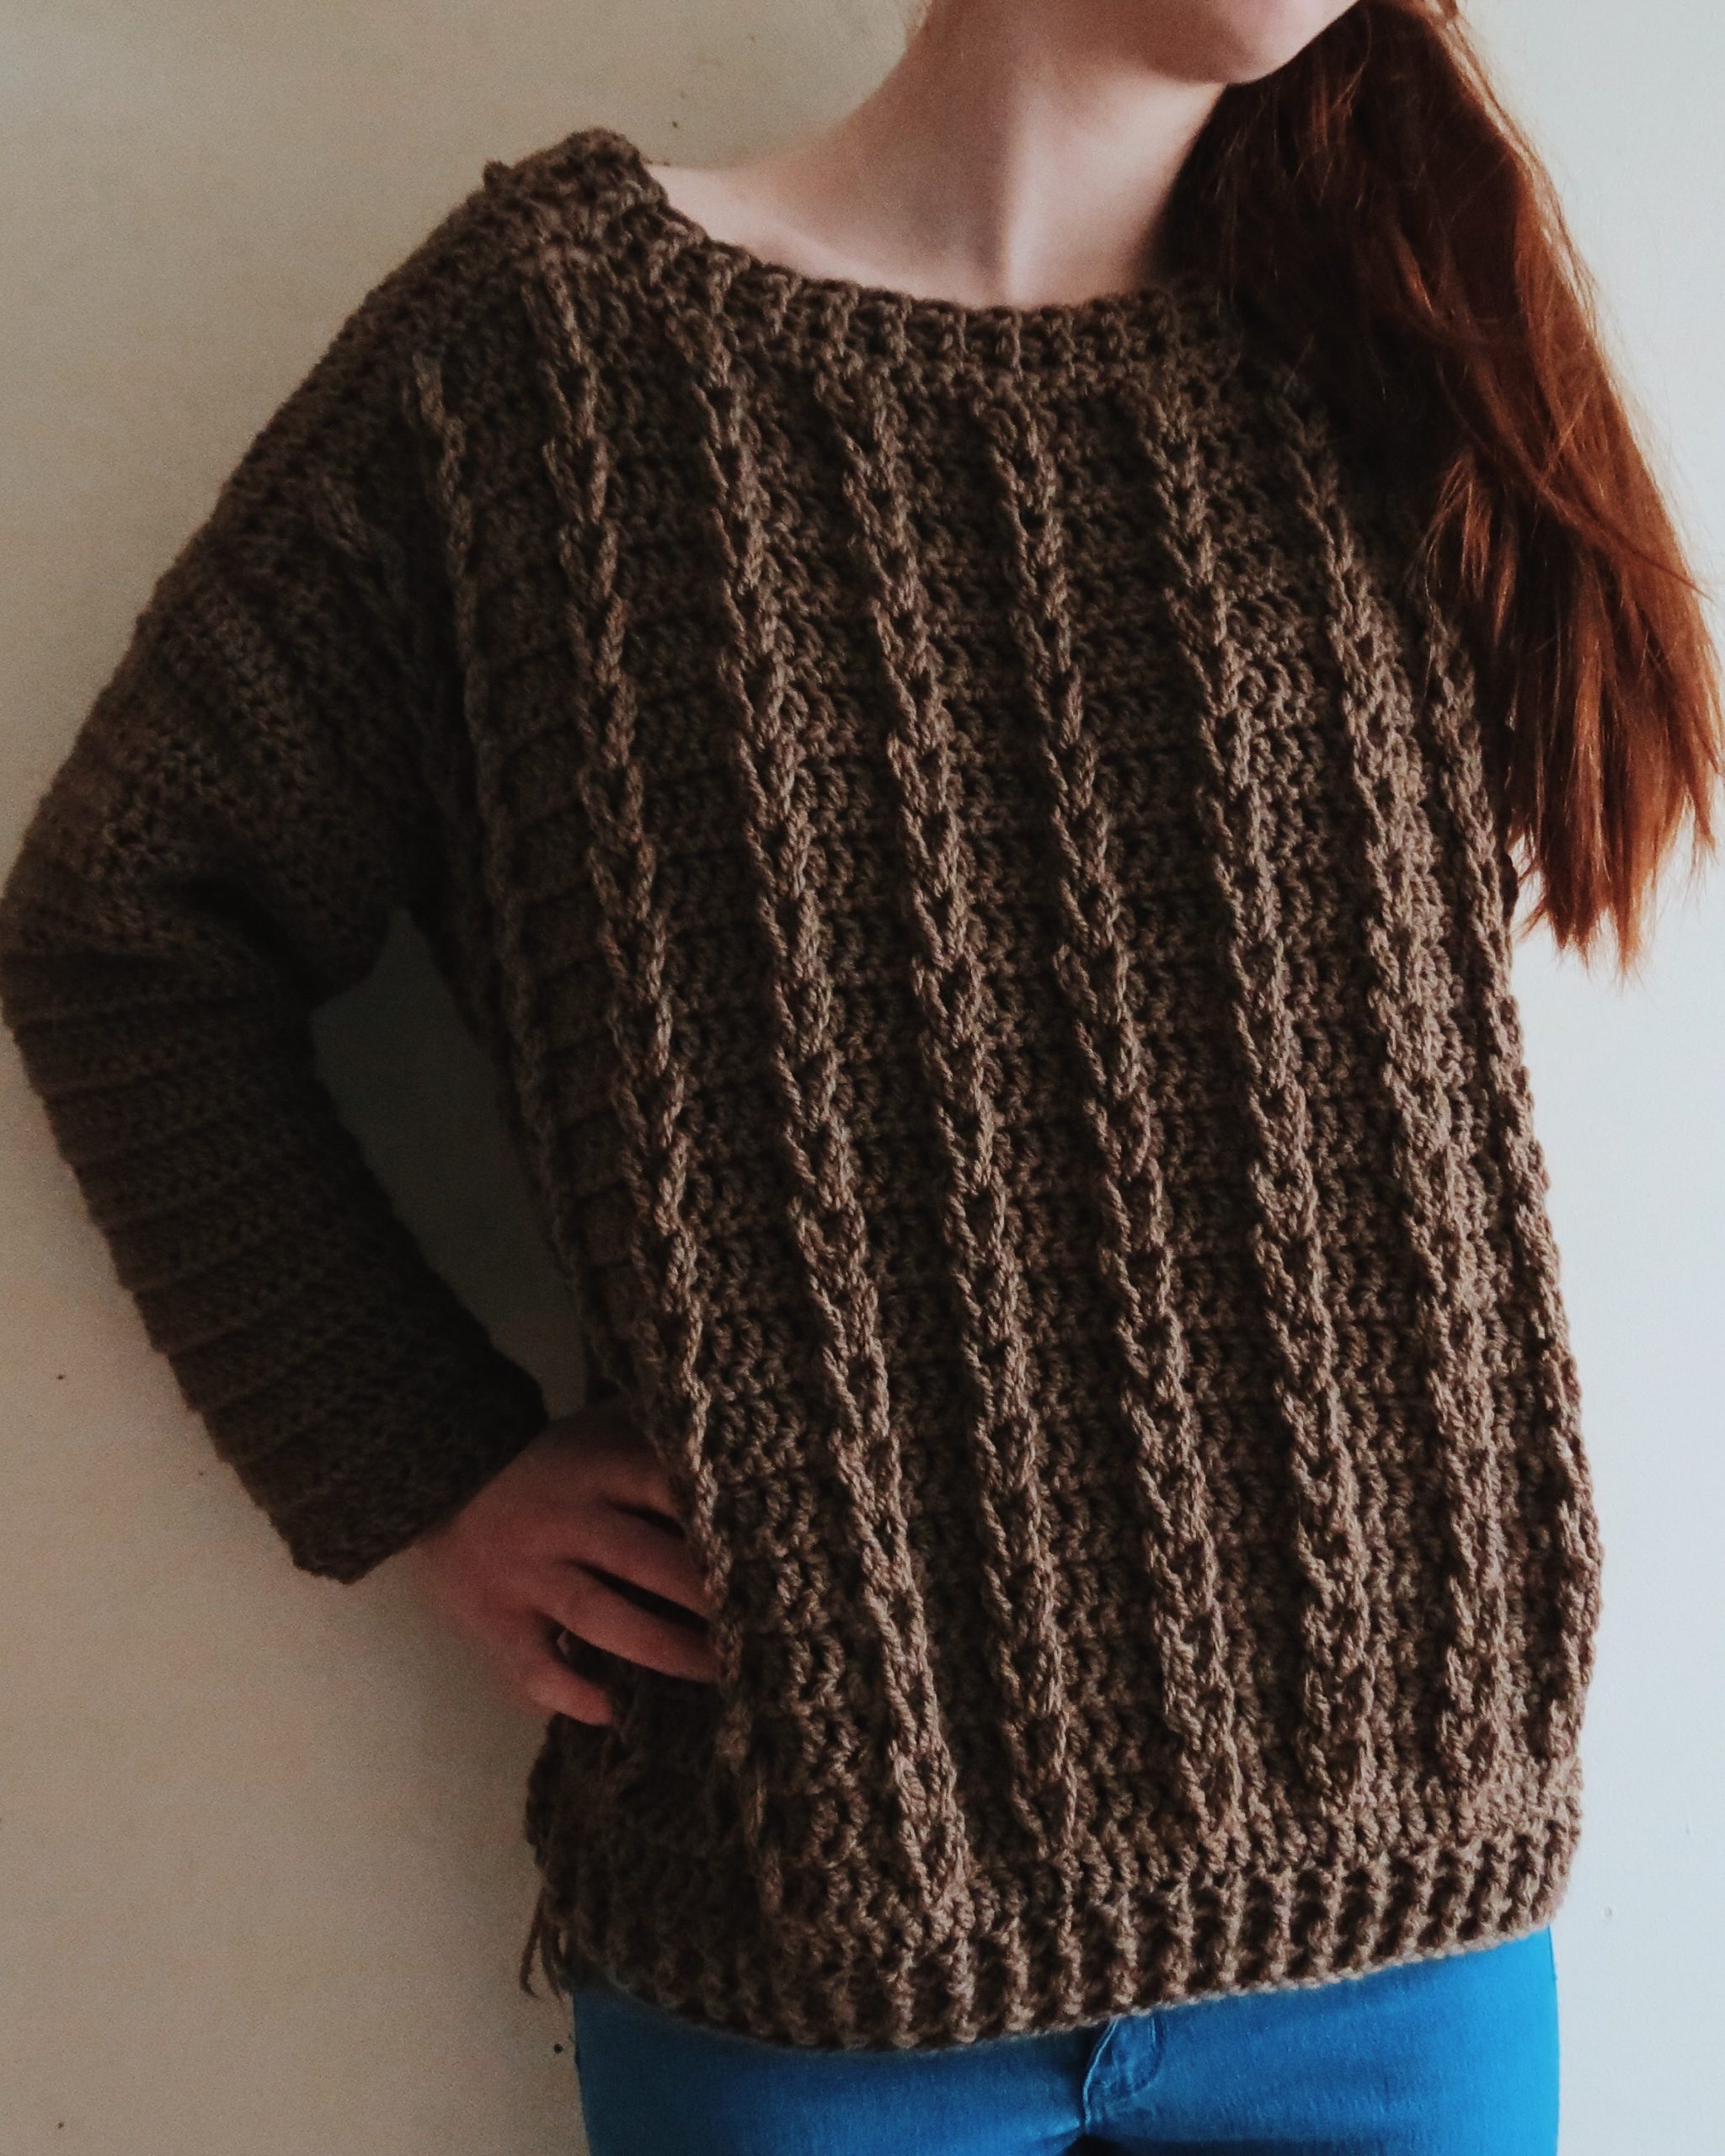
The cable boyfriend sweater is perfect for anyone who is perhaps afraid of the conventional cable stitch. This sweater is different…it gives the illusion of cable stitches yet it is merely just combined of a series of loops interwoven into each other.
Gauge: 3 dc sts and 3 rows = 1 inch
Yarn:
Any weight 4/worsted/aran/10 ply yarn. I used about 600g for size small. More yarn needed for bigger sizes.
Hook:
US J/6 mm crochet hook
Notions:
Yarn needle for weaving and sewing
Stitch markers
Measuring tape
Abbreviations:
ch. chain
sl st. slip stitch
sc. single crochet
dc. double crochet
fpdc. front post double crochet
bpdc. back post double crochet
Sizes:
S(M, L, XL, 2XL, 3XL, 4XL, 5XL)
To fit bust sizes:
32-34”(36-38”, 40-42”, 44-46”, 48-50”, 52-54”, 56-58”, 60-62”)
Front Panel:
Ch 61(66, 71, 76, 81, 91, 96, 101)
Row 1: dc into 3rd ch from hook, dc to end of row. Turn.
Row 2: Ch 2, *fpdc around next st, bpdc around the st after that, repeat from * to end, placing a dc into top of ch 2.
Rows 3-5: Repeat row 2
Row 6: Ch 3 (counts as first dc), 1 dc into next 4 sts. Ch 10, sl st into top of last dc you made. * 1 dc into next 5 dc, ch 10, sl st into top of last dc you made. Rep from * until 5 sts remain. 1 dc in last 5 sts. Turn.
Row 7: Ch 1. Make 1 sc into each st across, making sure to push the ch 10 loop to the back.
Repeat rows 6-7 until piece measures 20-22 inches. Add more or less length here by doing less/more rows.
Now it’s time to braid all these crazy loops you have on your sweater!
Grab a loop on the bottom with one hand, then grab a loop that directly on top and feed that loop through the first loop. Continue all the way up until you reach the top. Once you have one row that looks like a long braid, grab a loop from the bottom again and feed the loop directly on top through it. Keep going until your front panel looks like you have rows of braids on it.
Next row: Ch 3, dc into every stitch across. Turn
Next row: Ch 1, *1 sc into each of next 4 sts, insert hook into the 5th st, then grab the ch 10 loop from behind onto your hook and finish off a sc. Repeat from * across to end.
Next row: Ch 3, 1 dc into each of next 16(19, 22, 25, 28, 31, 34, 37) sts. Turn.
Next row: Ch 1, sc across. Turn
Next row: Ch 3, dc across. Turn
Next row: Ch 1, sc, across.
Cut your yarn leaving a long tail and fasten off.
For the other shoulder:
Turn your work around so the braided side is facing you.
Count 17(20, 23, 26, 29, 32, 35, 38) sts in from the edge. Attach yarn, ch 3 and dc across to outer edge. Turn.
Next row: Ch 1, sc across. Turn
Next row: Ch 3, dc across. Turn.
Next row: Ch 1, sc across. Cut yarn leaving a long tail and fasten off. Place this front panel to one side.
Back panel:
Ch 61(66, 71, 76, 81, 91, 96, 101)
Row 1: dc into 3rd ch from hook, dc across to end. Turn.
Row 2: Ch 2,* fpdc into next st, bpdc into the stitch after that, repeat from * across to end. Turn.
Row 3-5: Repeat row 2.
Row 6: Ch 3 (counts as 1st st), 1 dc into every st across. Turn
Row 7: Ch 1, sc into every st across. Turn
Repeat rows 6-7 until back panel is the same length as your front panel.
Cut yarn and fasten off. Put to one side.
Sleeves:
Ch 31.
This chain should be long enough to go around your wrist. Add more chains here if necessary but make sure you have an odd number.
Row 1: Dc into 3rd ch from hook, dc to end. Turn
Row 2: Ch 2, *fpdc into next st, bpdc into the next, repeat from * to end. Place a dc into top of ch 2. Turn
Rows 3-4: Repeat row 2.
Row 5: (increase row) Ch 3, dc into same space, then place 1 dc into each st across until you reach the last st. Here you will place 2dc into last st. Turn.
Row 6: Ch 1, sc across. Turn.
Repeat rows 5-6 until you have 62(64, 66, 68, 72, 76, 78, 78) sts.
Next row: Ch 3, dc across. Turn
Next row: Ch 1 sc across. Turn.
Repeat last 2 rows for a further 9 times. Add more rows here if needed. Keep going until sleeve is the same length as your arm.
Cut yarn leaving a long tail and fasten off. Repeat for the 2nd sleeve.
Assembling the sweater:
Grab your back panel and lay it face down. Now grab your front panel and lay that on top of back panel with the braided side facing down.
Sew the front shoulders to the back panel. Now lay piece completed flat on a hard surface still facing down. Grab a sleeve and fold it lengthwise so you can find the middle stitch. Line that middle stitch up with the shoulder seam and secure with stitch marker. Now sew sleeve to sweater. Repeat on the other sleeve. Now fold sweater over and sew along the bottom edge of sleeve and down along side of sweater. Repeat for other side.
Neck ribbing:
Turn Sweater right side out. Attach yarn to any corner on the neck area. Ch 3, and place a dc all the way around neck area. Slip st into top of beginning ch3 to close the round.
Next round: Ch 3, *fpdc into next st, bpdc into next st, repeat from * all the way around. Slip st to top of ch 3 to close the round. Repeat this row 3-4 more times depending on how thick you want neck ribbing to be.
Cut yarn, fasten off and weave in all your ends.
You are now finished you sweater x
I love this pattern and your instructions (video and written) were on point! Easy to make and assemble. I just recently started crocheting again and wanted an easy project. I made my version with short sleeves… this was actually my project during covid-19 quarantine week 1. Hahaha. Can’t wait to make some more of your patterns!!! Thank you. ❤️❤️❤️
IMG_2268.jpg
About how many yards did this projects take?
Hello, if this helps anyone with sizing issues, you can go to craftyarncouncil.com and look at their sizing chart. I need to make this in a 5XL, but I’m having issues too without having a gauge to go by. So this website is my go-to whenever I run across this issue. It will tell you the standard body measurements and you can match it to what’s written in the pattern or adjust the pattern to fit your specifics. Hope this helps someone. Take care and happy crocheting.
Hi LaTonia,
Thanks for that link, it is definitely a helpful reference! 🙂
I have an issue, I hope you can guide me here… I loved this pattern, and I want to make this sweater for my husband. I have a thinner yarn (it’s difficult to find thicker yarn where I live) and I’m not able to meet the guage, and I don’t want to use a larger hook as it wouldn’t be a tight knit as I’d like on this sweater. Can I go up one or two sizes to compensate? I have a 3 weight yarn and 5mm hook works good. I was thinking of making an XL (for my husband chest 42″). Would you recommend I follow the pattern for size 2XL or 3XL to still get the size I require (XL)?
Thanks in advance for your response. This would be the first thing I make for him so I don’t want to invest time and screw it up, I am still a beginner 🙂
Hi, may i know how to sew the sweater? The sleeves and the panel. I dont know how to sew it and still cannot get the idea on how to do it. Help me. Thank you.
Thanks I too am making this sweater in the plus-size and the sleeves just didn’t fit well oops
I didn’t give up started over with much more success but next time I’ll try this website. The video was awesome for the smaller size for anyone who is visual as I am thanks to all those making this possible 💕
Bonjour, je trouve ce pull magnifique. Je suis en train de le faire en taille S combien mesure t’il en largeur et combien de tresse y a t’il au total s’il vous plaît car je le trouve très large. Je le Crochète avec une laine que l’on Crochète en 5/6 et moi j’ai pris un crochet 5,5. Merci de m’aider je suis perdue
When I have issues meeting gauge due to using a lesser weight yarn, I double my yarn and work two strands together. That has worked for me in the past.
I’m having an issue when I go to finish row 8, row 6 ended with 5 dc, then I ch 1 and turn, sc in each st(row 7), chain 3, dc in next 4, ch 10, sl st in top on dc and continue to end, I only have 4 st after last loop. I have frogged this 6 times with the same result. Help please!
can tell how yarn you need for the 5xl for boyfriend jumper