
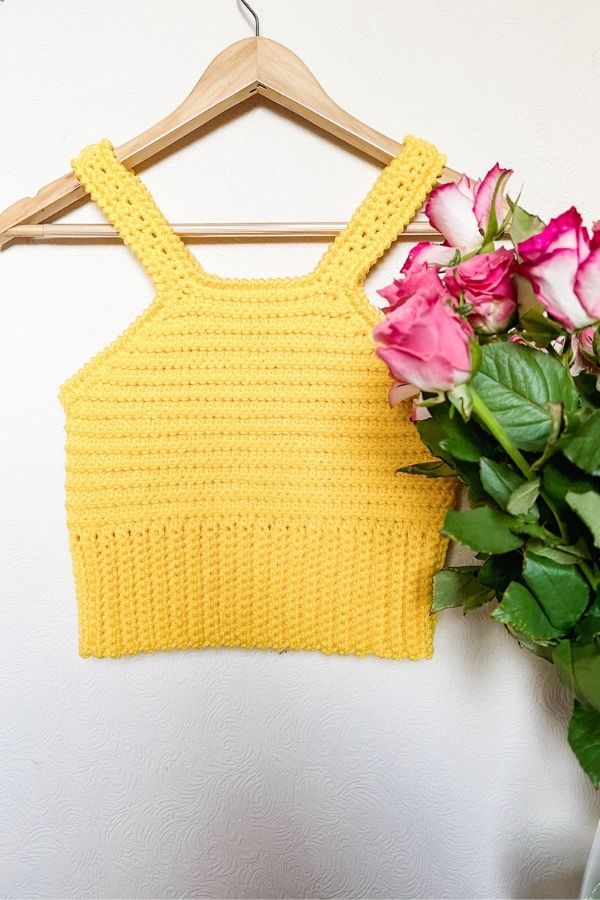
Learn to crochet this quick and easy crochet Zara crop top. Designed to work up quickly and fully customizable to fit any size, this crochet top is a must in your wardrobe this spring.
The Zara Crop Top is the perfect beginner friendly project. It uses very basic crochet stitches to create a modern wearable crop top.
This free written pattern is accompanied with a step by step video tutorial. Please scroll down to view it.
When I designed the Crochet Zara Crop Top I wanted it be a beginner friendly project and completely size inclusive. I do not give exact stitch counts in this pattern for all the different sizes but I do give you all the information needed to get to your perfect size.
This crochet top is worked in one piece from the bottom up. First we will crochet the ribbed band, the using simple stitches we will create the main body and after a little shaping we will add the edging. I think the edging is one of my favourite parts of this top. It just gives the top a little something I think.

YARN
Any yarn of your choice works fine for the Crochet Zara Crop Top. You can choose any fibre or yarn weight of your choice but I do recommend something that has a bit of stretch to it. I find that using cotton for this piece has little to no stretch so the final outcome may not be what you want. Acrylic or wool blends work up really great for these types of tops. Merino is also a great choice.
The top in the photos and video tutorial uses Hobbii Mega Ball Aran. This is a weight 4 or aran weight yarn with an acrylic fibre consistency. It has great stretch and shape and comes in a variety of colors. The best thing about these mega balls of yarn is you can make a few tops out of each ball!
MATERIALS
Any yarn of your choice. I used Hobbii Mega Ball Aran (approx 250 yds)/ weight 4/aran/ 10 ply
4.5 mm crochet hook
5 mm crochet hook
Yarn needle
Measuring tape
Scissors
Stitch marker.
** If you are using a different weight yarn uses the recommended hook size on yarn label and another hook that is half a size smaller.
STITCHES & ABBREVIATIONS
ch = chain
sc = single crochet
scblo = single crochet in back loop only
Rsc = reverse single crochet
hdc = half double crochet
hdcblo = half double crochet in back loop only
hdc2tog = half double crochet two together
slst = slip stitch
slstblo = slip stitch in back loop only
rep = repeat
st(s) = stitch(es)
SPECIAL STITCH: Reverse Single Crochet (Rsc): insert hook into st to the right, pull yarn through, yarn over, pull yarn through 2 loops
CROCHET ZARA CROP TOP PATTERN
Using 4.5 mm hook
Ch 15
ROW 1: sc in 2nd ch from hook, sc in each ch to end. Turn.
ROW 2: ch 1, scblo in each stitch across. Turn.
Rep row 2 until band is long enough to go around your under bust. End with an even number of rows. Take note of the number of rows.
Slst the two ends together.
Turn right side out so the seam is in the inside.
Change to 5 mm hook
Working along the top edge of band: REMEMBER TO TURN AFTER EVERY ROUND! Always count your sts at the end of each round. It’s very easy to add or subtract sts so be very careful.
NEXT ROUND: ch 1, hdc all the way around the band. The number of hdc you do should be the same number as the rows you did for band, eg. I did 90 rows for band, so now I do 90 hdc around top edge of band. Slst to first hdc to close round. TURN.
NEXT ROUND: ch 1, slstblo in each st around. Slst to first slst to close the round. TURN
NEXT ROUND: ch 1, hdcblo in each st around. Slst in first hdc to close the round. TURN.
NEXT ROUND: ch 1, slstblo in each st around. TURN.
Rep last 2 rounds until the majority of your chest is covered. I did 8-9 inches including ribbed band.
Now we need to half the number of sts you have. I had 90 to begin with so half of that is 45. Counting from where I am now I will place a stitch marker in the 45th st. You might have a different number so mark that halfway stitch.
NEXT ROW: ch 1, hdc2tog, hdc in each st across until you reach the 2nd st from st marker, hdc2tog. Turn.
NEXT ROW: ch 1, skip first st (the st with ch 1), slstblo in next st, slstblo in each st across until 2 sts remain, skip 2nd last st, slstblo in last st. Turn.
Rep last 2 rows until you’re happy with the width at the neck. You don’t want it too wide nor too narrow. I decreased until I had 19 sts for reference. Do not fasten off.
NEXT ROW: ch 1, sc in first st, sc in next st. Turn. (2sc).
Rep last row until you have 18 rows. This is half the length of one strap. Add or subtract more rows here if needed. Fasten off leaving a 3 inch tail. (first half strap completed).
Now count 2 sts in from the edge on the other side and attach your yarn to that 2nd st:
NEXT ROW: ch 1, sc in same st, sc in next st. Turn.
Rep last row until you have completed 18 rows. Add or subtract rows here if needed. Fasten off leaving 3 inch tail. (second half strap completed)
You have now completed the front of the top. Now we will turn the top over and start working on the back.
Attach your yarn to the right hand corner, into the next available st.
NEXT ROW: ch 1, hdc2tog, hdc in each st across until 2 sts remain, hdc2tog. Turn.
NEXT ROW: ch 1, skip first st (the st with the ch1) slstblo in next st, slstblo in each st across until 2 sts remain, skip 2nd last st, slstblo in last st. Turn.
Rep last 2 rows until neck is same width as the front side. Continue on making the straps in the same way as the front side by:
NEXT ROW: ch 1, sc in same st as ch 1, sc in next st, turn.
Rep last row until strap is same length as the other two front straps. Fasten off. (3rd half strap completed).
Now attach yarn to the 2nd st in from the edge on the other side.
NEXT ROW: ch 1, sc in same st as ch1, sc in next st, turn.
Rep last row until strap is same length as other 3 straps. Fasten off. (4th half strap completed).
Now using a yarn needle stitch the straps together.
ARMHOLE EDGING:
Change to 4.5 mm hook
Attach yarn to the underarm area.
NEXT ROUND: ch 1, sc all the way around the under arm and along the outer edge of strap. Slst to 1st sc to close the round. Ch 1 and Rsc all the way around armhole and edge of strap. Slst to first st to close the round. Fasten off.
Rep this same process around the second armhole.
Now we will attach yarn to the corner of the neck:
NEXT ROUND: ch 1, sc across front neck, up along raw edge of strap, across back of neck, around raw edge of 2nd strap. Slst to 1st sc in to close round.
NEXT ROUND: ch 1 and Rsc in each st around armhole and strap. Slst to 1st st to close the round. Fasten off.
Weave in all your ends.
You are now finished your Crochet Zara Crop Top.