
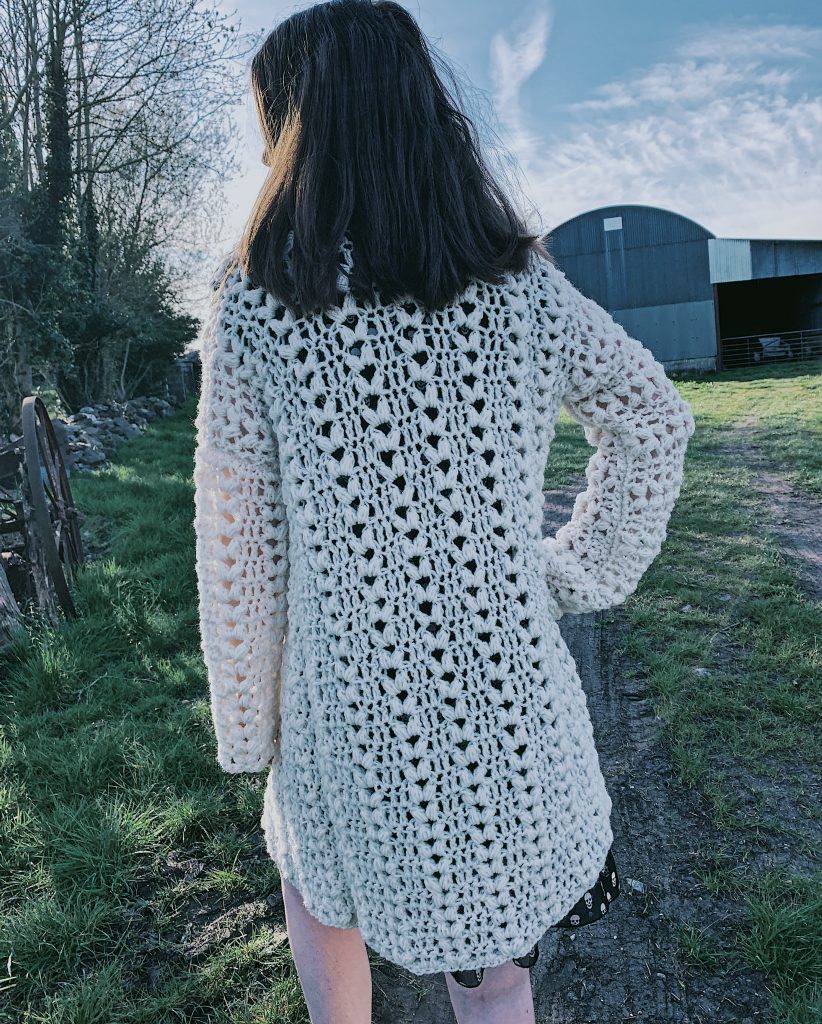
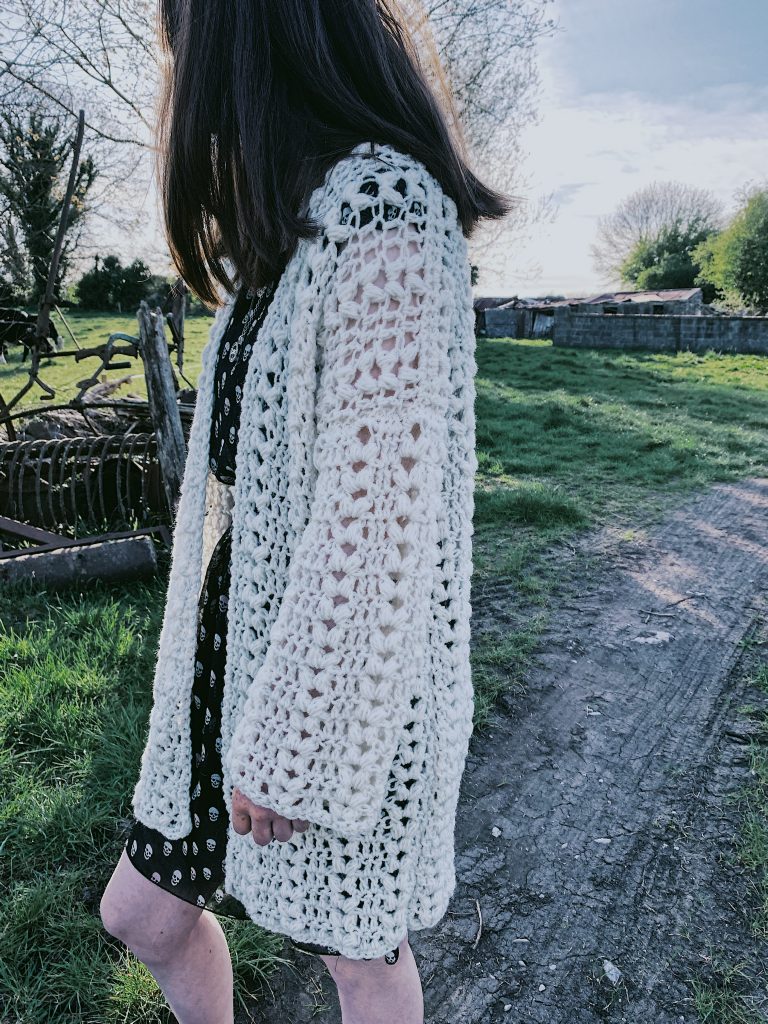
I’m so excited to be sharing with you all my latest design, the Blathnaid [blaw-nid] Cardigan. This crochet cardigan was designed to be airy enough to wear during the summer months yet still have plenty of texture, hence why I decided to use the beloved puff stitch.
Materials
weight 4/aran/10 ply yarn
8mm crochet hook
stitch markers and tapestry needle
You will need about 600g for S/M, 700g for L/XL, 750g for 2XL/3XL and 800g for 4XL/5XL
Special stitch: puff stitch: YO, insert hook into the designated stitch, YO, pull up a loop. (YO, insert hook into same stitch, YO, pull up a loop) 2 times. YO, pull through 6 loops on hook. YO, pull through last 2 loops on hook.
Sizes:
S/M(L/XL,2XL/3XL,4XL/5XL)
The cardigan is made up using 3 panels (back and two front) and two identical sleeves that are sewn on to cardigan.
Abbreviations:
ch chain
sc single crochet
dc double crochet
slst slip stitch
Pst puff stitch
Back panel:
Ch 66(73,80,87)
Row 1: sc into 2nd ch from hook, sc across to end. Turn.
Row 2: ch 3(counts as first dc here and throughout) dc into next st, *skip 2, (Pst, ch2, Pst) into next st, skip 2, dc in next 2 sts, repeat from * across to end. Turn.
Row 3: ch 3, dc in next st, *(Pst, ch2, Pst) into next ch2 space, dc in next 2 dc, repeat from * to end. Last dc is made on top of beginning ch3. Turn.
Row 4-34: repeat row 3. Do more or less row here depending on how long/short you want the cardigan to be.
Row 35: ch 1, sc into every st across, including the top of every Pst and place 2 sc in every ch2 space. Fasten off leaving a long tail.
Front panels (make 2!):
Ch 24(31,38,45)
Repeat rows 1-35 of the back panel. Fasten off leaving a long tail.
Sleeves:
Ch 31(38,45,52)
Repeat rows 1-15 of the other panels. Then finish off by doing a row of sc. Fasten off leaving a long tail. If your sleeve needs to be shorter or longer, simply do less or more puff stitch rows.
Assembly:
Lay the back panel flat on a hard surface. Make sure the puff stitches are facing up like “vs”. Next lay the front panel on top making sure the puff stitches are facing in the same direction. Slip stitch across the tops to attach the front panels to the back panels.
Next lay the entire piece out flat. Grab a sleeve and place a stitch marker into the middle stitch. Make sure the puff stitch “vs” are facing up. Now line that stitch marker up with a shoulder seam and attach the stitch marker. Slip stitch across attaching the sleeve to the main body. Repeat for the other side. Next fold your cardigan over and slip stitch up along the sides. Fasten off and weave in any loose ends.
Turn your cardigan right side out. Attach your yarn to the bottom right hand inner edge, ch 1 and sc all the way around to the other front panel. Fasten off. Weave in your ends. You can add more rows of sc here if you want, it’s entirely up to you.
You are now ready to wear you new creation.
Thank you so much for doing this!!!! I begged you for it on one of your YouTube channels and you did it!!! It’s lovely!!! I can’t wait to try it!!! I’m busy crocheting face masks right now due to COVID, unfortunately. I hope you are safe and well!
Thank you, again!
Love,
Tina
Hello Carrie,just found you and your pattern on utube,I like it a lot and am looking forward to making it,the Blathnaid Cardigan looks perfect for summer evenings thank you and your tutorial is easy to watch and follow thank you for sharing this stay safe Jackie
Hi
I am doing your chuncky crochet cardigan but i cant see the pattern anymore. Has it been removed?
Thankyou Alex
Can you tell me what the gauge is for this pattern? Thank you!
Where can I buy the 10 ply yarn for the Blathnaid yarn for this cardigan. I can’t seem to find this yarn where I live
Thank you