
Learn to crochet this quick and easy crochet sweater vest, perfect for layering this Fall and Winter. This turtleneck sweater vest is a simple project to keep you busy for a couple nights and with a step by step video tutorial you will fly though it no problem at all.
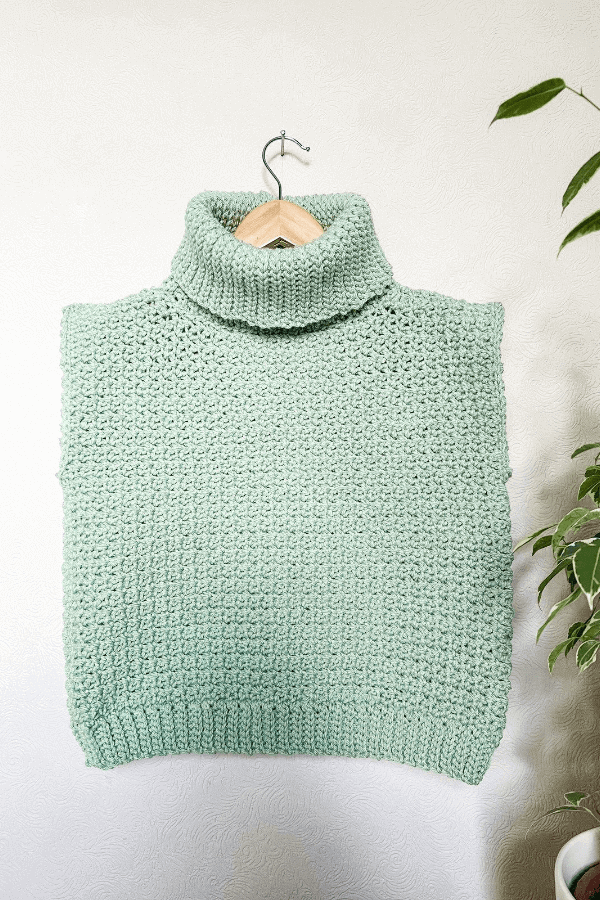
This turtleneck sweater vest is crocheted in three pieces, the front panel, back panel and the big oversized collar. Both front and back panels are crocheted from the bottom up, sewn together, with the collar crocheted separately and later sewn onto the body.
I love that the bottom band and collar are created in a ribbed texture, while the main body gives a sort of knit moss stitch kind of vibe. This sweater vest is perfect for layering over cute tops or sweaters and would make a definite must to any Fall wardrobe.
YARN
This crochet turtleneck sweater vest uses Paintbox Simply Chunky yarn which is a weight 5 or bulky, chunky yarn. It is made from 100% acrylic yarn, making it easier to wash and care for. With so many shades in the line, there is definitely a color for everyone.
You can use any weight 5 yarn of your choice but please keep the gauge listed below in mind. I think this sweater vest would also be lush in a cozy wool blend. Can you imagine this vest in a lovely rust or mustard shade? Beautiful.
MATERIALS
Yarn – Paintbox Simply Chunky – weight 5/ bulky/ chunky – 100g/ 136m/ 149 yds in each ball.
Approximately 4(5, 5, 6, 6, 6) balls
7mm crochet hook
Stitch markers
Measuring tape
Yarn needle

STITCHES & ABBREVIATIONS
ch = chain
sc = single crochet
slst = slip stitch
ch1-sp = chain one space
blo = back loop only
sc2tog = single crochet two together
rep = repeat
st(s) = stitch(es)
SIZING & MEASUREMENTS
Sizing follows S(M, L, XL, 2XL, 3XL)
Finished bust measurements : 38(42, 46, 50, 54, 58)”
Length: 19(19, 20, 20, 21, 21)”
Gauge: 14 sts x 13 rows using main body stitch.
CROCHET TURTLENECK SWEATER VEST PATTERN
BACK PANEL
Ch 8
ROW 1: slst in 2nd ch from hook, slst in each ch to end. Turn.
ROW 2: ch 1, slst in blo in each st to end of row. Turn.
Rep row 2 until end of row 65(71, 77, 83, 89, 95)
Now turn your work so you will be working along the long edge of ribbing.
NEXT ROW: ch 1 and make 65(71, 77, 83, 89, 95) sc across. Turn.
NEXT ROW: ch 1, sc in 1st st, *ch 1, skip 1, sc in next sc, rep from * across to end of row. Turn.
NEXT ROW: ch 1, sc in 1st st, *ch 1, skip ch1-sp, sc in next sc, rep from * across to end of row. Turn.
Rep last row until end of row row 53(53, 57, 57, 61, 61). Feel free to add more rows here.
Fasten off and weave in your ends.
FRONT PANEL
Ch 8
ROW 1: slst in 2nd ch from hook, slst in each ch to end. Turn.
ROW 2: ch 1, slst in blo in each st to end of row 65(71, 77, 83, 89, 95)
Now turn your work so you are working along the long edge of the ribbing.
NEXT ROW: ch 1 and make 65(71, 77, 83, 89, 95) sc across. Turn.
NEXT ROW: ch 1, sc in 1st st, *ch 1, skip next st, sc in next sc, rep from * across to end of row. Turn.
NEXT ROW: ch 1, sc in 1st st, *Ch 1, skip ch1-sp, sc in next sc, rep from * across to end of row. Turn.
Rep last row until end of row 49 (49, 53, 53, 57, 57). Feel free to add more rows here but make sure to do 4 rows less than back panel.
Now with work laying flat, mark the 18th(24th, 28th, 32nd, 36th, 40th) st in from the right. This stitch should be a ch1-sp.
Next count in 17( 23, 27, 31, 35, 39) stitches in from the left and mark that stitch. This stitch should be a sc.
Continuing on from where you are now:
NEXT ROW: ch 1, sc in 1st st, *ch 1, skip ch1-sp, sc in next sc, rep from * across until you have 2 sts left before st marker, sc2tog. Turn.
NEXT ROW: ch 1, sc2tog, *ch 1, skip ch1-sp, sc in next sc, rep from * across to end of row. Turn.
NEXT ROW: ch 1, sc in 1st st, *ch 1, skip ch1-sp, sc in next sc, rep from * across until 2 sts remain, sc2tog. Turn.
NEXT ROW: ch 1, sc2tog, *ch1, skip ch1-sp, sc in next sc, rep from * across to end of row. Fasten off.
Now turn your piece.
Next attach your yarn to the other side, the stitch with your second stitch marker.
NEXT ROW: ch 1 sc2tog, sc in next sc, *ch 1, skip ch1-sp, sc in next sc, rep from * across. Turn.
NEXT ROW: ch 1, sc in 1st st, ch 1, skip ch1-sp, *sc in next sc, ch 1, skip ch1-sp, rep from * across until 2 sts remain, sc2tog. Turn.
NEXT ROW: ch 1, sc2tog, sc in next sc, *ch1, skip ch1-sp, sc in next sc, rep from * across to end of row. Turn.
NEXT ROW: ch 1, sc in 1st st, ch 1, skip ch1-sp, *sc in next sc, ch 1, skip ch1-sp, rep from * across until 2 sts rem, sc2tog. Fasten off.
COLLAR
Ch 31
ROW 1: slst in 2nd ch from hook, slst in each ch across. Turn.
ROW 2: ch 1, slst in blo in each st across. Turn.
Rep row 2 until piece measures 17, (17, 17.5, 17.5, 18, 18) inches.
Slip stitch ends together to form a “cylinder”. Fasten off leaving long tail.
ASSEMBLY:
Lay the front panel on top of the back panel and seam across shoulders. Next measure 7(7.5, 8, 8.5, 9, 9) inches down the side from the shoulder down. Place a stitch marker. Repeat on the other side. With your yarn needle and some yarn seam from the bottom up to the stitch marker. Repeat on the other side. Fasten off and weave in all ends. Your armholes have now been created!
With the wrong side still facing you, seam the collar to the neck line making sure the collar seam is towards the back.
Next turn your vest the right side out and attach yarn to the armhole. I like to attach it right above the side seam of the vest. Once yarn is attached ch 1 and slst all the way around the armhole. Once you have slip stitched around the armhole make a slst to the first slst to close the round. Fasten off and weave in all ends. Repeat on the other side.
You have now finished your crochet turtleneck sweater vest. Enjoy!
Love this vest!!! Your designs are so beautiful!!!
Another fantastic pattern and tutorial a beautiful top for layering, your designs are brilliant😁👍.
What are the measurements for this gauge?
Gauge: 14 sts x 13 rows using main body stitch