
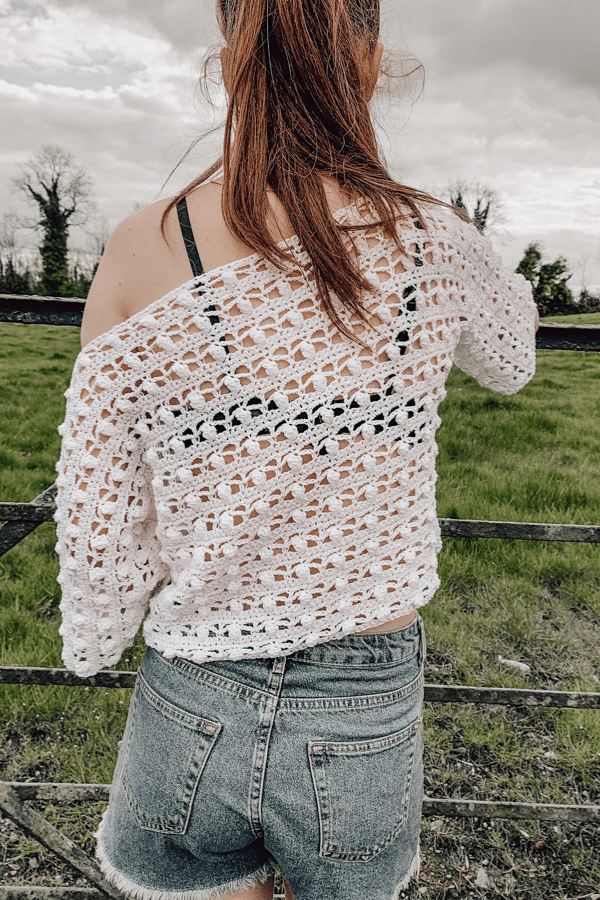
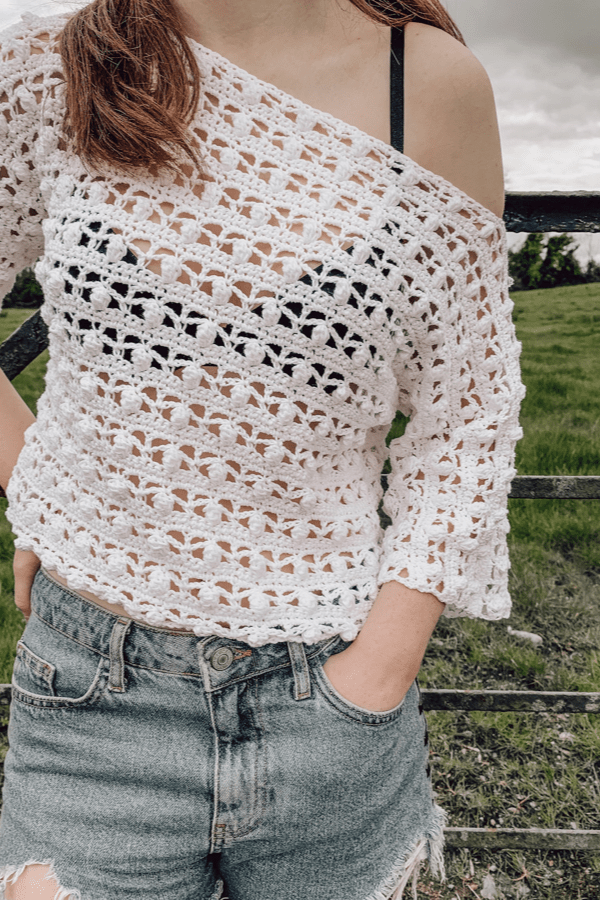
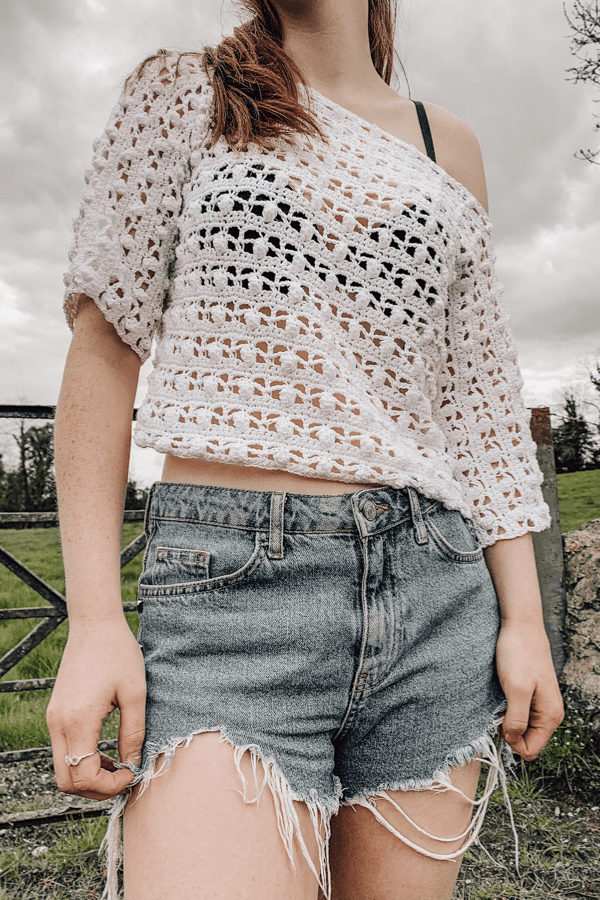
Learn how to crochet this quick and easy crochet cropped top, perfect for summer. The Azalea cropped top is the perfect top to layer over a cute cami or simply thrown over a bikini top making it perfect for long days chillin’ on the beach! This crochet cropped top is easy to make using simple stitches and due to the t shaped construction of the top it requires absolutely no increasing or decreasing.
This free written pattern is accompanied with a step by step video tutorial. Scroll down to watch!
The Azalea top is constructed using two identical T-shaped panels that are sewn together giving you a light, beautiful and airy summer top. It is completely customisable so if you want it longer you simply add more rows before we begin the sleeve section of the top.
I designed this top to lay slightly off one shoulder but if you want it as a regular top I give instructions throughout the pattern so you can make changes.
MATERIALS
Yarn – Drops Safran – weight 2/sport, 50g/160 m/ 175 yds
5(5, 6, 6, 6, 7) balls
4 mm crochet hook
Yarn needle
Scissors
MEASUREMENTS
To fit bust S( M, L, XL, 2XL, 3XL)
Width (minus sleeves) 19( 21, 23, 25, 27, 29) inches
Length: 15( 16, 17, 18, 19, 20) inches
STITCHES & ABBREVIATIONS
ch = chain
sc = single crochet
dc = double crochet
PST = popcorn stitch
Esc = extended single crochet
st = stitch
rep = repeat
SPECIAL STITCH: Popcorn Stitch (PST): 4 dc in designated stitch, drop loop from hook, insert hook from front to back in first dc of the group, pull dropped loop through stitch.
Extended single crochet (Esc): insert hook in designated st, pull up loop, yarn over and draw through first loop only, yarn over and draw through both loops on hook.
CROCHET AZALEA CROPPED TOP PATTERN
Ch 80( 92, 98, 110, 116, 122)
ROW 1: sc in 2nd ch from hook, sc in each ch across. Turn.
ROW 2: ch 1, sc in first st, *ch 3, skip next 2 sc, PST in next sc, ch 3, skip next 2 sc, sc in next sc; rep from * across, turn.
ROW 3: ch 5 (counts as dc and ch 2), skip next ch3-sp, *sc in next PST, ch 2, skip next ch3-sp, dc in next sc**, ch 2, skip next ch3-sp; rep from * ending last rep at **, turn.
ROW 4: ch 1, sc in first dc, * 2 dc in next ch2-sp, sc in next st; rep from * across ending with last sc in 3rd ch of turning ch, turn.
ROW 5: ch 1, sc in each st across. Turn.
Repeat rows 2-5 a further 7(8, 9, 10, 11, 12) times ending with row 4. For a longer top simply add more rows here but make sure to end on row 4. DO NOT FASTEN OFF.
SLEEVES
Continuing on from where you are now, ch 42( 42, 48, 48, 48, 54). For a longer sleeve add more chains but make sure you add in multiples of 6. Fasten off.
Now attach yarn to the end sc on the other side and ch 42( 42, 48, 48, 48, 54). Fasten off.
TURN YOUR WORK TO THE OTHER SIDE
Attach yarn to the end ch on the right hand side.
ROW 1: Ch 1, sc in same st, sc in each ch across, continue with sc across the main section of top and then across the chain on the other side. Turn.
ROW 2: ch 1, sc in first sc, *ch 3, skip next 2 sc, PST in next sc, ch 3, skip next 2 sc, sc in next sc; rep from * across, turn.
ROW 3: ch 5 (counts as dc and ch 2), skip next ch3-sp, *sc in next PST, ch 2, skip next ch3-sp, dc in next sc**, ch 2, skip next ch3-sp; rep from * across, ending last rep at **, turn.
ROW 4: ch 1, sc in first dc, *2 dc in next ch2-sp, sc in next st: rep from * across ending with last sc in 3rd ch of turning ch, turn.
ROW 5: ch 1, sc in each st across, turn.
Rep rows 2-5 a further 5(6, 7, 7, 8, 9) times ending on row 4. For a wider and smaller sleeves simply add/subract rows here but make sure you end on row 4. DO NOT FASTEN OFF.
Now you need to decide on how big you want your neck opening to be. I wanted a top that hung down off one shoulder so I simply marked out the centre 11.5 inches of the top. You can make yours however big or small you want. So go ahead and place your stitch markers where you want your neck opening to be.
Ch 1, Esc in each st across to the nearest stitch marker. I ended up doing 58 ESC for your reference. Fasten off. Now attach your yarn to the stitch with the second stitch marker.
Ch 1, Esc in same st, Esc in each st across. Fasten off.
Repeat this entire process for the second panel.
Now lay one panel on a flat surface with the right side facing up. Place the second panel directly on top with the wrong side facing up. With you yarn needle and some yarn sew across the top side of sleeves towards the neckline and then down along the sides. Now turn your top right side out and wear it with pride!
There is a difference between your written pattern for Row4 and your video’d version.
I was following your video’d version ran out of cotton yarn and had to reorder yarn when re-
started I was following your writtenpatern . Row 4 inyour video’d version you changed double crochets to single ones in the chain 2 spaces.