
Learn to crochet this beautifully textured Samhain Sweater. This free written pattern is also accompanied with a step by step video tutorial. Please scroll down to view.
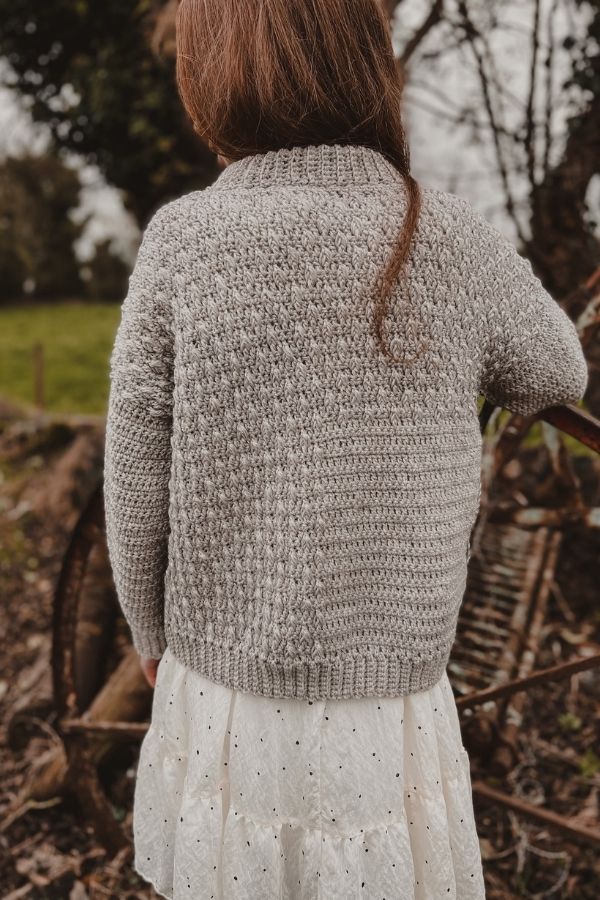
I decided to call this newest design of mine the Samhain Sweater simply because the word Samhain [s-ow-in] literally translates to November in the Irish language. The word Samhain also marks the end of harvest and the beginning of winter so I thought this would be a perfect name for this sweater.
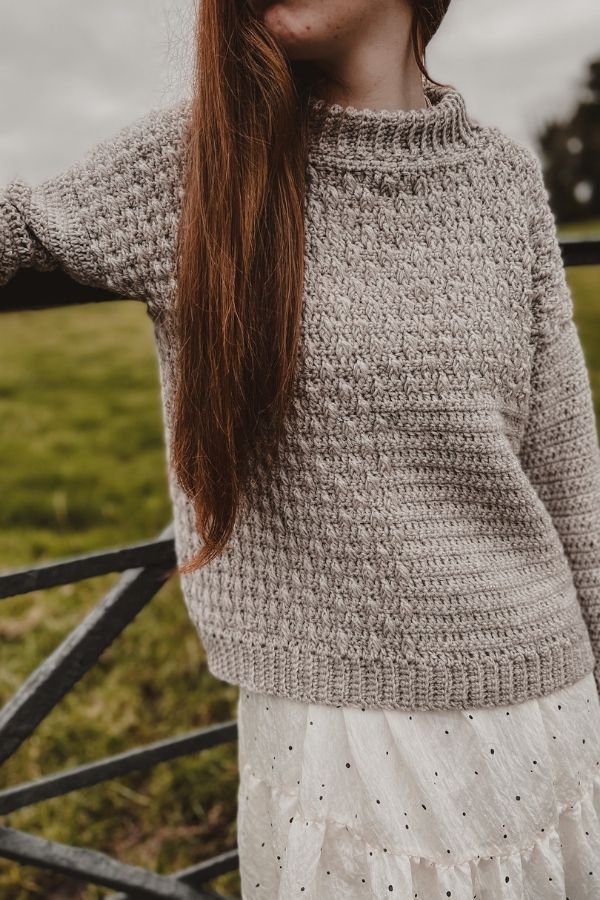
I love that this sweater is full of beautiful texture yet there is just one square crocheted in a simple basic stitch. I just think it adds a little something special to the piece. Another thing that i love is the sturdy collar. I find that when you create a ribbed collar, especially with crew necks, the collar is always flimsy and flops about. But not with this sweater. One simple technique changes all that and I love it. I think all of my sweaters from now on will follow this idea.
So, the sweater is constructed using four panels, the back, front, and two sleeves. Both the front and back panels are completely identical except for a few rows of neck shaping on the front panel. Once all pieces are crocheted we will seam them all together. Lastly we will crochet the ribbed collar into the neckline and do our special technique to strengthen it slightly.
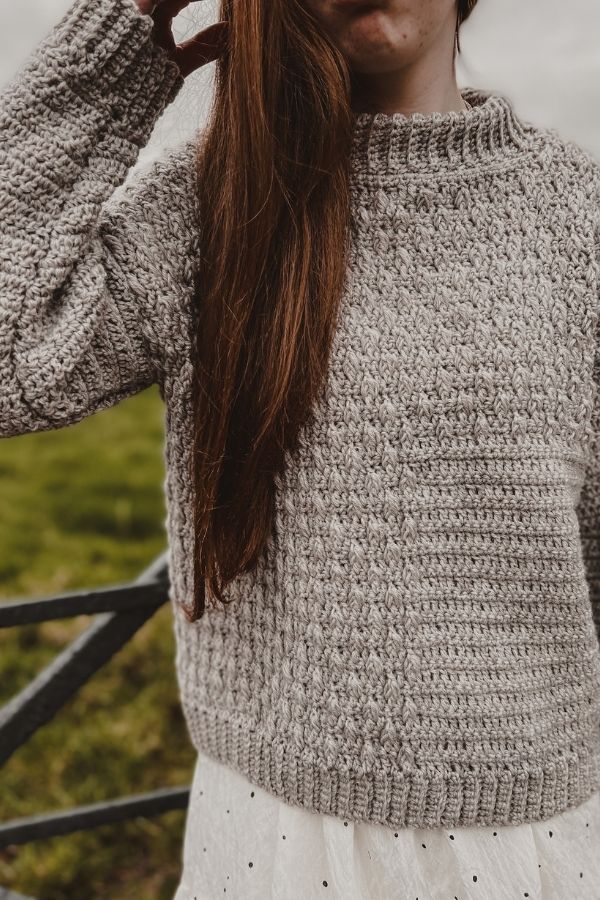
This sweater was created with a slightly oversized and relaxed fit in mind. Please feel free to go down a size for a more fitted look.
YARN
The yarn I used for the Samhain Sweater was Drops Karisma. This is a weight 3 or Dk yarn made entirely from wool. With winter just around the corner I opted for a warmer yarn and this yarn is perfect. I’ve used this yarn several times in my cardigans and sweaters and it is quickly becoming one of my favourites. I love that it keeps its shape and is superwash treated for easy care and every day wear.
SIZING & MEASUREMENTS
The Samhain Sweater fits sizes S(M, L, XL, 2XL)
Finished bust: 42(46, 50, 54, 58) inches
Length: 24(24, 24.5, 25, 25.5) inches
Sleeve length: 17(17, 17, 17.5, 17.5) inches
MATERIALS
Yarn – Drops Karisma – weight 3/ Dk/ 8 ply – 109 yds/ 100m/ 50g per ball
10(11, 11, 12, 12) balls
5 mm crochet hook
Stitch markers
Yarn needle
Scissors
STITCHES & ABBREVIATIONS
ch = chain
sc = single crochet
dc = double crochet
DP = double post
BLO = back loop only
st(s). = stitch(es)
slst = slip stitch
rep = repeat
SPECIAL STITCH: Double Post (DP): (yo, insert hook around post of dc 2 rows below, yo and draw up loop to 1″) twice (5 loops on hook), yo draw through 4 lopps on hook, yo draw through 2 loops on hook.
GAUGE: 15 dc x 12 rows = 4″
CROCHET SAMHAIN SWEATER PATTERN
BACK PANEL
Ch 9
ROW 1: sc in 2nd ch from hook, sc in each ch to end. Turn.
ROW 2: ch 1, sc in BLO in each st to end. Turn.
Repeat row 2 until you have a TOTAL of 79(87, 95, 103, 111) rows completed.
Now we will work along the long edge of the ribbing
NEXT ROW: ch 3(counted as first dc), make 78(86, 94, 102, 110) dc across. Turn.
NEXT ROW: ch 1 (not counted as st), sc in each st across. Turn.
NEXT ROW: Ch 3, dc in next 40(44, 48, 52, 56) *DP in next st, skip sc just behind st just made, dc in next 3 sts, rep from * across placing DP in second last st and dc in last st. Turn.
NEXT ROW: ch 1, sc in each st across. Turn.
NEXT ROW: ch3, dc in next 42(46, 50, 54, 58) sts, *DP, skip st directly behind st just made, dc in next 3 sts, rep from * across. Turn.
NEXT ROW: ch 1, sc in each st across. Turn.
Repeat last 4 rows a further 6(6, 7, 7, 8) more times.
NEXT ROW: Ch 3, *DP in next st, skip sc directly behind st just made, dc in next 3 sts, rep from * across, placing DP in 2nd last st, and dc in last st. Turn.
NEXT ROW: ch 1, sc in each st across. Turn.
NEXT ROW: Ch 3, dc in next 2 sts, *DP in next st, skip sc directly behind st just made, dc in next 3 sts, rep from * across to end. Turn.
NEXT ROW: ch 1, sc in each st across. Turn.
Rep last 4 rows a further 6(6, 7, 7, 8) times.
NEXT ROW: ch 3, *DP in next st, skip sc directly behind st just made, dc in next 3 sts, rep from * across ending with DP in 2nd last st, dc in last st. Turn.
NEXT ROW: ch 1, sc in each st across. Turn.
Fasten off.
FRONT PANEL
Ch 9
ROW 1: sc in 2nd ch from hook, sc in each ch to end. Turn.
ROW 2: ch 1, sc in BLO in each st to end. Turn.
Repeat row 2 until you have a TOTAL of 79(87, 95, 103, 111) rows completed.
Now we will work along the long edge of the ribbing
NEXT ROW: ch 3(counted as first dc), make 78(86, 94, 102, 110) dc across. Turn.
NEXT ROW: ch 1 (not counted as st), sc in each st across. Turn.
NEXT ROW: Ch 3, dc in next 40(44, 48, 52, 56) *DP in next st, skip sc just behind st just made, dc in next 3 sts, rep from * across placing DP in second last st and dc in last st. Turn.
NEXT ROW: ch 1, sc in each st across. Turn.
NEXT ROW: ch3, dc in next 42(46, 50, 54, 58) sts, *DP, skip st directly behind st just made, dc in next 3 sts, rep from * across. Turn.
NEXT ROW: ch 1, sc in each st across. Turn.
Rep last 4 rows a further 6(6, 7, 7, 8) more times.
NEXT ROW: Ch 3, *DP in next st, skip sc directly behind st just made, dc in next 3 sts, rep from * across, placing DP in 2nd last st, and dc in last st. Turn.
NEXT ROW: ch 1, sc in each st across. Turn.
NEXT ROW: Ch 3, dc in next 2 sts, *DP in next st, skip sc directly behind st just made, dc in next 3 sts, rep from * across to end. Turn.
NEXT ROW: ch 1, sc in each st across. Turn.
Rep last 4 rows a further 5(5, 6, 6, 7) more times.
Now with the right side facing you count 27(31, 35, 39, 43) in from each side and mark those stitches with a stitch marker.
NEXT ROW: ch 3, *DP in next st, skip sc directly behind st just made, dc in next 3 sts, rep from * across placing DP in st before stitch marker, and dc in stitch with marker. Turn.
NEXT ROW: ch 1, sc in each st across. Turn.
NEXT ROW: ch 3, dc in next 2 sts, *DP in next st, skip sc directly behind st just made, dc in next 3 sts, rep from * across. Turn.
NEXT ROW: ch 1, sc in each st across. Turn.
NEXT ROW: ch 3, *DP in next st, skip sc directly behind st just made, dc in next 3 sts, rep from * across placing DP in 2nd last st, dc in last st. Turn.
NEXT ROW: ch 1, sc in each st across. Fasten off leaving a long tail.
Now flip your piece around so the right side is facing you. Attach yarn to the stitch with your second stitch marker.
NEXT ROW: ch 3, *DP in next st, skip sc directly behind st just made, dc in next 3 sts, rep from * across placing DP in 2nd last st, and then dc in last st. Turn.
NEXT ROW: ch 1, sc in each st across. Turn.
NEXT ROW: ch 3, dc in next 2 sts, *DP in next st, skip sc directly behind st just made, dc in next 3 sts, rep from * across. Turn.
NEXT ROW: ch 1, sc in each st across. Turn.
NEXT ROW: ch 3, *DP in next st, skip sc directly behind st just made, dc in next 3 sts, rep from * across placing DP in 2nd last st, dc in last st. Turn.
NEXT ROW: ch 1, sc in each st across. Fasten off leaving a long tail.
SLEEVES (MAKE 2)
Ch 9
ROW 1: sc in 2nd ch from hook, sc in each ch to end. Turn.
ROW 2: ch 1, sc in BLO in each st across. Turn.
Rep row 2 until you have a total of 35(35, 37, 37, 39) completed.
Now we will be working on the long edge of the ribbing.
NEXT ROW: ch 3, make 34(34, 36, 36, 38) dc across. Turn.
NEXT ROW: ch 1, 2sc in first st, sc in each st across, 2sc in last st. Turn.
NEXT ROW: ch 3, dc in each st across. Turn.
NEXT ROW: ch 1, 2sc in first st, sc in each st across, 2sc in last st. Turn.
Repeat last 2 rows until you have 59(61, 63, 67, 71) sts. Turn.
NEXT ROW: ch 3, dc in each st across. Turn.
NEXT ROW: ch 1, sc in each st across. Turn.
Rep last 2 rows until entire sleeve measures 17(17, 17, 17.5, 18) inches long.
Fasten off leaving a long tail.
SEAMING TOGETHER
Lay the back panel flat on a hard surface with the right side facing up. Next lay the front panel on top with the wrong side facing up. With a yarn needle and your long tails seam across the shoulders connecting the front panel to the back panel.
Next lay the entire piece out flat, with the wrong side facing up. Mark the middle stitch on the top of a sleeve with a stitch marker. Now connect to the shoulder seam. With your long tail and yarn needle seam sleeve to main body. Repeat for the second sleeve on the other side.
Fold cardigan over, wrong side still facing out and seam down along the under edge of sleeve and along the edge of sweater. Repeat on the other side.
COLLAR
Turn your sweater the right side out. Attach yarn to the side of neck opening, near the shoulder seam.
Ch 1, sc all the way around the neckline. Slip stitch to first sc to close the round.
NEXT ROW: ch 17. sc in 2nd ch from hook, sc in next 15 chains. Slst in next 2 sc . *Turn. Skip 2 slsts, sc in BLO in each of the next 16 sc, ch 1, turn, sc in BLO in next 16 sts, slst in next 2 sc, rep from * all the way around the neckline.
Once you have reached all the way around the neckline, slst the beginning row and the row you have just completed together. Fasten off leaving long tail.
Now fold the collar over and with your yarn needle and long tail stitch along the inside, and all the way around. Fasten off and weave in all ends.
You are now finished your sweater!
Love love love!!!
Gorgeous sweater! Thank you!!!
Is it possible to make this in a 3x? If so, how would I do it? Thanks in advance!
Carrie- I don’t know how it is that you are able to keep coming up with such amazing patterns. But I’ll tell you, since I found you, I don’t think you have a pattern out that I have looked at and said, “Eh, no, that’s not my style. I don’t like that.” Instead, every single one is, “Honey, I’m putting in another yarn order for myself. Carrie released a new pattern and I just have to make it.” Usually that is followed up with some sparky reply about you putting out patterns much faster than I crochet, but I don’t care. I’ll make them all one day.
Keep them coming, they are beautiful, timeless and so cozy looking.
Beautiful sweater! I can’t wait to start!
Is there somewhere to buy a PDF of this pattern? I really don’t want to screenshot the pattern just to save it lol.
Is there a PDF file for sale that we can buy for this pattern?
All I can say is WOW!
Hello,
I tried to make the sweater, I think I did all the measurements right and the right weight of yarn, small size, it fits and all, but my yarn was not enough. I think it takes a lot more than 1000 metres to make this overall beautiful sweater.
I have just finished this jumper a gift for my daughter.i’m very happy with it,but like you I used the same wool measurements are ok,but I had to buy an extra 4 balls,and that was only just enough.
Really love the jumper jumper though,lovely pattern.
Hi, I love this but if I make a jumper in size S that’s designed to be oversized it will drown me – how should I adapt it to make it an XS? Thanks if you do reply to this
I am in the creation process for the sweater. I am using a variegated yarn of car on in pink camo
The DP stitch makes the pieces of the pattern look like leaves, buds, and flowers. It is beautiful! I would love for you to see the result. If you will contact me you can maybe get a pic to post.
great pattern! How do I download and print it out without all the adverts?