
Learn to crochet this quick and easy crochet top. Customize it to your perfect size and length for a perfect fit.
Scroll down to view the free step by step video tutorial or you can purchase the ad-free printable here.
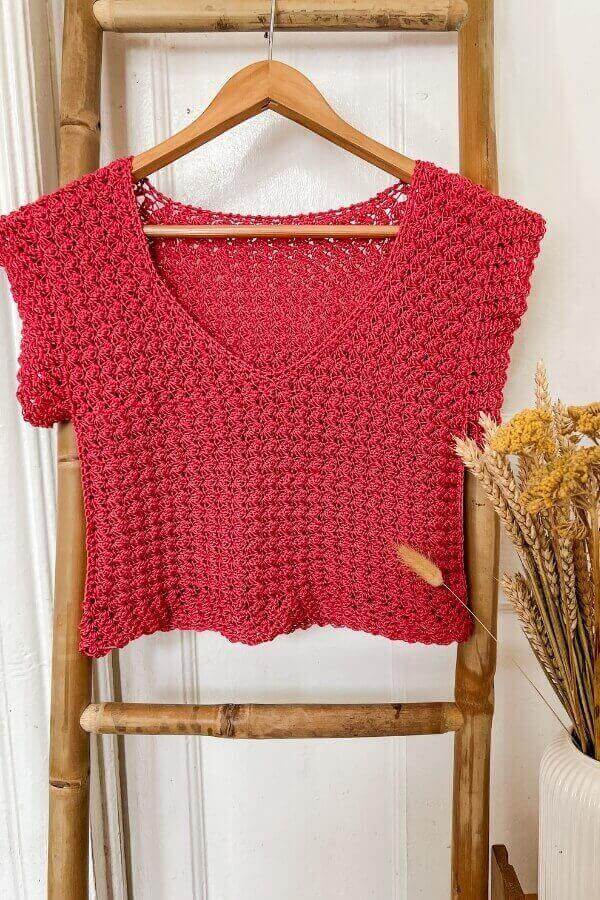
The crochet Omey Top has a delicate shell stitch throughout giving it a modern and feminine feel. The v-neck construction gives a flattering look no matter your shape or size, making this top the perfect piece to have in your collection this summer.
Recently I spent a few weeks summer vacation in Connemara, the west coast of Ireland. A close family friend has a beautiful cottage there overlooking Omey Island and it was here that I recently designed the Omey Top. I loved every second of my time spent here in this wonderful little space of Ireland so I had to name the top after this glorious location. If you ever get to travel Ireland, Omey Island is a must to your itinerary.
Using basic single and double crochets to create this simple shell stitch gives the Omey Top a beautiful light and lacy feel. It’s perfectly paired with shorts, jeans or a skirt.
CONSTRUCTION
The Omey Top is constructed by crocheting two separate pieces, the front and back. We begin with the front panel and working from the top down. Each of the shoulders and neckline are constructed separately until we reach the bust. Here we will join both pieces together and work as one front panel. Then we work the back panel until it is the same length as the front before we join both front and back panel together at the sides and shoulders. Next we will work the bottom shell section which is worked in the round before heading over to each of the sleeves which are worked directly into the top and crocheted in the round. Finally we will create a lovely detail along the neckline to give the top an extra bit of umph!
MATERIALS
Yarn – Hobbii Friends Wheel – sport/fine/weight 2 – 55% cotton, 45% acrylic – 400m/437yds/100g each.
Approximately 2(3, 3, 3, 4, 4) balls
Hooks – 4.5mm and 6mm
Notions – yarn needle, scissors, stitch marker
STITCHES & ABBREVIATIONS
ch – chain
sc – single crochet
dc – double crochet
sc2tog = single crochet two together
st(s) – stitch(es)
rem – remain(ing)
Shell stitch: (sc, 2dc) in designated stitch.
Crab stitch: ch 1 and without turning your work, insert hook from front to back in the first sc. Yarn over your hook and draw up a loop. You should have two loops on hook now. Yarn over and draw through both loops. When working the crab st tich you are essentially working a single crochet but working it backwards!
SIZING
S(M, L, XL, 2XL, 3XL)
Finished bust measurements: 34(37.5, 41, 48.5, 52.5, 56)”
GAUGE: 6 shells = 4″ using 4.5mm hook
CROCHET OMEY TOP PATTERN
LEFT FRONT
Using 4.5mm hook
Ch 20(20, 23, 32, 32, 38)
Row 1: shell in 2nd ch from hook, skip 2 ch, *shell in next ch, skip 2 ch, rep from * across, sc in last ch, turn. [19(19, 22, 31, 31, 37)]
Row 2-16: ch 1, shell in first sc, *skip 2 dc, shell in next sc, rep from *across to last sc, sc in last sc, turn.
SHAPING NECKLINE
We will now be increasing on just one side for the neck.
Row 17: ch 1, shell in first sc, *skip 2 dc, shell in next sc, rep from * across to last sc, shell in last sc, turn.
Row 18: ch 1, shell in first dc, skip next dc, shell in next sc, *skip 2 dc, shell in next sc, rep from * across to last sc, sc in last sc, turn.
Rep rows 17-18 until you have 37(43, 46, 55, 61, 64) sts. Your last row should end on the edge with no increases. Fasten off.
RIGHT FRONT
Rep all the steps you did for the left front but this time do not fasten off.
MAIN BODY
Continuing on from where you are now we will join the two pieces together to form the main body.
Row 1: ch 1, shell in first sc, *skip 2 dc, shell in next sc, rep from * across the right front until 3 sts rem, skip next 2 dc, insert hook into last sc and into the last sc on the increase edge of the left front, and complete a sc. Place 2 dc into same space. The right and left fronts are now joined. *Skip 2 dc, shell in next sc, rep from * across to last sc, sc in last sc, turn.
Row 2: ch 1, shell in first sc, *skip 2 dc, shell in next sc, rep from * across to last sc, sc in last sc, turn.
Rep row 2 until you are happy with your preferred length keeping in mind we will be adding an extra 2 inches later. Fasten off.
BACK PANEL
Using 4.5mm hook
Ch 74(86, 92, 110, 122, 128)
Row 1: shell in 2nd ch from hook, skip 2 ch, *shell in next ch, skip 2 ch, rep from * across, sc in last ch, turn.
Row 2: ch 1, shell in first sc, *skip 2 dc, shell in next sc, rep from * across to last sc, sc in last sc, turn.
Rep row 2 until the back panel is the same length as the entire front panel.
ASSEMBLY
Lay the front panel directly on top of the back panel. Make sure the last row you completed of the back panel is at the bottom. Using your preferred way of seaming (ie. slip stitch, sc, or sewing with some yarn and needle) seam across both shoulders. Then attach yarn to a bottom corner edge and seam up along the sides leaving an opening of 6.5(7, 7.5, 8, 8.5, 9)” at the top. Feel free to make this opening bigger or smaller. Repeat for the other side.
SLEEVES
The sleeves are worked using a larger hook to give them a lacy, flowy and softer look. We will now be working directly into the armhole. The stitch for the sleeves is the exact same as for the body of the top but because we will be working in continuous rounds and using a larger hook, the stitch will look slightly different. I love how this stitch changes depending on whether it’s crocheted flat or in rounds.
We will also be working in continuous rounds so it is advisable to mark the first st of the round with a stitch marker to make it easier for you to identify the beginning of each round.
Turn the top the right side out. Attach yarn to the underarm near the side seam of the top.
Round 1: ch1, shell in same stitch. Now you will try to identify the “eye” of each shell along the armhole. You will work each shell of your sleeve into each of these “eyes for the first round. So, go ahead and place a shell into each “eye around.
Round 2-6: shell in first sc, *skip 2 dc, shell in next sc, rep from * around.
Feel free to add more rounds here if you prefer. Fasten off and repeat this entire process for the second sleeve.
BOTTOM EDGING
Using the 6mm hook
Attach yarn to any sc at the bottom edge of the top. I attached mine to the sc nearest the side seam but it makes no real difference as we will also be working in continuous rounds here.
Round 1: ch 1, shell in same sc, *skip 2 dc, shell in next sc, rep from * around.
Round 2-6: shell in first sc, *skip 2 dc, shell in next sc, rep from * around.
Feel free to add more rounds here. Fasten off.
NECKLINE TRIM
Using the 4.5mm hook
Attach yarn at the neckline near the shoulder seam.
Round 1: ch 1, sc around the entire neckline, making sure stitches are spaced evenly and not too near or too far away from each other. When you reach the “V” make a sc2tog. Continue with sc around remainder of the neckline. Slst to first sc to close the round. You can choose to fasten off here for a basic neckline trim or proceed to round two for a little more something something!
Round 2: ch 1 and work crab stitch (or sometimes called reverse single crochet around the neckline. Slst to first st to close the round. Fasten off.
Weave in all your ends and enjoy your Omey Top!