
Scroll down to view this free crochet sweater pattern. Learn how to crochet a gradient-like stripe sweater.
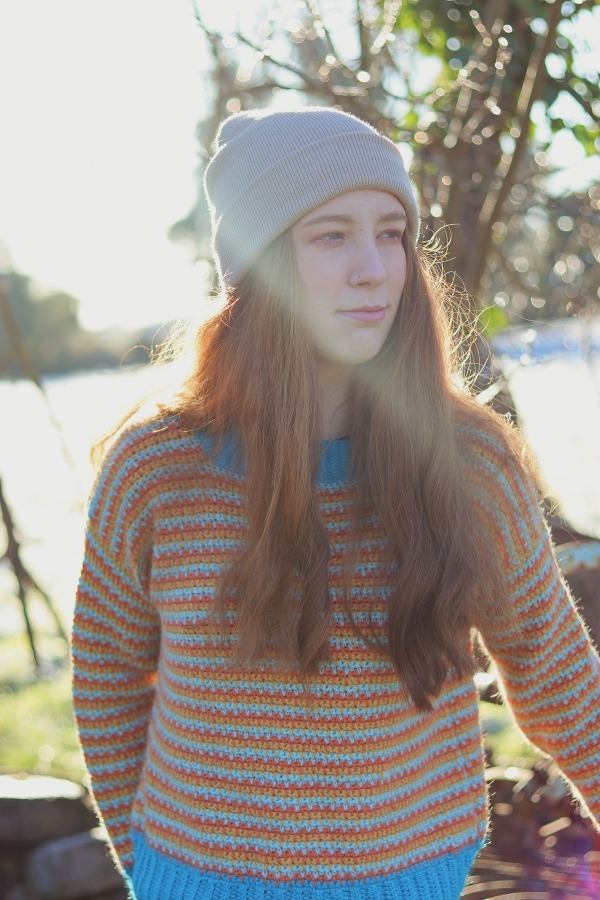
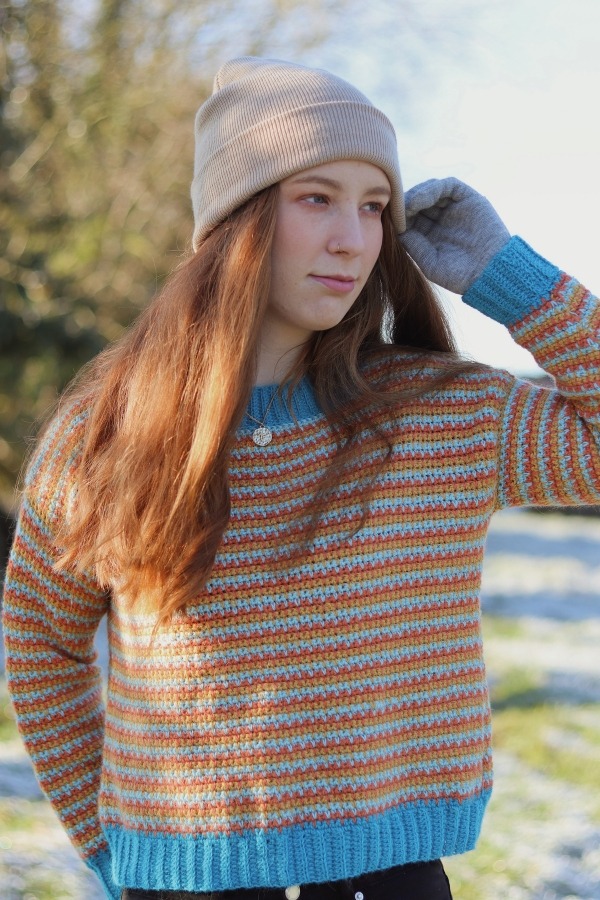
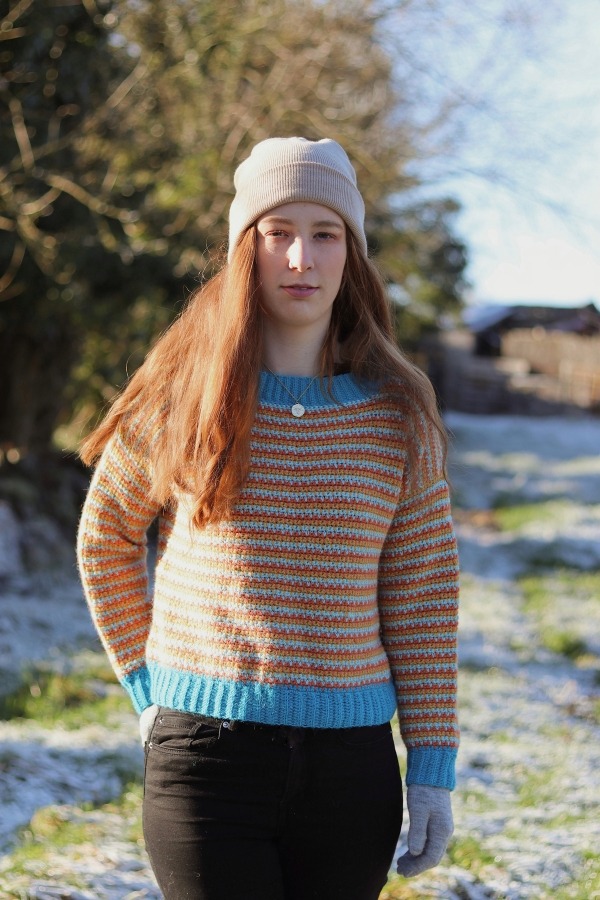
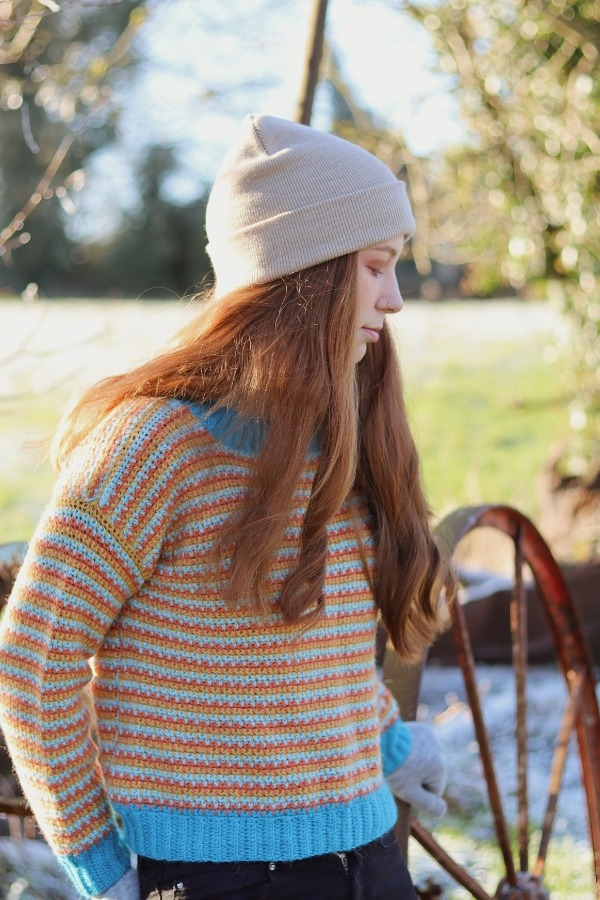
Simple, slightly oversized and bursting with color! What more could you want with a sweater? The Kylemore Sweater is a great seasonal transition sweater to get you through the entire year. Crochet with warm earthy tones for fall/winter or opt for bright cooler tones for spring.
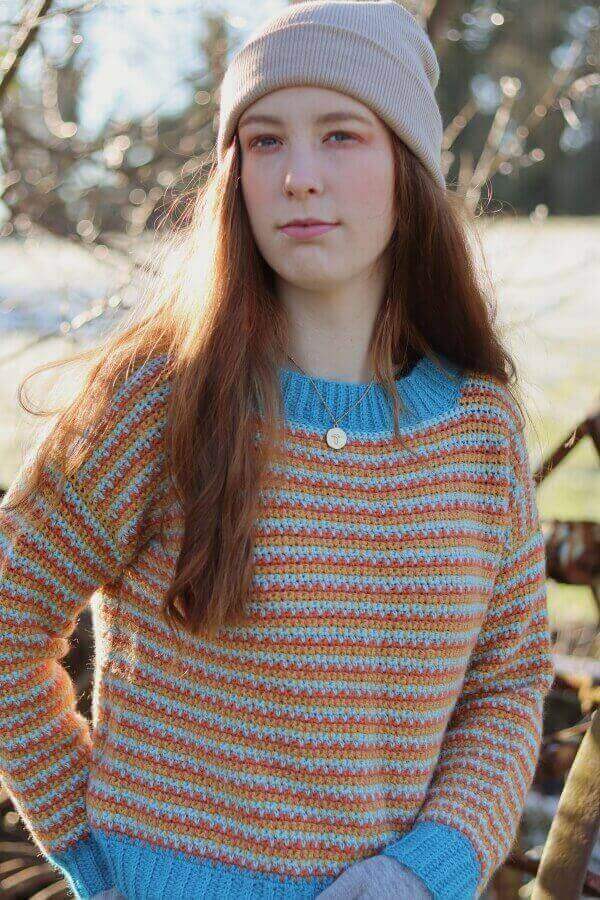
Worked flat and consisting of just half double crochets for the ribbing and single crochet short spike stitches for the body, this sweater can be paired with jeans, dresses or just simply as lounge wear.
CONSTRUCTION
This sweater is crocheted in 4 panels – front, back and 2 sleeves and uses simple stitches throughout the entire pattern – short spike stitch, single crochet and half double crochet.
Both the body and sleeves are worked from the bottom up. First we begin the ribbed hem of the body panels or ribbed cuff of the sleeves. We then work at the long edge of the ribbing and work back and forth in rows until we reach the specified length.
Once we have all 4 pieces made, they are seamed together before we finally crochet the ribbed neckline directly into the sweater. When seaming the pieces together the key to a great finish is to make sure the stripes are all lined up and it goes without saying that you check your gauge!
I designed this sweater so the ribbed hem, neckline and cuffs were one solid color while the body was crocheted using three different colors. Each of the three body colors are worked over two rows. When changing color you can cut your yarn after every second row if you don’t mind weaving lots of ends in. However, I opted for the cheeky way. I simply carried my yarn up along the sides. It will look a bit messy to begin with but once you seam your pieces together you won’t even notice.
YARN
The crochet Kylemore Sweater uses the yarn Drops Alpaca which is a 100% alpaca sport/fine weight yarn. I used the color Dark Turquoise for the ribbing and Goldenrod, Turquoise and Orange for the body. This was my first time using this yarn and I must say I was slightly dubious about using such a lightweight yarn. However after crocheting a few rows I loved it. Crocheting with such finer yarns give your work such a lovely drape that I’m all for. This yarn was a perfect choice for this sweater, adding unbelievable softness, perfect for any garment.
Of course any similar weight yarn or fibre will work for this sweater as long as you match gauge. You can even make it using cotton if you want to wear your sweater in spring. Another option in the creation of your Kylemore Sweater is to make it in more or less colors or you can even make it with just one color. I think I’ll have to make one myself in a solid color!
SIZING & MEASUREMENTS
S(M, L, XL, 2XL, 3XL)
Finished bust: 42(46, 50, 54, 58, 62)”
Width: 21(23, 25, 27, 29, 31)”
Length: 20.5(21, 21.5, 22.5, 23, 23.5)”
GAUGE: 18 sts x 28 rows = 4×4″
MATERIALS
Yarn – Drops Alpaca – 100% alpaca – 167m(183yds) per 50g ball
1 ball Dark Turquoise (shade 2918) for all sizes
3(3, 3, 3, 4, 4) balls Goldenrod (shade 2923)
3(3, 3, 3, 4, 4, 4) balls Turquoise (shade 2917)
3(3, 3, 3, 4, 4) balls Orange (shade 2915)
Hook – 4mm crochet hook
Notions – yarn needle, interlocking stitch markers to help with seaming.
STITCHES & ABBREVIATIONS
ch = chain
sc = single crochet
hdc = half double crochet
hdcblo = half double crochet back loop only
SSPst = short spike stitch
st(s) = stitch(es)
rem = remaining
SPECIAL STITCH: Short spike stitch (SSPst): worked the same as a regular single crochet except you insert hook in stitch 1 row below.
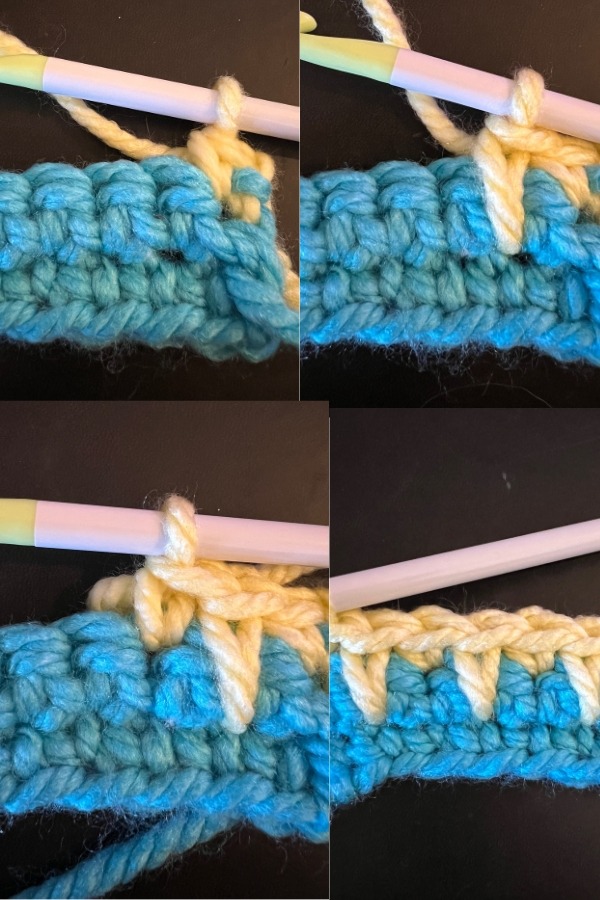
The beginning ch 1 DOES NOT count as a stitch.
This pattern uses US crochet terms
Change colors every two rows.
CROCHET KYLEMORE SWEATER PATTERN
*Use the Dark Turquoise for the hemline, cuff and neckline. Use also for first two rows of main body of back/front panel and main body of sleeves. Continue changing colors every two rows with the remaining 3 colors.
BACK PANEL
*The body panels are crocheted from the bottom up starting with the ribbed hem and then crocheting along the long edge of the ribbing to create the back panel.
RIBBED HEMLINE
Ch 13
Row 1: hdc in 2nd ch from the hook and in each ch across, turn. [12 hdc]
Row 2: ch 1, hdcblo in each st across, turn.
Rep row 2 until you have 64(68, 76, 80, 86, 92) rows completed.
Do not fasten off. We will now work along the long edge of the band.
MAIN BODY
Row 1: ch 1, sc 95(103, 113, 121, 129, 139) evenly across, turn.
Row 2: ch 1, sc in each st across, turn.
Row 3: ch 1, sc in same st, *SSPst in next st, sc in next st, rep from * across, turn.
Row 4: ch 1, sc in each st across, turn.
Row 5: ch 1, sc in same st, *sc in next st, SSPst in next st, rep from * across until 2 sts rem, sc in last 2 sts, turn.
Row 6: ch 1, sc in each st across, turn.
Rep rows 3- 6 until the end of row 130(134, 138, 142, 146, 150).
Fasten off.
*Alteration note: You can add or remove rows to make your sweater longer or shorter.
FRONT PANEL
Repeat BACK PANEL instructions until end of row 118(122, 126, 130, 134, 138).
*Alteration note: If you altered the length of the back panel, crochet until you are 12 rows short of the total number of rows in you back panel.
Do not fasten off. We will now work on the shoulders.
SHOULDERS
Counting from your crochet hook, place a stitch marker in the 29th(33rd, 39th, 43rd, 45th, 49th) st.
Row 1: ch 1, sc in same st, *SSPst in next st, sc in next st, rep from * across, turn.
Row 2: ch 1, sc in each st across, turn.
Row 3: ch 1, sc in same st, *sc in next st, SSPst in next st, rep from * across until you reach 2nd st from marker, sc in each of the last 2 sts, turn.
Row 4: ch 1, sc in each st across, turn.
Rep rows 1-4 two more times. Fasten off leaving a long tail.
Count in from the other edge and mark the 29th(33rd, 39th, 43rd, 45th, 49th) st. Attach yarn to that marked st.
Row 1: ch 1, sc in same st, *SSPst in next st, sc in next st, rep from * across, turn.
Row 2: ch 1, sc in each st across, turn.
Row 3: ch 1, sc in same st, *sc in next st, SSPst in next st, rep from * across until 2 sts rem, sc in each of the last 2 sts, turn.
Row 4: ch 1, sc in each st across, turn.
Rep rows 1-4 two more times. Fasten off leaving a long tail.
SLEEVES (MAKE 2)
CUFF
Ch 13
Row 1: hdc in 2nd ch from hook, hdc in each ch across, turn. [12 hdc]
Row 2: ch 1, hdcblo in each st across, turn.
Rep row 2 until end of row 27(29, 29, 31, 31, 31).
Do not fasten off. We will now work along the long edge of the ribbed cuff.
MAIN SLEEVE BODY
S(M, L, XL) ONLY
Row 1: ch 1, sc 41(43, 43, 45) sts evenly across, turn.
Row 2: ch 1, sc in each st across, turn
Row 3: ch 1, sc in same st, *SSPst in next st, sc in next st, rep from * around, turn.
Row 4: ch 1, sc in each st across, turn.
Row 5: ch 1, sc in same st, *sc in next st, SSPst in next st, rep from * across until 2 sts rem, sc in each of the last 2 sts, turn.
Row 6: ch 1, sc in each st across, turn.
Row 7: ch 1, sc in same st, *SSPst in next st, sc in next st, rep from * across, turn.
Row 8: (inc. row): ch 1, 2sc in first st, sc in each st across placing 2sc in last st, turn.
Row 9: ch 1, sc in same st, *sc in next st, SSPst in next st, rep from * across until 2 sts rem, sc in each of the last 2 sts, turn.
Row 10: ch 1, sc in each st across, turn
Row 11: ch 1, sc in same st, *SSPst in next st, sc in next st, rep from * across, turn.
Row 12: ch 1, sc in each st across, turn.
Row 13: ch 1, sc in same st, *sc in next st, SSPst in next st, rep from * across until 2 sts rem, sc in each of the last 2 sts, turn.
Row 14: ch 1, sc in each st across, turn.
Row 15: ch 1, sc in same st, *SSPst in next st, sc in next st, rep from * across, turn.
Row 16: (inc. row) 2sc in first st, sc in each st across placing 2sc in last st, turn.
Rep rows 9-16 until you have 67(69, 71, 73) sts.
Continue in st pattern WITHOUT any increasing until you reach row 118. Fasten off leaving a long tail.
2XL/3XL ONLY
Row 1: ch 1, sc 45(45) sts evenly across, turn.
Row 2: (inc. row): ch 1, 2sc in first st, sc across placing 2sc in last st, turn.
Row 3: ch 1, sc in same st, *SSPst in next st, sc in next st, rep from * across, turn.
Row 4: (inc. row): ch 1, 2sc in first st, sc across, placing 2sc in last st, turn.
Row 5: ch 1, sc in same st, *sc in next st, SSPst in next st, rep from * across until 2 sts rem, sc in each of the last 2 sts, turn.
Row 6: (inc. row): ch 1, 2sc in first st, sc across placing 2sc in last st, turn.
Row 7: ch 1, sc in same st, *SSPst in next st, sc in next st, rep from * across, turn.
Row 8: (inc. row): ch 1, 2sc in first st, sc across placing 2sc in last st, turn.
Row 9: ch 1, sc in same st, *sc in next st, SSPst in next st, rep from * across until 2 sts rem, sc into each of the last 2 sts, turn.
Row 10: (inc. row): ch 1, 2sc in first st, sc across placing 2sc in last st, turn.
Row 11: ch 1, sc in same st, *SSPst in next st, sc in next st, rep from * across, turn.
Row 12: ch 1, sc in each st across, turn.
Row 13: ch 1, sc in same st, *sc in next st, SSPst in next st, rep from * across until 2 sts rem, sc in each of the last 2 sts, turn.
Row 14: ch 1, sc in each st across, turn.
Row 15: ch 1, sc in same st, *SSPst in next st, sc in next st, rep from * across, turn.
Row 16: (inc. row): ch 1, 2sc in first st, sc across placing 2sc in last st, turn.
Row 17: ch 1, sc in same st, *sc in next st, SSPst in next st, rep from * across until 2 sts rem, sc into each of the last 2 sts, turn.
Row 18: ch 1, sc in each st across, turn.
Row 19: ch 1, sc in same st, *SSPst in next st, sc in next st, rep from * across, turn.
Row 20: ch 1, sc in each st across, turn.
Row 21: ch 1, sc in same st, *sc in next st, SSPst in next st, rep from * across until 2 sts rem, sc in each of the last 2 sts, turn.
Row 22: ch 1, sc in each st across, turn.
Row 23: ch 1, sc in same st, *SSPst in next st, sc in next st, rep from * across, turn.
Row 24: (inc. row): ch 1, 2sc in first st, sc across placing 2sc in last st, turn.
Rep rows 17-24 until you have 81(81) sts.
Row 113-118: continue in stitch pattern WITHOUT increasing.
Fasten off leaving a long tail.
ASSEMBLY
Lay the front panel on top of the back panel. Make sure the back panel is right side facing up and the front panel is wrong side facing up.
Whip stitch the shoulders together.
Whip stitch up the sides of body panels leaving 7.5(7.5, 8, 8, 9, 9)” from the top of a gap for the sleeves.
Whip stitch the top of the sleeves to the body and then seam down along sides of sleeves.
Turn your sweater the right side out and attach your Dark Turquoise to the neckline, near the shoulder seam.
Round 1: ch 1, hdc all the way around the entire neckline. Slst to first hdc to close the round, turn.
Row 2: ch 13, hdc in 2nd ch from hook, hdc in next 11 chains, slst into next 2 hdc on neckline, turn.
Row 3: skip the 2 slsts you just did, hdcblo in next 12 hdc, turn.
Row 4: ch 1, hdcblo in next 12 hdc, slst in next 2 hdc on the neckline, turn.
Rep rows 3-4 all the way around the neckline.
Fasten off leaving a long tail. Using your long tail and yarn needle seam the two ends of the collar closed.
Weave in all your ends.
Carrie,
Thank you so much for sharing ALL of your lovely patterns. I have made most everyone of them. I’ve been a knitter for the last 40 years, but do to my wrist becoming weaker, I learned how to crochet. Thanks to you!
I used to raise my own wool and spin it. Now I can not. But still love hand work.
Would love to see an easy capelet pattern from you. Again! Thank you!
Love it that you used thinner wool. Most cardigan and sweater patterns use 4 weight or sometimes dk yarns, but like you say the drape is so much more beautiful if you crochet with thinner yarn. It takes more time, but it is definitely worth it.
Why is this called the Kylemore sweater?
[email protected]