
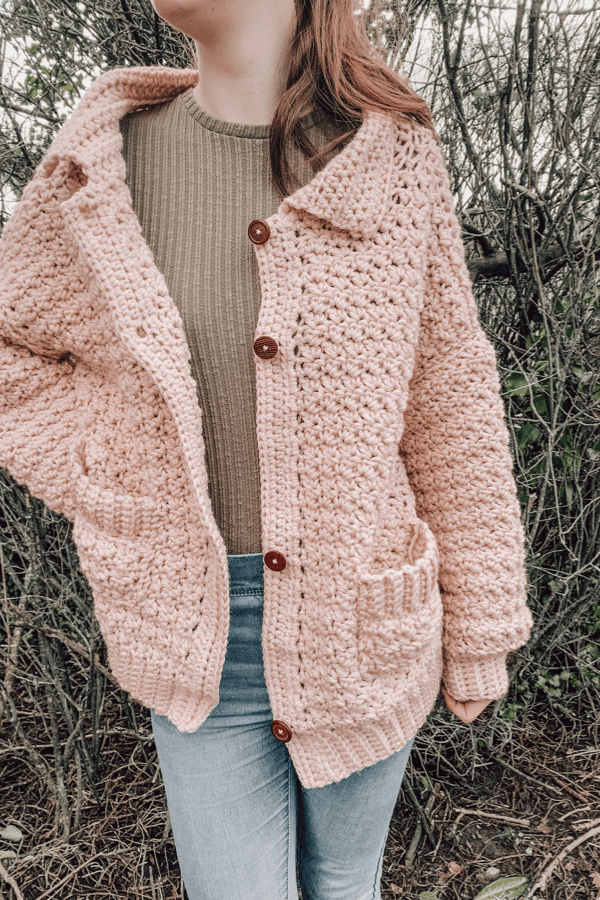
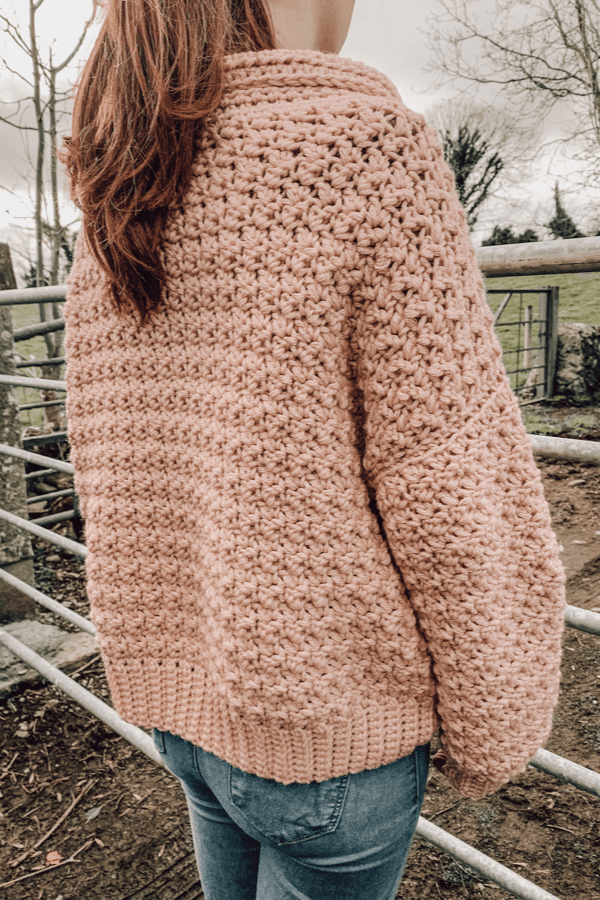
Learn to crochet this super quick and easy crochet cardigan with buttons and pockets. The Clíodhna [clee-na] Cardigan is designed to be super oversized, and more of a light coat than a cardigan. I guess you can really call it a coatigan!
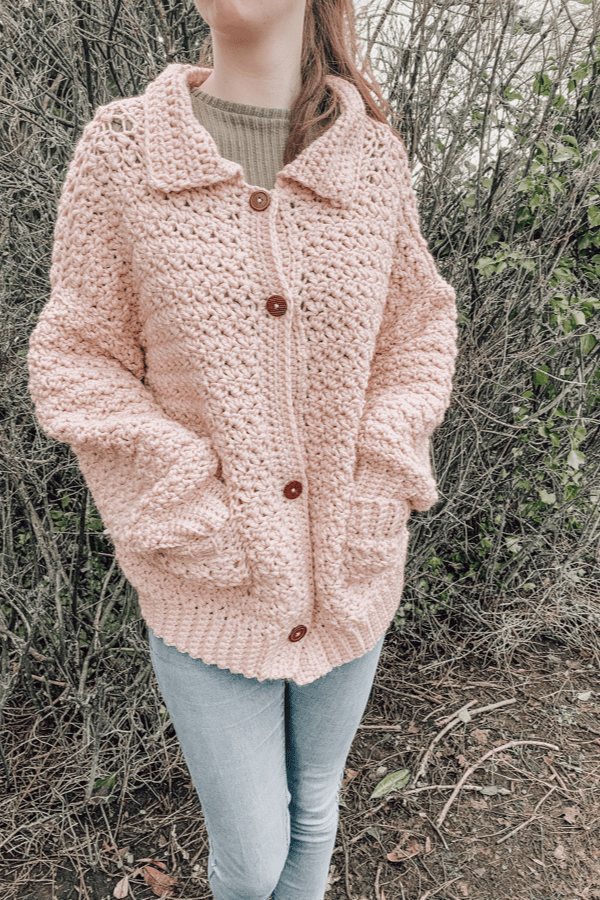
It is now March and there is still a bitterness in the air so I decided to make one more cozy cardigan. This crochet cardigan has lots of texture and the best part about it is it has the added bonus of buttons and pockets!
The cardigan is made with five panels, the back, two identical front panels and two identical sleeves. Once all these pieces are crocheted and seamed together we will crochet into the top edge of the cardigan to create a nice big collar. Finally we will crochet some button holes and then we will make our two pockets will will be sewn onto the cardigan at the end.
All panels are worked from the bottom up. We will begin crocheting the ribbing and the work in our stitch pattern along the long edge of the ribbed hem. The back, front panels and sleeves are made this same way. However, the pockets will be made slightly different but we will get into that towards the end of the pattern.
YARN
The yarn I used for this crochet cardigan was Heritage Supersoft Twist Yarn. It can be purchased at your local Home Savers here in Ireland or in any B&M store if you are living in the UK. I do realise that these stores might not be in other countries but you can use any weight 5 bulky yarn. For reference the yarn I used was 80% acrylic and 20% polyamide but any fibre blend will work fine for this project.
MEASUREMENTS
S/M(L/XL, 2XL/3XL)
To fit bust 34-38(40-44, 46-50) inches
Actual cardigan bust measurements: 50(54, 58) inches.
Back width: 25(27, 29) inches
Length: 22(23, 25) inches
Materials
Yarn – any weight 5 bulky/chunky yarn
Approximately 880(990, 1100) metres
6mm crochet hook
8mm crochet hook
Stitch marker
Buttons
Stitches & Abbreviations
ch = chain
sc = single crochet
dc = double crochet
hdc = half double crochet
BLO = back loop only
GAUGE: 10sts x 7 rows = 4″ x 4″
CROCHET CLÍOBHNA CARDIGAN PATTERN.
USING 6MM HOOK
BACK PANEL
Ch 9
Row 1: sc in 2nd ch from hook, sc to end. Turn.
Row 2: ch 1, sc in BLO in each st across. Turn.
Repeat row 2 until you have a total of 62(68, 76) rows
Now working along the long edge of the ribbing:
CHANGE TO 8MM HOOK
Next row: ch 1, make (62, 68, 76) sc across. Turn.
Next row: ch 1, sc in first st, (sc, dc) in next st, skip next st, *(sc, dc) in next st, skip next st, rep from * across placing sc in last st. Turn.
Repeat last row until you have 35(37, 41) rows. You can add more rows here if you want the cardigan longer. Fasten off and weave in ends.
FRONT PANEL (MAKE 2)
USING 6MM HOOK
Ch 9
Row 1: sc in 2nd ch from hook, sc to end. Turn.
Row 2: ch 1, sc in BLO in each st across. Turn.
Repeat row 2 until you have a total of 26(30, 34) rows.
Now working along the long edge of the ribbing:
CHANGE TO 8MM HOOK
Next row: ch 1, make 26(30, 34) sc across. Turn.
Next row: ch 1, sc in first st, *(sc, dc) in next st, skip next st, rep from * across placing sc in last st. Turn.
Repeat last row until you have 35(37, 41) rows completed (or the same length as your back panel). Fasten off leaving a long tail.
SLEEVES (MAKE 2)
USING 6MM HOOK
Ch 9
Row 1: sc in 2nd ch from hook, sc in each ch to end. Turn.
Row 2: ch 1, sc in BLO in each st across. Turn.
Rep row 2 until you have a total 25(27, 29) rows completed.
Now working along the long edge of the ribbing:
CHANGE TO 8MM HOOK
Next row: ch 1, make 36(42, 46) sc across. Your stitches may look a little crammed here but don’t worry, everything will even out later!
Next row: ch 1, sc in first st, *(sc, dc) in next st, skip next st, rep from * across, placing a sc in last st. Turn.
Repeat last row until you have a total of 30(32, 34) rows completed. You can add more rows here if you need sleeve longer. Fasten off leaving a long tail.
ASSEMBLY:
Lay your two front panels on top of the back panel. With your yarn needle and starting on the outer right hand side shoulder, sew across 18( 20, 24) sts. Fasten off. Now on the other shoulder sew 18(20, 24) sts. This will be the beginning of your collar.
Next lay your cardigan completely flat with the wrong side facing up. Take a sleeve and mark the centre st with a stitch marker. Now line that marker with the shoulder seam and attach stitch marker. With your yarn needle and tail sew the sleeve to cardigan. Rep on the other side.
Next fold your cardigan over and sew along the under edge of sleeve and down along the side of cardigan. Rep on other side.
TURN YOUR CARDIGAN RIGHT SIDE OUT
To begin the collar attach your yarn using the 8MM HOOK to the corner stitch on the right hand side on the neck area.
Once yarn is attached, ch 1 and hdc all the way around neck line until you reach the other corner. When you reach the other corner, ch 1 and hdc around and back to the initial corner. Do a total of 8 rows in hdc. You can add more rows here if you want a bigger collar. Fasten off and weave in all ends.
CHANGE TO 6MM HOOK
Attach yarn to bottom right hand inner corner of cardigan.
Row 1: Ch 1, hdc up along inner edge of cardigan. You will stop right before the collar begins. Turn
Row 2: Ch 1, hdc in every st . Turn. Rep this row one more time. Fasten off and weave in all ends.
Next we will attach yarn to the bottom inner left hand edge.
Row 1: ch 1, hdc all the way up. You should stop right before the collar begins. Turn.
With a few stitch markers, mark out where you want your button holes to be.
Ch 1, hdc in every st until you reach the st right before your first stitch marker, ch 1, skip stitch with st marker, hdc in next st and in every st until you reach the st right before the next stitch marker, ch 1, skip stitch with marker, hdc in next st. Repeat this pattern for what ever number button holes you intend on having.
At the end of the row, ch 1, turn, and hdc in every stitch and button hole to the end. Fasten off.
POCKETS
USING 8MM HOOK
Ch 17
Row 1: sc in 2nd ch from hook, sc in each ch to end. Turn.
Row 2: ch 1, sc in first st, *(sc, dc) in next st, skip next st, rep from * across ending with a sc in last st. Turn.
Row 3-6: rep row 2. You can add more rows here for a deeper pocket but don’t forget we will next be adding a strip of ribbing. Fasten off leaving an 8″ tail.
RIBBING FOR POCKET
USING 6MM HOOK
Ch 7
Row 1: sc in 2nd ch from hook, sc in each ch to end. Turn.
Row 2: ch 1, sc in BLO in each st across. Turn.
Row 3 – 16: rep row 2. This ribbing must be long enough to stretch across the top of the main pocket. Add more rows here if needed. Fasten off leaving a long tail (about 15″)
Using a yarn needle and the 8″ tail sew the ribbing to the main pocket section. Once they are sewn together, use your yarn needle and the 15″ tail to sew the pockets to the cardigan.
You are now finished your cardigan. Enjoy x
Absolutely love your patterns, I watch your YouTube videos but not a fan of commenting it takes me forever to get tjem right! Spelling and so foth.
Absolutely LOVE your channel. Your voice is so soothing and your patterns seem so simple. I’m addicted to watching you make cardigans.
Hi Carrie! I am so excited to try to crochet this cardigan for my mom.
Can I use lighter yarns, not the bulky one for this design?
Hi Faza Did you make this with a lighter yarn? I usually work to the inches that I need, and take it from there.
Really appreciated your excellent visuals and explanation on the youtube video of the Crochet Chunky Cardigan with buttons and pockets. Having a pattern without a lot of increasing and decreasing for shaping is so much easier to crochet up quickly and to fit the wearer!
I’m trying out large sample blocks of crochet patterns using sc/hdc in the same stitch, skip a stitch; sc/hd alternating in each stitch; and sc/dc as you’ve done it; and sc/dc alternating in each stitch so that the following row is doing sc in previous dc, dc in previous sc.
I like that final pattern best for texture and thickness–the rows and spaces are less noticeable.
In Canada I’m using Bernat Super Value (a Canadian Brand I love for its softness and easy care) of 100% Acrylic in a Medium 4 ply which recommends a 5mm hook. I will trial different size hooks to see whether I prefer a looser or tighter stitch. I would crochet this sweater to the measurements of width and length rather than stitch count. Thanks for posting a straight-forward design. For me one of the most difficult things is figuring out how much yarn to purchase for each size. I liked your buttons but I have my eye on some unusual, extra large buttons…
I’m currently making this cardigan. in a bulky orange to grey to blues. It’s so easy and like always, your video tutorial and written instructions are so easy to follow. Thank you!
OK .. I have all this chunky yarn and have been searching for what to crochet with it. “Cliodhna” it is !!
Wish me luck with my sometimes fading level of perseverance ! 😀