
Learn to crochet the Neith Top, with a bright and colorful granny stitch throughout making this piece the perfect addition to your spring or summer wardrobe.
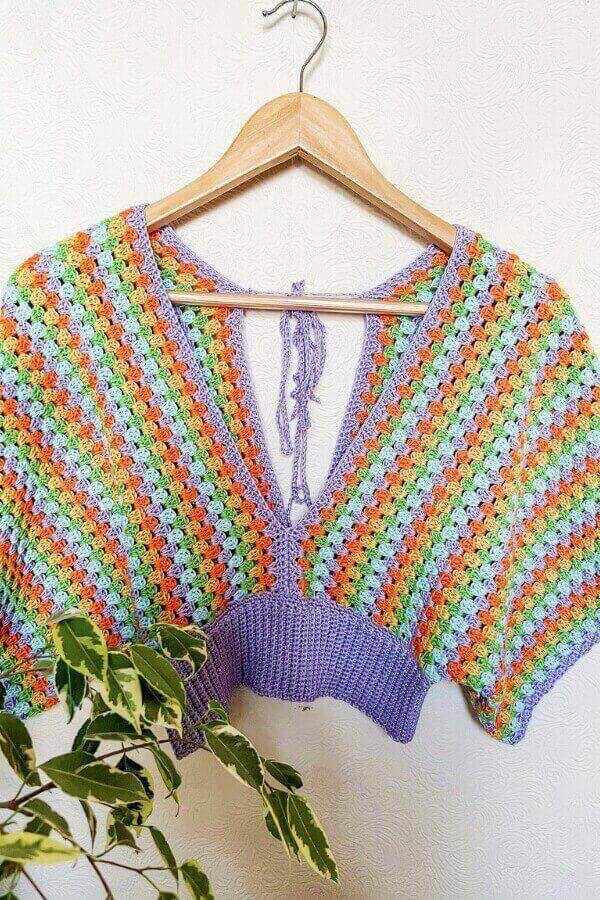
Is it January right now? Am I currently looking out my window at a blanket of snow covering the ground before me? Yes indeed it is, but will that stop me from making a pretty awesome granny stitch top for the upcoming warmer season? No it won’t, is the short answer.
Recently the lovely peeps over at Hobbii contacted me and asked if I would be interested in their newest campaign, No Shades of Grey. I’ve worked several times with them before so I immediately jumped at the chance. Their idea was to create something that will brighten your mood during “Gloomy January”. They wanted me to create something that was brightly colored and had at least four different colors throughout the piece that I crochet.
I had been toying with the idea of granny stitch piece for a while so this was the perfect opportunity, and so the Neith Top was created.
CONSTRUCTION
The Neith Top is crocheted by making two simple rectangles using the ever so popular granny stitch. The length of your initial chain should be long enough to go from your under bust, up around your shoulder and down your back. Once you are happy with your chain length we will crochet a certain amount of rows until the rectangle is wide enough to cover one half of your chest and fall below your shoulder. You will then make another piece the same way.
Once both granny stitch rectangles are made we will fold each of them over so the short ends of each rectangle are touching each other. Using some stitch markers we will secure the centre corners of the rectangle together. Next we will measure our waists and crochet the waist band directly to the bottom of the top to your own measurement. Finally we will add our back tie for some extra security.
MATERIALS
Yarn – sport/fine – Hobbii Twister Solid – 55% cotton, 45% acrylic – 400m per ball.
Shades used in photo: light purple, iceberg, green apple, pineapple, tangerine. I used about 200 m per color for a size S/M
Hooks – 3mm, 3.5mm
Notions – yarn needle, 6 stitch markers, measuring tape.
SIZING & MEASUREMENTS
This pattern does not give precise sizes but it does give you the proper steps needed so you can make the top to your own specific size.
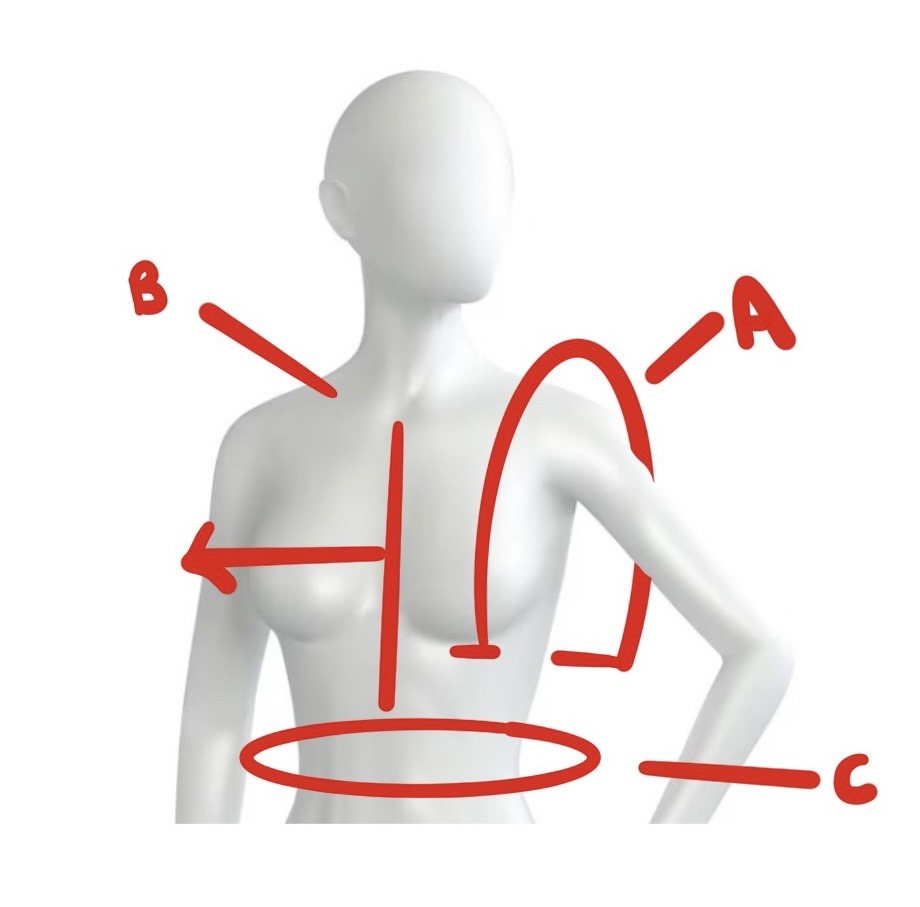
Measurement A = make a chain long enough to go from your under bust, over your shoulder and down your back but this chain MUST BE IN MULTIPLES OF 3+1. For reference the top in the photo has a chain of 124.
Measurement B = crochet rows of granny stitch until rectangle is big enough to go from centre of chest to below shoulder. If you want a top with longer sleeves, simple crochet the rectangle wider.
Measurement C = using a measuring tap, measure around your waist.
NOTES
I changed color every row. This will involve weaving in some ends at the end.
STITCHES & ABBREVIATIONS
ch = chain
sc = single crochet
dc = double crochet
scblo = single crochet back loop only
slst = slip stitch
st(s) = stitch(es)
rem = remaining
tch = turning chain
CROCHET NEITH TOP PATTERN
Main Body (Make 2)
Using the 3.5mm hook:
Chain to your preferred “measurement A” as shown in diagram above.
Row 1: sc in 2nd ch from hook, sc in each ch across, turn.
Row 2: ch 3 (counts as a dc here and throughout), *skip 2 sts, 3dc in next st, rep from * across until 2 sts rem, skip next st, dc in last st, turn.
Row 3: ch3, 2dc between first dc and next dc, *sk next 3 dc, 3 dc between last dc and next dc, rep from * across, skip next 3 dc, 2 dc between last dc and tch, dc on top of tch, turn.
Row 4: ch 3, skip next 2 dc, *3 dc between last dc and next dc**, skip next 3 dc, rep from * across, ending last rep at **, skip next 2 dc, dc on top of tch, turn.
Rep rows 3-4 until you reach “measurement B”. DO NOT FASTEN OFF YET!
Next row: ch 1 (not counted as a stitch), sc in each dc across, turn.
Fasten off leaving a long tail.
At this point you will have lots of tails so now is a good time to weave those in.
ASSEMBLY
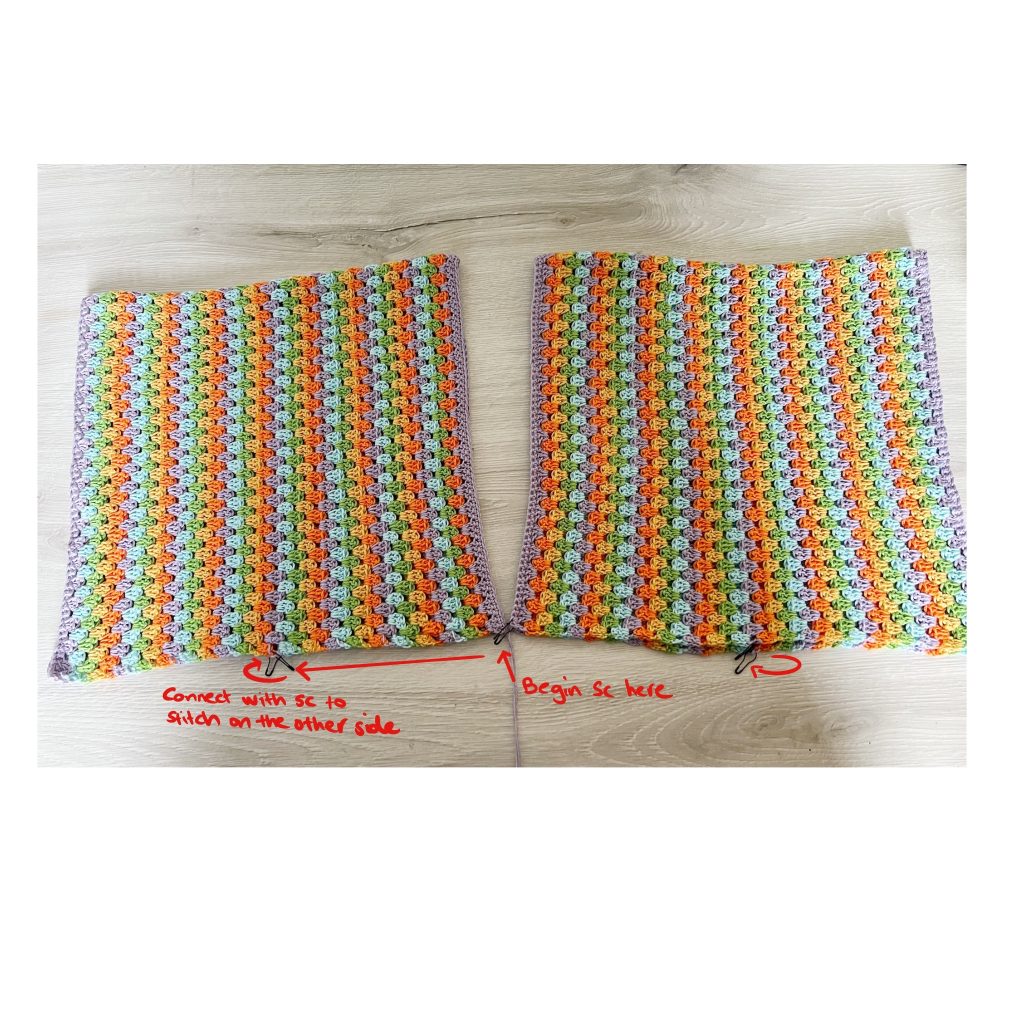
Fold each of your rectangles so the short sides are touching.
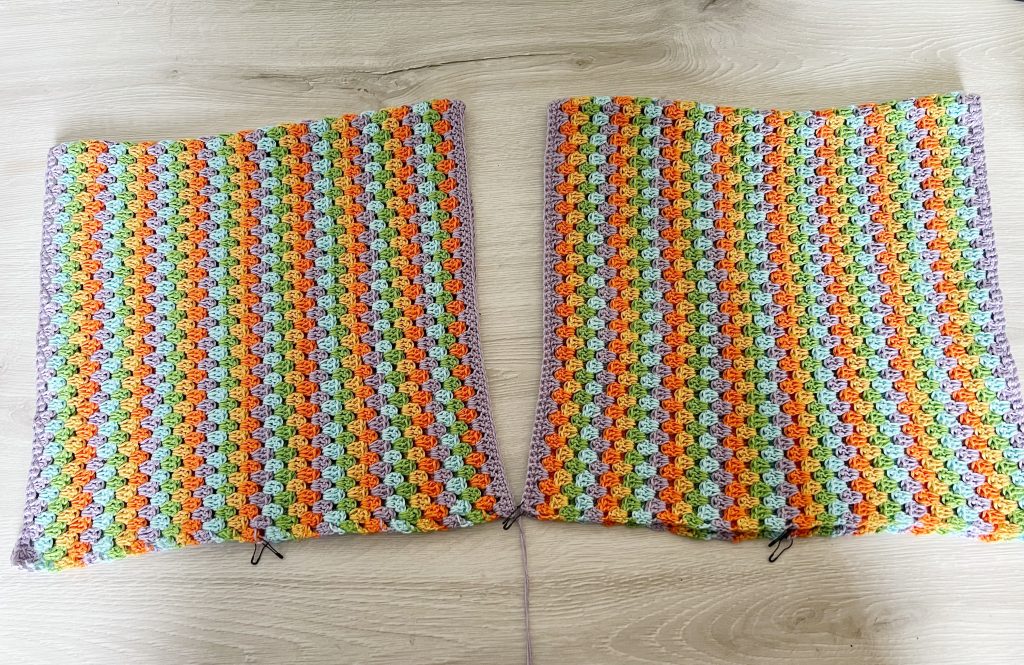
Place both rectangles side by side and folded over like depicted in the photo. Use a stitch marker to pin the centre corners together and using a separate stitch marker pin the centre back too. Next you will find your “measurement c” and divide that number by 4. For example, I did a waist measurement of 28″, divide by 4 = 7″. Using a measurement tape measure from the centre stitch marker outwards on one rectangle. Mine was 7″ so I measured 7″ from centre stitch marker out. Place a marker. Repeat on the other rectangle. You will then do the same on the back of the top.
So you should now have 6 stitch markers, three in the front of the top and three in the back.
WAISTBAND
Using the 3mm hook
Attach yarn to the corner of the centre front.
Round 1: ch 1, 2 sc into the edge of every colored row until you reach the first stitch marker, 2sc into the stitch with the stitch marker directly behind (this will involve some manoevering!), continue placing 2 sc into the edges of every colored row until you reach the back centre corner, connect the two back centre points together with a sc, continue placing 2 sc into edge of every colored row until you reach next stitch marker, conect with a sc to the next stitch with a stitch marker (in the front) with a sc, continue placing 2 sc into each colored row until you reach the front centre aain, slst to first sc to close the round.
Round 2: ch 1, sc all the way around the waistband, slst to first sc to close round.
Row 3: ch 19, sc in 2nd ch from hook, sc ito each of the next 17 chains, slst into each of the next 2 sc, turn.
Row 4: skip the 2 slsts, scblo in neaxt 18 sc, turn.
Row 5: ch 1, scblo in next 18 sc, slst into each of the next 2 sc, turn.
Rep rows 4-5 all the way around waistband.
Once you have crocheted the waistband you can either slst the two ends together or use a yarn needle and tail and sew using a whip stitch.
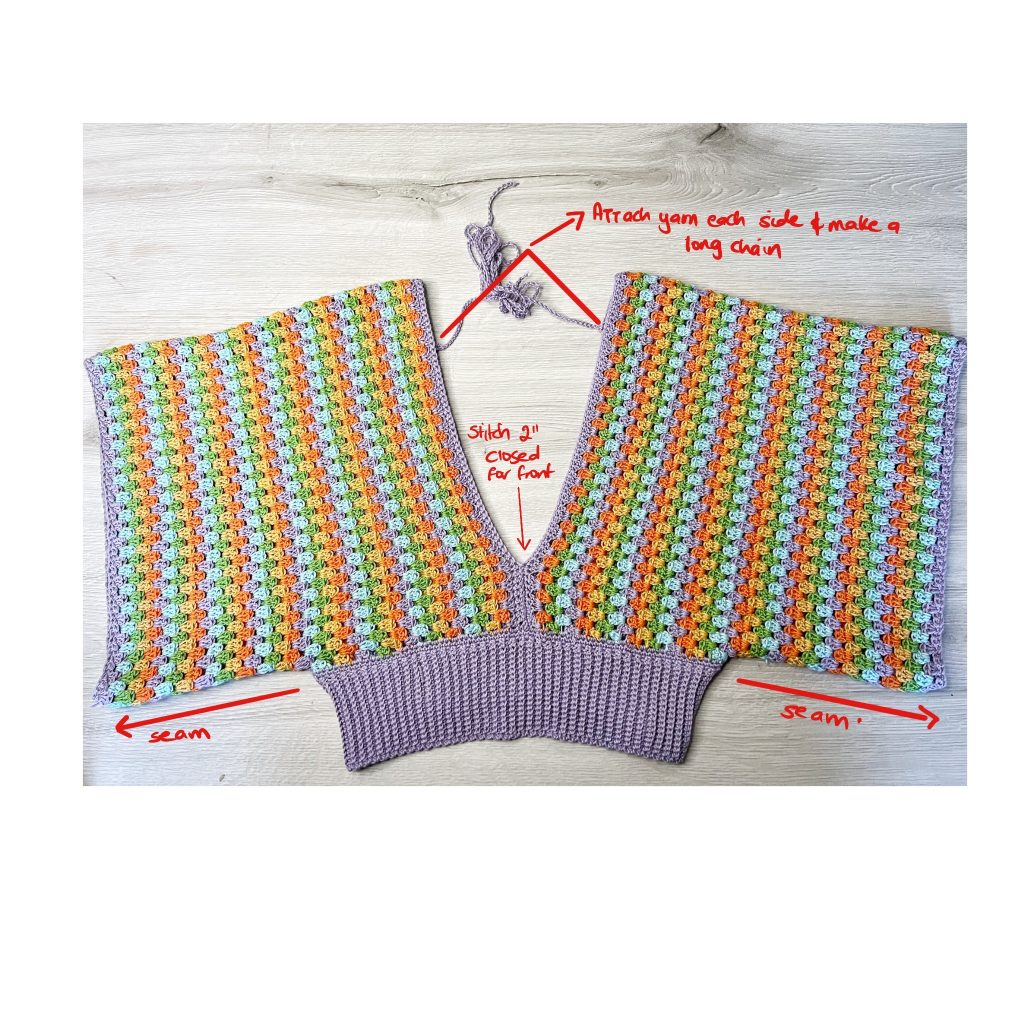
Next you will seam across the under edge of both sleeves. Turn your top the right side out. Then, with the top facing the front you will stitch about two inches of the v neck line closed. You can stitch more closed here if needed.
Now turn the top right side out and with the back of the top facing you. Now you will place a stitch marker on each side about two inches down from the top of the top. These stitch markers will mark where the back ties will be so if you need to move them lower or higher please do so.
Attach yarn to one of the stitches with the marker and ch1, sc in same st and then ch about 150. Fasten off and tie a secure knot to the end of the chain for added security. Repeat on the other side for the second back tie.
Weave in any ends that you may have and your top is now finished. Enjoy!