
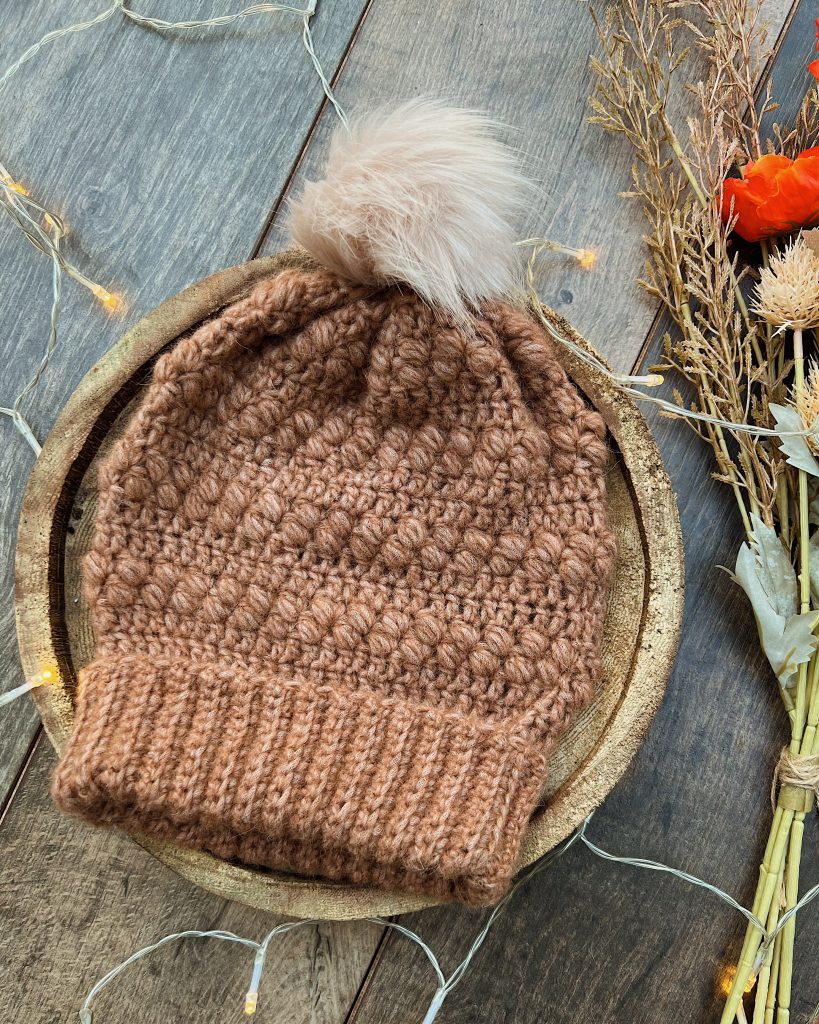
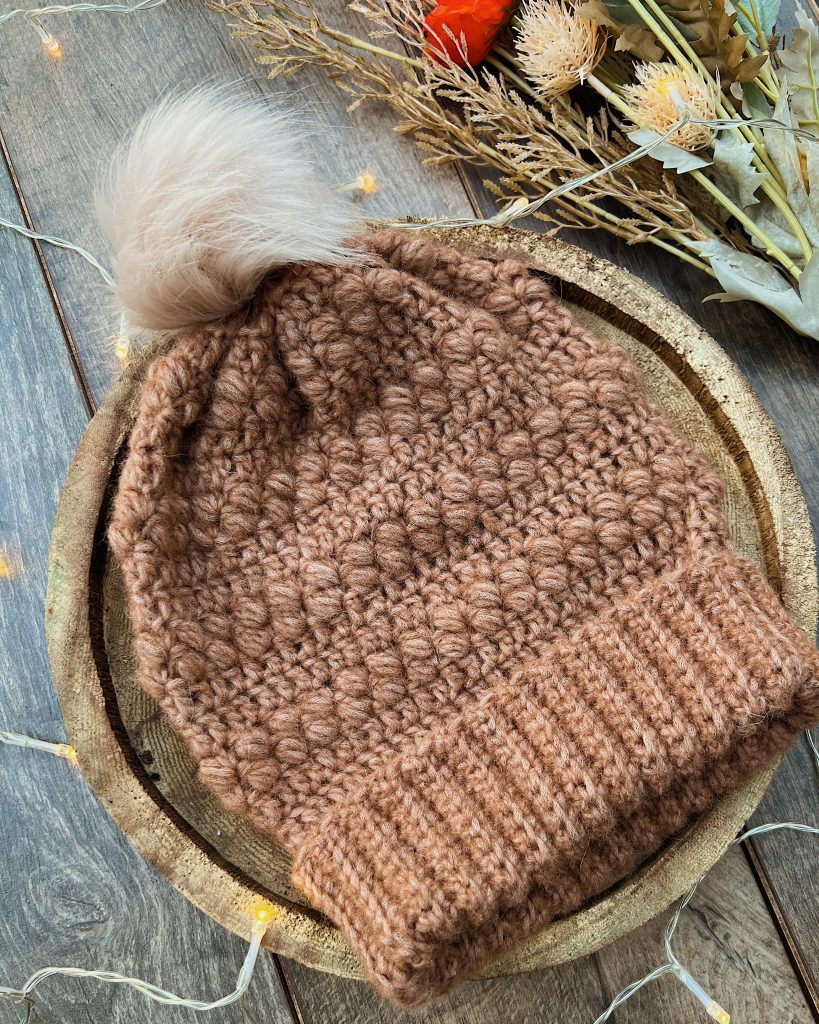
The Wilbur Beanie hat is the perfect crochet beanie for everyone in the family. Designed with a fold over brim, along with simple double crochets and lots of puff stitches arranged in a way to give a braided look and feel.
Scroll down to see the free written pattern!
I designed this beanie so it could be made to anyone’s specific head measurements. It’s pretty easy to customize the perfect fit whether you make the hat for yourself, a child, man or woman. You will simply crochet the ribbed brim until it’s long enough to go around your head, making sure to keep this number of rows an even number.
CONSTRUCTION
The Wilbur Beanie is crocheted from the bottom up. Firstly we will begin with the ribbed brim. I wanted the brim to to be quite large and fold over for extra sturdiness, however if you want to save on time and yarn you can definitely do a smaller brim. You just have to make less chains at the beginning.
Once we are happy with the width and length of our brim we will then slip stitch the ends together to begin working in the round. We will be crocheting the body of the beanie along the top edge of the brim and work in rounds until we reach a certain height.
After a bit of decreasing we will then fasten off leaving a long tail and using a yarn needle we will weave the long tail around the very top of the hat. Pulling the tail once we have weaved all the way around the crown of the beanie will cinch the hat closed. Pop on a pom pom and you’re good to go!
MATERIALS
Yarn – Drops Air -70% alpaca, 23% nylon, 7% wool- medium/aran/10 ply – 150m(164yds) per 50g ball
Approximately 2 balls
Hook – 5mm
Notions – scissors, measuring tape, yarn needle.
Faux fur pom pom
STITCHES & ABBREVIATIONS
ch = chain
sc = single crochet
scblo = single crochet back loop only
dc = double crochet
Pst = puff stitch
slst = slip stitch
st(s) = stitch(es)
rep = repeat
tch = turning chain
yo = yarn over
SPECIAL STITCH: Puff Stitch (Pst) – (yo, insert hook in designated st, yo and pull up a loop) 3 times (7 loops on hook. Yo and pull through 6 loops (2 loops left on hook). Yo and pull through the last 2 loops on the hook.
SIZING & MEASUREMENTS
The Wilbur Beanie pattern is designed so that you can crochet to your own specific size, however below I do provide a chart for child and adult sizing. You just need to crochet the ribbed brim of the hat until it stretches around the head.
| SIZE | Head Circumference | Hat Height |
| 3- 10 child | 17-19″ | 7-7.5″ |
| Teen/adult (small) | 19-20″ | 7.5-8″ |
| Adult (medium) | 20-21″ | 8.5-9″ |
| Adult (large) | 21-22″ | 9-9.5″ |
| Adult (extra large | 22-23″ | 9.5-10″ |
Please not that the ribbed brim will stretch a lot so it is recommended to crochet the brim at least 2 inches smaller than the head circumference.
CROCHET WILBUR BEANIE HAT PATTERN
Ribbed Brim
Ch 23
*This will create a large width of a hat brim that will eventually be folded over giving it a double layer. If you prefer to have a smaller brim to save on time or yarn I would recommend you ch 9.
Row 1: sc in 2nd ch from hook and in each ch across, turn. [22 hdc].
Row 2: ch 1, scblo in each st across, turn.
Rep row 3 until the ribbed brim is long enough to go around the head but make sure you have an even number of rows. (I did 62 rows but your row count might be different.
Slst the ends together. Keep the seam to the outside if doing the foldable brim, but keep seam to the inside if doing the regular size. Do not fasten off.
Next we will be crocheting around the top edge of the brim.
Round 1: ch 3 (counts as first dc here and throughout), dc into the edges of every scblo row you did. So I did 62 rows for the brim so here I will do another 61 dc around. Don’t forget the beginning ch 3 counts as your first dc so in total I have 62 dc. Slst to beginning ch 3 to close the round.
Round 2: ch 3, dc in each st around. Slst to beginning ch 3 to close the round.
Round 3: ch 1 (not counted as a stitch here and throughout), (sc+Pst) in same st, skip next st, *(sc+Pst) in next st, skip next st, rep from * around. Slst to beginning sc to close the round.
Round 4: ch 1, *(Sc+Pst) in first st, skip next st, rep from * around. Slst to beginning sc to close round.
Round 5: ch 3, dc in each st around. Slst to beginning ch 3 to close round.
Round 6: ch 3, dc in each st around. Slst to beginning ch 3 to close the round.
Round 7: ch 1, *(sc+Pst) in first st, skip next st, rep from * around. Slst to beginning sc to close round.
Round 8: ch 1, *(sc+Pst) in first st, skip next st, rep from * around. Slst to beginning sc to close round.
Rounds 9-16: rep rows 5-8.
Round 17: ch 3, dc in each st around. Slst to beginning ch 3 to close the round.
Round 18: ch 3, skip next dc, *dc into next st, skip next dc, rep from * around. Slip st to beginning ch 3 to close the round.
Fasten off leaving a long tail.
Using your long tail and yarn needle weave your long tail in and out of the dc row you just finished. Keep going until you reach the end of the round.
When you reach the end of the round you will next pull that tail slightly. This will close the crown of the hat but be careful not to pull too hard or your yarn will snap.
Once the crown is closed secure with a few stitches.
Weave in any ends you might have. Stitch your favorite faux fur pom pom to the top of the beanie and you are good to go.

If you would like to make a matching pocket shawl you can find the free written pattern HERE
Thank you again! I love this beanie! I don’t see many I would like to do. This one us perfect.
this is a gorgeous pattern! I will make one for each of my girls – thank you for sharing!