
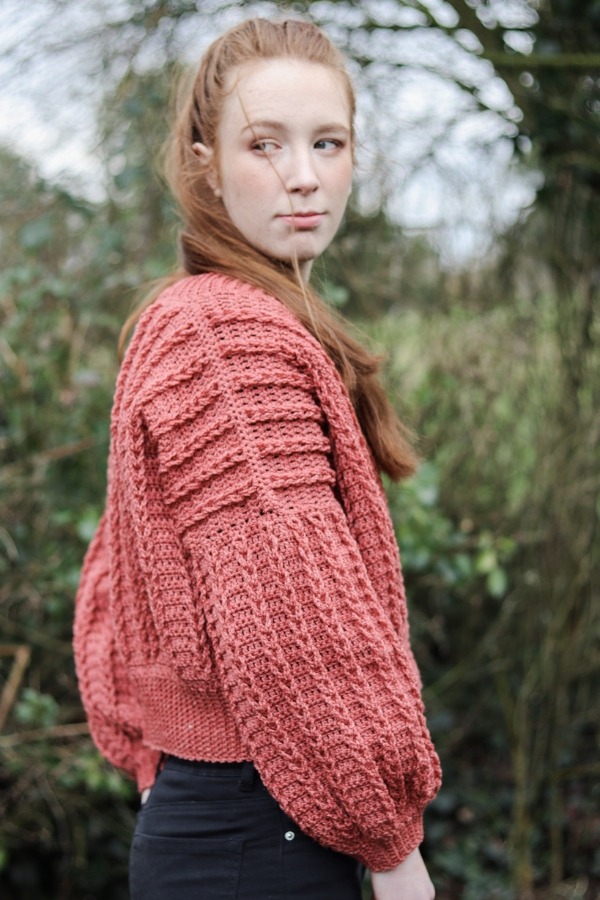
Learn to crochet this quick and easy braided cardigan. The Márta Cardigan is the perfect transitional piece to have in your wardrobe this season. With it’s oversized fit and cropped look, this cardigan will be on the top of your to-do pile this Spring.

**This post contains affiliate links. This is of no cost to you whatsoever but it does help me out**
Scroll down to view the free written pattern and step by step video tutorial. If you prefer to have the ad-free and printable version you can find the inexpensive pdf in my Etsy Shop.
A few years ago I designed the Crochet Cable Cardigan that is still much loved by many of you to this day. But here we are, a few years later and I decided this pattern needed a little update, a makeover if you will! I wanted this new version to be cropped, oversized and using a lighter weight yarn. So with my hook and yarn I got working and I’m so pleased with how it turned out. The truth be told I think I love this version so much better!
CONSTRUCTION
The Márta Cardigan is made my crocheting five separate pieces, the back, two fronts and two sleeves. All pieces are crocheted from the bottom up starting with the ribbed hem for the back and front panels or the ribbed cuff for the sleeves.
The pattern is perfect for the adventurous beginner as it contains just basic stitches such as the chain, single crochet and double crochet. There is no special shaping involved making it a quick and easy project to keep you going throughout the evenings.
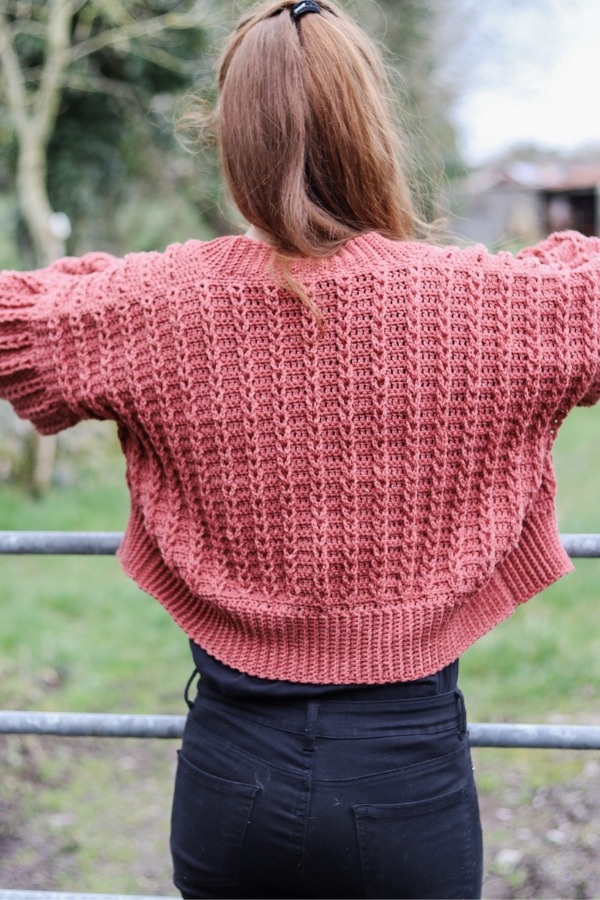
So once all pieces are crocheted we will seam across the shoulders connecting the back panel to the two front panels. Then we will seam up along the sides of the cardigan leaving enough space for our arms to get through. Once the sleeves are attached we will crochet the neck ribbing directly into the cardigan.
The best thing about this cardigan is that it is easily customizable. The photos here show the cardigan cropped but you can easily add more rows for a longer cardigan. Don’t want the cardigan oversized as much? You can crochet a size smaller or alter the pattern by decreasing your stitches in multiples of 5. So as you can see it’s a pretty nice and easy cardigan to make!
YARN
The yarn I used for the Márta Cardigan was So Crafty Dk from Aldi. I had so much of it stored away I simply had to use it up. This yarn is 100% acrylic and a weight 3 or Dk. I realise not everyone has this yarn available to them so I think a good alternative is Paintbox Simply Dk . Both yarns come in similar yardage but I must say if I were to make this again I would recommend the Paintbox as it’s softer than the Aldi. Don’t get me wrong, the Aldi yarn will work great for this cardigan but I did find it slightly scratchy. But like I always say, any similar weight yarn will work fine as long as you keep to the gauge listed in the pattern.
MATERIALS
Yarn – So Crafty Dk – weight 3/Dk – 100% acrylic – 300m/100g per ball
or Paintbox Simply Dk – weight 3/Dk – 100% acrylic – 276m/100g per ball
Approximately 4(4, 5, 5, 5, 6) balls
Hook: 4mm
Notions: yarn needle, measuring tape.
SIZING & MEASUREMENTS
This cardigan fits sizes S(M, L, XL, 2XL, 3XL).
Finished bust: 44(48, 52, 56, 60, 64)”
Total length: 17(17, 18, 19, 19, 20)”
Upper arm circumference: 16(16, 18, 18, 18, 19)”
If you want the cardigan less oversized you can make a size smaller of reduce your stitches in multiples of 5.
For a longer cardigan simply add more rows but keep in mind you will need extra yarn than stated in the pattern.
STITCHES & ABBREVIATIONS
ch = chain
sc = single crochet
dc = double crochet
scblo = single crochet back loop only
slst = slip stitch
st(s) = stitch(es)
rem = remaining
rep = repeat
GAUGE: 18 dc x 14 rows = 4×4″
CROCHET MÁRTA CARDIGAN PATTERN
BACK PANEL
RIBBED HEM
Ch 17
Row 1: sc in 2nd ch from hook, sc in each ch across, turn. [16 sc]
Row 2: ch 1, scblo in each st across, turn.
Rep row 2 until the end of row 100(105, 115, 125, 135, 145).
Turn your work to start crocheting along the edges of the rows you completed.
BODY
Row 1: ch 3 (counts as first dc), dc in next 4 sts, *ch 10, slst into front loop and diagonal loop of last dc worked, dc in next 5 sts, rep from * across, turn [100(105, 115, 125, 135, 145) dc].
Row 2: ch 1, sc into each dc across pushing each ch-10 loop towards the back of your work, turn. [100(105, 115, 125, 135, 145) sc].
Rep rows 1-2 until entire back panel measures 17(17, 18, 18, 19, 20) ” long. For a longer cardigan simply rep rows 1-2 until your preferred length.
Next row: ch 3 (counts as first dc), dc in every sc across, turn.
DO NOT FASTEN OFF
Now it’s time to braid your loops. Starting on the outer right corner, feed the second loop from the bottom into the first loop. Rep this braid method all the way up towards the top. Leave the final loop to rest as is. Now repeat the same thing by starting on the bottom of the next row, braiding your way upwards and leaving final loop to rest. Rep all the way across the back panel of the cardigan.
Next row: ch 1, sc across working in groups of 5 but at the same time when you reach the 5th sc you will also catch the ch-10 loop to secure it. On the next 1st sc (of the next group of 5) you will also catch the SAME ch-10 loop to secure. On the next 5th sc you will catch the NEXT ch-10 loop, and then for the next 1st sc (of the next group of 5 sc) you will catch the SAME ch-10 loop.
Fasten off.
FRONT PANEL (make 2)
Ch 17
Row 1: sc in 2nd ch from hook, sc in each ch across, turn. [16 sc]
Row 2: ch 1, scblo in each st across, turn.
Rep row 2 until the end of row 35(40, 45, 50, 55, 60).
Turn your work to begin crocheting along the edges of the rows you just completed.
BODY
Row 1: ch 3 (counts as first dc), dc in next 4 sts, *ch 10, slst to front loop and diagonal loop of the last worked dc, dc in next 5 sts, rep from * across, turn. [35(40, 45, 50, 55, 60) dc]
Row 2: ch 1, sc into each dc across pushing each ch-10 loop towards the back of your work, turn. [35(40, 45, 50, 55, 60) sc].
Rep rows 1-2 until entire front panel measures 17(17, 18, 18, 19, 20) ” long. For a longer cardigan simply rep rows 1-2 until your preferred length.
Next row: ch 3 (counts as first dc), dc in every sc across, turn.
DO NOT FASTEN OFF
Now it’s time to braid your loops. Starting on the outer right corner, feed the second loop from the bottom into the first loop. Rep this braid method all the way up towards the top. Leave the final loop to rest as is. Now repeat the same thing by starting on the bottom of the next row, braiding your way upwards and leaving final loop to rest. Rep all the way across the front panel of the cardigan.
Next row: ch 1, sc across working in groups of 5 but at the same time when you reach the 5th sc you will also catch the ch-10 loop to secure it. On the next 1st sc (of the next group of 5) you will also catch the SAME ch-10 loop to secure. On the next 5th sc you will catch the NEXT ch-10 loop, and then for the next 1st sc (of the next group of 5 sc) you will catch the SAME ch-10 loop.
Fasten off leaving a long tail.
Rep this entire process for the second front panel.
SLEEVES
CUFF
Ch 11
Row 1: sc in 2nd ch from hook, sc in each ch across, turn. [10 sc]
Row 2: ch 1, scblo in each st across, turn.
Rep row 2 until the end of row 42(42, 46, 46, 46, 48).
Turn your work to begin crocheting along the edges of the rows you just completed.
BODY OF SLEEVE
You will now squeeze more dcs than there are rows on the cuff. By the end of this row your cuff will curve due to the large amount of stitches but this is perfectly normal. Everything will straighten out after a few rows are completed.
Row 1: You will squeeze 65(65, 75, 75, 75, 80) dc across the long edge of the ribbed cuff but at the same time keeping with the same pattern of row 1 of back/front panels ie ch 3 (counts as first dc), dc in next 4 sts, ch 10, slst into front loop and diagonal loop of last worked dc, dc in next 5 sts, rep from * across, turn.
Row 2: ch 1, sc into each dc across pushing each ch-10 loop towards the back of your work, turn. [65(65, 75, 75, 75, 80) sc].
Rep rows 1-2 until entire sleeve measures 17″ long. Feel free to add or subtract rows here for a longer or shorter sleeve.
Next row: ch 3 (counts as first dc), dc in every sc across, turn.
DO NOT FASTEN OFF
Now it’s time to braid your loops. Starting on the outer right corner, feed the second loop from the bottom into the first loop. Rep this braid method all the way up towards the top. Leave the final loop to rest as is. Now repeat the same thing by starting on the bottom of the next row, braiding your way upwards and leaving final loop to rest. Rep all the way across the sleeve.
Next row: ch 1, sc across working in groups of 5 but at the same time when you reach the 5th sc you will also catch the ch-10 loop to secure it. On the next 1st sc (of the next group of 5) you will also catch the SAME ch-10 loop to secure. On the next 5th sc you will catch the NEXT ch-10 loop, and then for the next 1st sc (of the next group of 5 sc) you will catch the SAME ch-10 loop.
Fasten off leaving a long tail.
ASSEMBLY
Lay the back panel of a hard surface with the braided side facing up. Next lay both front panel (braided side facing down) on top of the back panel. Using your long tails and yarn needle seam across the shoulders connecting the front panels to the back panel. Seam up along the sides leaving an 8(8, 9, 9, 9, 9.5)” opening for the armholes.
Fold your sleeves in half lengthwise and seam closed.
Seam the sleeves to the armholes.
Turn the cardigan the right side out.
NECKLINE RIBBING
Set up row: Attach yarn to the inner bottom left corner and sc all the way around until you reach the other side, turn.
Row 1: ch 11, sc in 2nd ch from hook, sc in next 9 ch, slst into each of the next 2 sc (on the main body of cardigan), turn.
Row 2: skip the 2 slsts you created, scblo in next 10 sc, turn.
Row 3: ch 1, scblo in next 10 sc, slst in next 2 sc (on the main body of cardigan), turn.
Rep rows 2-3 all the way around the entire neckline.
Fasten off and weave in all your ends.
You are now finished your Crochet Márta Cardigan.
Hi Carrie! How could I adapt this or the Bomber Cardigan for Bernat Blanket Extra , size 7 jumbo yarn?
Thresa
Graag patroon carrie vest